If you’ve been looking for the best WordPress funnel builder in the market, you may have certainly come across FunnelKit and CartFlows. Both of these powerful plugins are exclusively designed to work with WooCommerce.
FunnelKit (formerly WooFunnels) has long been the funnel builder of choice for big agencies and eCommerce platforms due to its automation and flexibility.
However, CartFlows remains a strong alternative, more so after the addition of the SureTrigger cross-platform automation.
So, let’s get down to the review and see whether these tools are worth the hype and money.
I will thoroughly compare these WordPress funnel builders’ features, automation, and pricing to determine the best one for your business.
Let’s get started with the review.
FunnelKit vs. CartFlows: Comparison table
| Features | FunnelKit | CartFlows |
|---|---|---|
| Pricing | Starts at $129/year | Starts at $129/year |
| Free version | Available. But it limits advanced features such as store checkout, split testing, automations, etc. | Available. But it only offers basic features to create funnels. |
| Funnel templates | Hundreds of templates for funnel pages and automation | Several templates for funnel pages |
| Cart abandonment | Built-in abandoned cart recovery | Requires free plugin for abandoned cart recovery |
| Built-in analytics | In-depth, real-time analytics for funnels and sales features | Tracks revenue and conversion, lacks visual data presentation |
| One-click upsells | Multiple upsells on one page, based on customer history | Dynamic offers for relevant product upsells |
| Built-in CRM integration | Integrates with various CRMs like Hubspot, ActiveCampaign, etc. | No direct CRM integration, requires third-party plugins |
| Email and SMS marketing | Native email and SMS marketing features | Requires third-party tools for email and SMS campaigns |
What do we like about FunnelKit over CartFlows? 👍
- Top-notch analytics feature: FunnelKit comes with a powerful analytics feature that allows you to track the performance of your funnels and marketing campaigns with visual representations of data. In contrast, CartFlows’ insight lacks visual data representation.
- All-in-one automation system: With FunnelKit, you can automate your marketing efforts using the built-in FunnelKit Automations. This feature enables you to create automated emails and SMS, track performance, and segment contact details all from a single interface.
- In-house email and SMS marketing tools: FunnelKit provides you with its own email and SMS marketing tools, allowing you to design impactful campaigns without relying on third-party plugins. CartFlows, on the other hand, requires third-party plugins for email and SMS marketing.
- Funnels sharing: FunnelKit allows you to easily share your funnels with your team members. Unfortunately, CartFlows lacks this funnel-sharing feature.
- Smart delay actions: FunnelKit offers smart delay actions, which enable you to automatically reconnect with your audience through email sequences after a specified period of time.
- Core action filters: FunnelKit provides several core action filters that trigger events based on user actions. You can also set up conditional actions in the automation that respond when users meet specific conditions.
- Seamless integrations with LMS platforms: FunnelKit seamlessly integrates with various LMS platforms such as LearnDash, TutorLMS, LifterLMS, and more. In comparison, CartFlows only integrates with LearnDash.
What do we like about CartFlows over FunnelKit?👍
- Dynamic offers: Showcase your customers’ most relevant pre and post-purchase offers using multiple data points and conditions. With this feature, you can visually see the customer’s end-to-end journey as it automatically generates a visual flowchart of your checkout flows.
- Cart abandonment feature: Remind your customers to finish the checkout by triggering personalized email alerts if they do not complete the purchase. The customer’s details are passed to your CRM for easy follow-up.
- SureTriggers Pro: Access the SureTriggers Pro plan for free and integrate various third-party plugins, CRM platforms, LMS platforms, email marketing tools, and more into your website to automate your workflow.
- Affordable pricing: CartFlows offers a more cost-effective option compared to FunnelKit. The starter plan of CartFlows costs $79 annually, while FunnelKit’s basic plan is priced at $99.5 per year. Additionally, if you choose FunnelKit’s basic or plus plans, you’ll need to spend an extra $129.5 for FunnelKit Automations.
Latest product updates ✨
As two of the most powerful WordPress funnel builders in the market, both FunnelKit and CartFlows are consistent with product updates. However, FunnelKit seems more reluctant to add new features to improve its plugin.
Here are a few latest product updates of FunnelKit:
- Automated birthday reminders – To help you send birthday emails to your customers and connect with them on their special day.
- Conditional webhooks – These let you set condition-based automation on the data received from the webhook.
- With their latest update, FunnelKit is now integrated with Advanced Coupons and Formidable Forms.
- It has added product selection in order-related events to let you set up automation for a specific product.
Likewise, here are some latest product updates of CartFlows:
- It has added PayPal Payments For WooCommerce and WooCommerce payments gateway support for upsell and downsell.
- It has released Gutenberg Blocks on its latest versions to provide more control and flexibility in designing the funnel pages.
- CartFlows has added a multi-step checkout layout style to enhance user experience at checkout.
- CartFlows now integrates with SureTriggers cross-platform automation to connect your favorite plugins, websites, and online services for automating workflows and business processes.
- It has also released a WooCommerce addon called Modern Cart to improve your users’ buying process and experience.
Funnel building
As you may already know, both FunnelKit and CartFlows are WordPress funnel builders exclusively designed to operate on top of WooCommerce. So, before you build funnels in one of these plugins, you must set up your WooCommerce and create plugins.
You can start building a funnel with either of these funnel builders using the integrated page builders. Currently, FunnelKit integrates with Elementor, Gutenberg, Divi Builder, and Oxygen. Likewise, CartFlows also integrates with Elementor, Beaver Builder, Divi Builder, and Thrive Architect.
Building a funnel with both FunnelKit and CartFlows is relatively easy. These WordPress funnel builders come with several conversion-optimized funnel templates for all the pages. You can import the funnel template with just a single click and start customizing them as per your preference.
First, let’s talk about building funnels with FunnelKit.

To create a new funnel in FunnelKit, choose a pre-designed funnel template or start entirely from scratch.

Either way, you can add multiple steps to your funnel, including an opt-in page, sales page, checkout page, upsell page, thank you page, etc. You can further customize each of these steps as per your business needs.
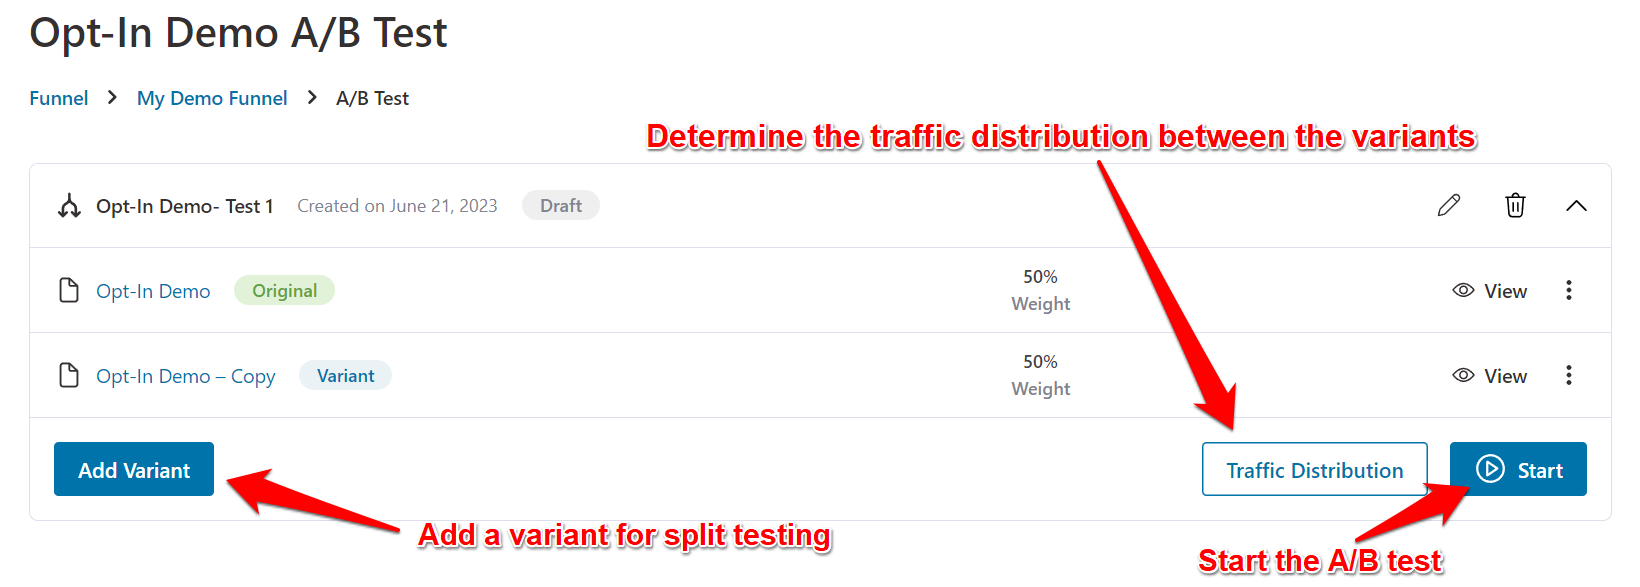
FunnelKit has a built-in A/B split testing feature. With this, you can split-test every page in your funnel by creating multiple variations to direct traffic to both pages.

To enable the split test on your funnel page, click on the A/B test button on the right side of the funnel step. Once you click on the button, you can add multiple variants to the funnel and determine the traffic distribution on each variant.
Once the split test ends, you can analyze the results to see which variant performs better. FunnelKits provides in-depth metrics with total views, conversions, revenue per visit, conversion rate, and total revenue.
Besides that, FunnelKit has a feature-rich canvas builder to help you build and manage your funnels visually. It lets you see the detailed analytics (total views, conversions, and revenue) of each data point in your funnel at a glance.

Moreover, you can click on each funnel step for a detailed analytics breakdown, including all the statistics, contact details, and split test results.

As FunnelKit has a native automation and email marketing tool — FunnelKit Automations, you’ll have more controls and features to set up high-converting funnels with automated actions and triggers.
Now, let’s talk about building funnels with CartFlows.
For some reason, funnels in CartFlows are referred to as flows. Here, you can select a ready-made funnel template or start designing your funnel from scratch.

If you start from scratch, you’ll have to add multiple steps to your funnel manually. But, if you choose a ready-made funnel template, it will automatically create a template for various pages within your funnel.

You can edit these pages or add more steps within the funnel per your business needs.
Like FunnelKit, CartFlows also offers a decent A/B split testing feature. To determine which variant performs better, you can see in-depth metrics of both variants, including total visits, unique visits, conversion, conversion rate, and revenue.
Moreover, CartFlows also has a canvas mode that allows you to view the funnels visually as flowcharts.

However, compared to FunnelKit’s canvas builder, CartFlows offers the bare minimum. You only have the option to preview and edit the steps in the funnel.
Bottomline: When it comes to building a funnel, FunnelKit and CartFlows go nip and tuck as they are both dedicated funnel builders. They have easy-to-use interfaces and are packed with ready-made funnel templates, page builder integrations, checkout and upsell pages, A/B split testing, and canvas mode.
Marketing and automation
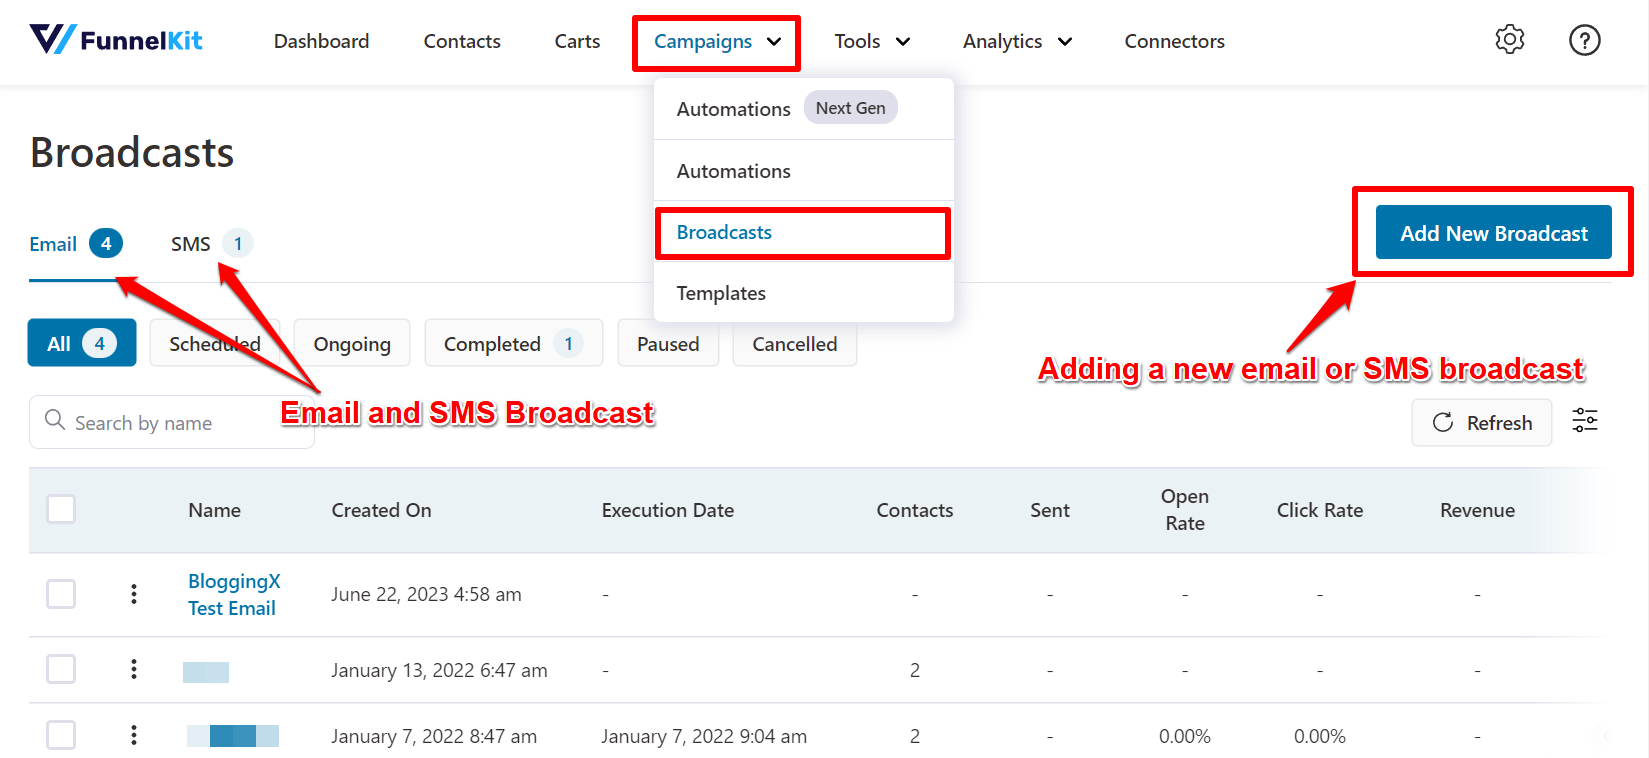
The Pro version of FunnelKit comes with a dedicated automation tool called FunnelKit Automations. It acts as an all-in-one marketing automation system for WordPress that allows you to manage contact profiles, set up automated email sequences, track abandoned carts, design broadcast campaigns, view detailed analytics, etc.
Although CartFlows previously failed to deliver in this department, it recently introduced SureTriggers cross-platform automation on its pro version. This powerful plugin lets you connect your favorite WordPress plugins, websites, and online services to automate workflows.
Both FunnelKit and CartFlows’ SureTriggers come with a pre-designed series of emails called the “recipes.” You can customize the text in the ready-made workflows as per your business requirements and reduce the hassle of manual work.
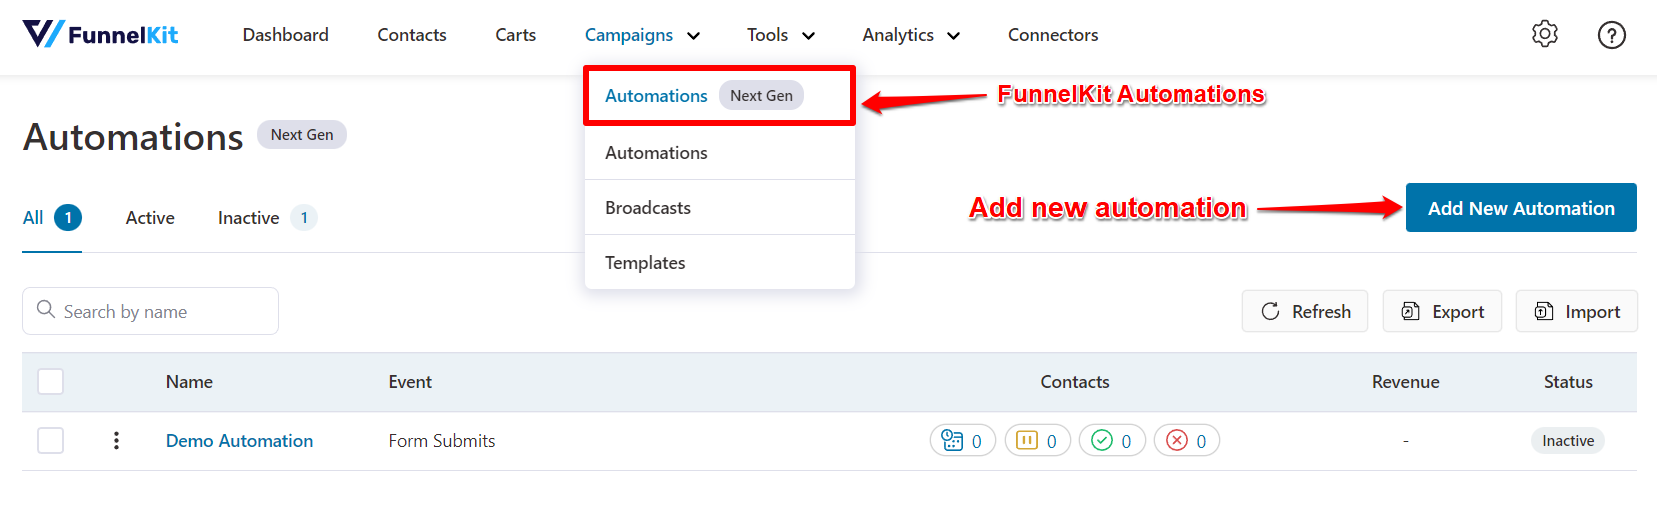
Once you add new automation, you’ll be directed to a series of automation templates. You can import the preferred template or create one from scratch to start the automation.

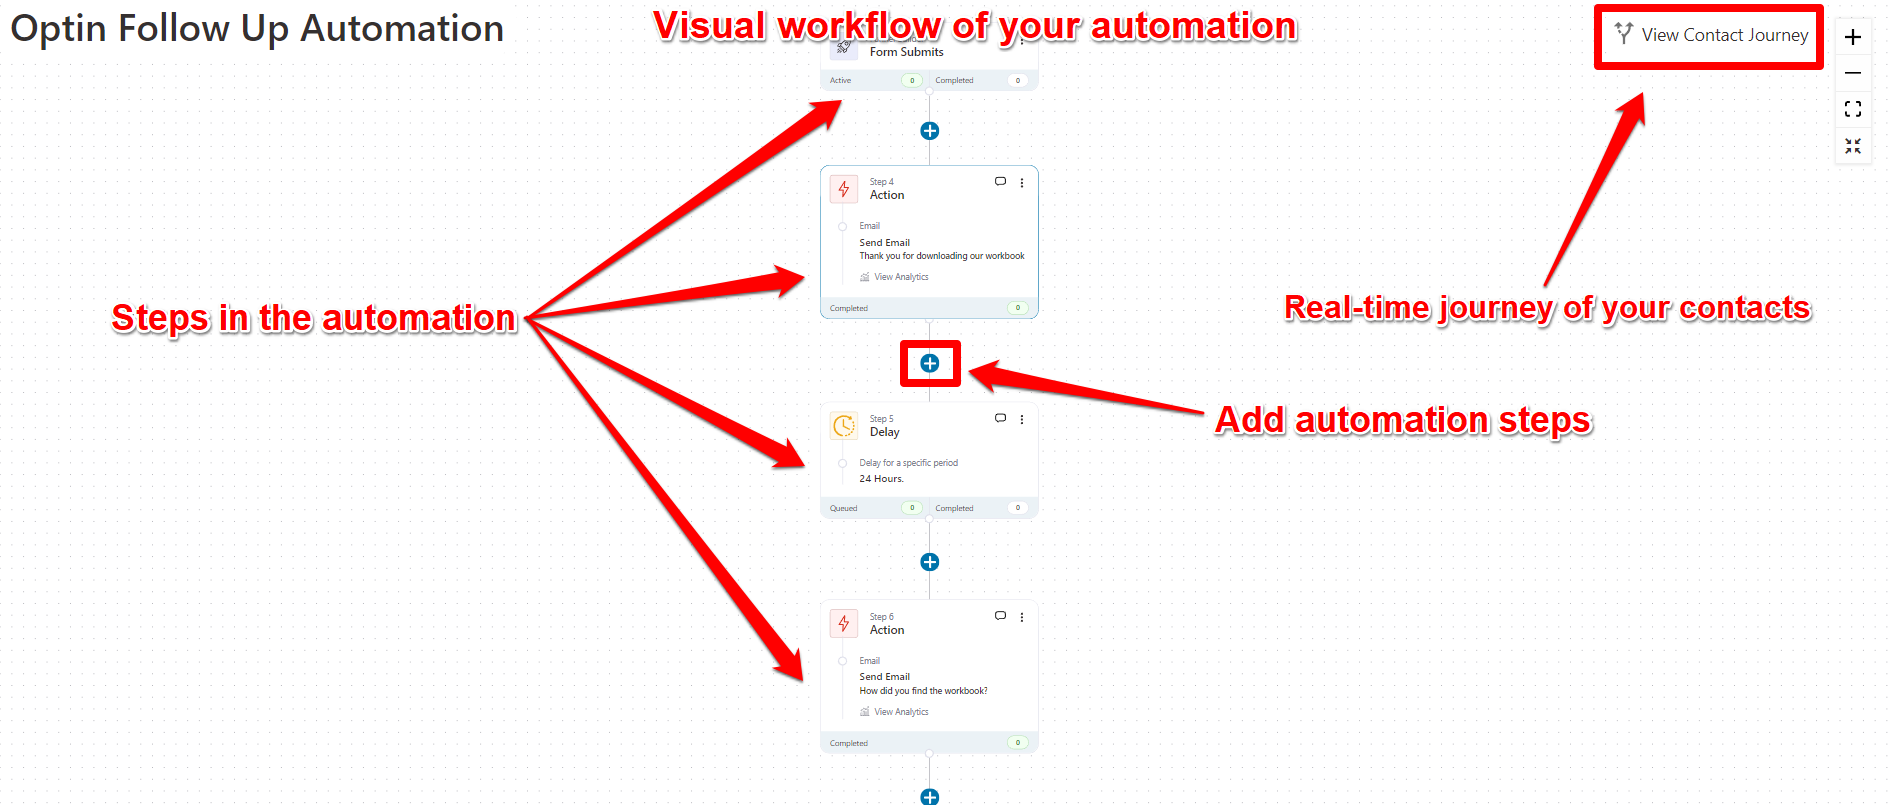
FunnelKit offers top-notch control and flexibility to create powerful workflows. You can specify your automation actions, add delays, define conditions, specify goals, skip particular steps if necessary, and exit from the automation.
With SureTriggers, you can create automation between multiple WordPress websites. You can sell your product on one website while automating your traffic to another site for other purposes.
Besides that, it also allows you to create multi-step automation with a series of actions triggered by a particular event. For instance, you can create a customer onboarding process with a series of emails, enroll them in your online course, and add them to your mailing list using this feature.
FunnelKit includes a live cart tracking feature that you can enable in FunnelKit automations settings. This lets you capture users’ email addresses on the checkout page. If the cart gets abandoned, you can set up an abandoned cart recovery sequence or offer a discount coupon code to encourage users to purchase the product.
You also have the option to add a specific wait period on the settings before marking the cart as recoverable, a cool-off period to exclude the users from cart tracking, and a lost cart to mark them as lost if not recovered within the specified time.
CartFlows also includes an abandoned cart recovery feature. However, you’ll need to install a free plugin to access this feature on your website.
After installation, you can automate a series of follow-up emails and limited-time coupon codes to encourage users to take necessary actions. Although it does a decent job of recovering abandoned carts, it still lacks advanced features such as adding tags, cool-off periods, lost cart periods, etc., unlike FunnelKit Automations.
Let’s move on to automation analytics. FunnelKit’s next-gen automation builder comes with a distinct analytics section to track the performance metrics of your automation.
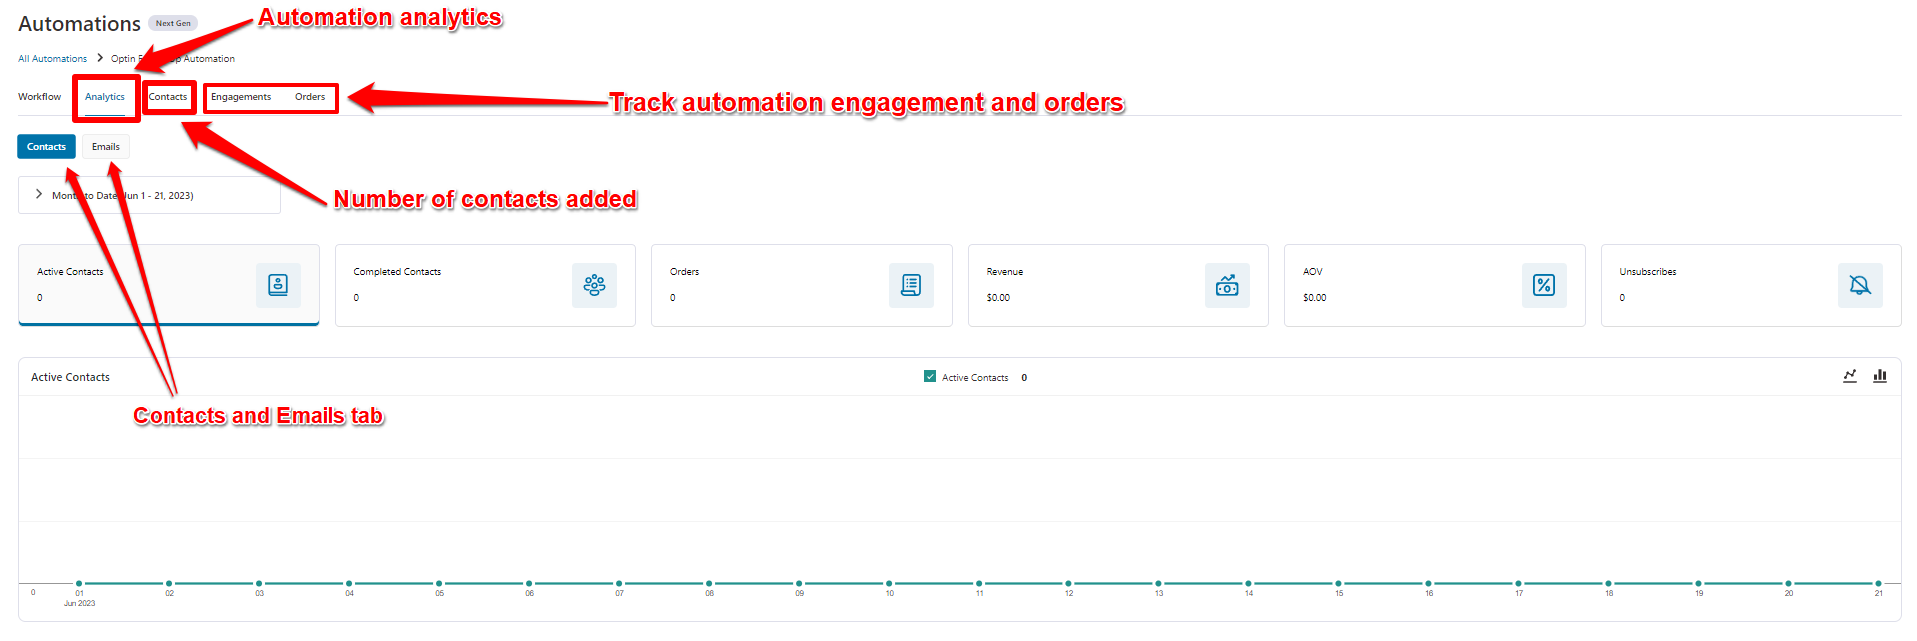
It includes two tabs — Contacts and Emails. Here, you can view the total number of contacts added via specific automation and analyze the performance of your emails within a particular automation.
However, CartFlows does not currently include any feature to view automation analytics.
Bottomline: FunnelKit has a native marketing automation system called FunnelKit Automations, while CartFlows has recently introduced SureTrigger cross-platform automation. In a nutshell, both platforms are great for marketing and automation. However, FunnelKit Automations has the edge over SureTrigger regarding its overall flexibility, workflow, broadcast campaigns, and analytics feature.
Email marketing
The top-tier plans of FunnelKit offer native email and SMS marketing features for designing email and SMS campaigns. It lets you create your marketing emails in three ways — rich text, raw HTML, or FunnelKit’s visual email builder.
It offers rich contact profiles to help you manage and segment your buyers and subscribers based on their preferences and interests. With access to such an organized contact list, you can effortlessly start creating automated email campaigns or trigger-based emails for your target audience based on their past actions and interests.
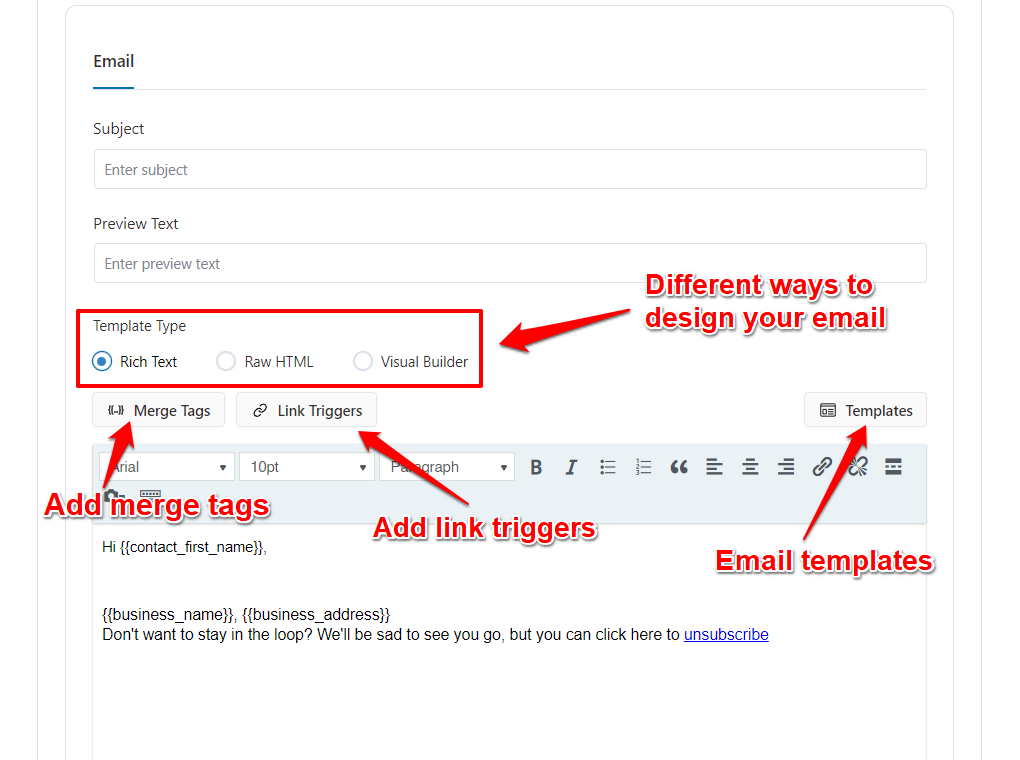
Instead of sending mass emails to the entire mailing list, you can use the merge tags to personalize your emails with dynamic content for specific groups of users and make them more relevant and impactful.
Besides that, this WordPress funnel builder allows you to set up automated email follow-ups for all your contacts who do not take action on the initial email. You can even automate the email sequences after a specified period using its smart delay actions to reconnect with your audience.
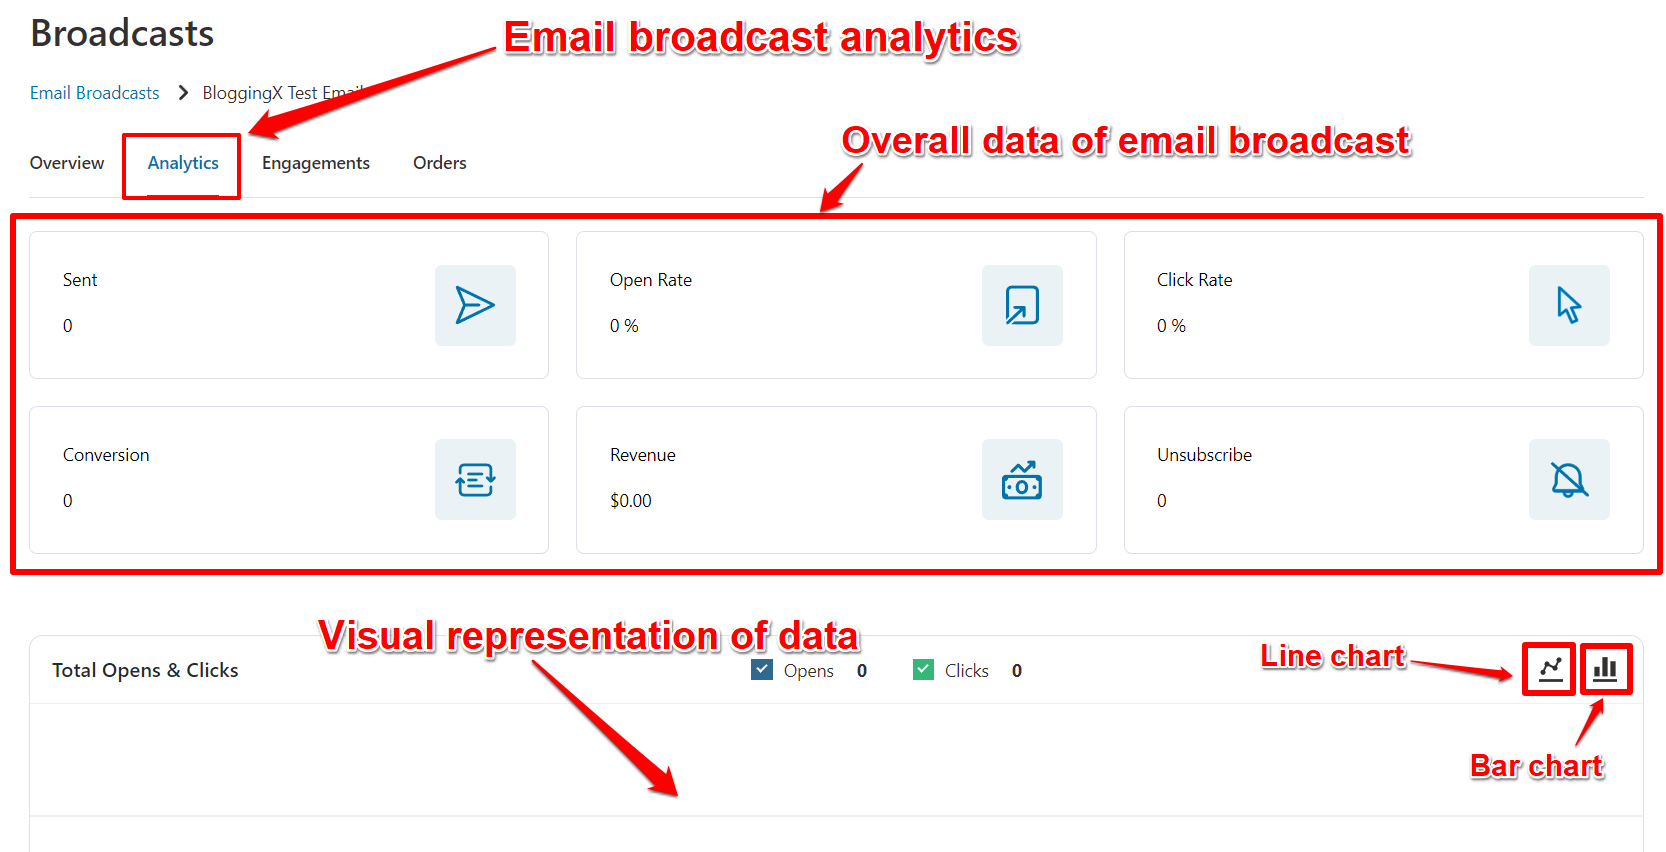
FunnelKit has a built-in A/B split testing feature. Therefore, you can experiment with several email variations to split your audience for better engagement and conversions. Moreover, you can track and analyze the performance of your email campaigns, including open rate, clickthrough rate, orders placed, and so on.
On the contrary, CartFlows falls short of expectations in this aspect. Unlike FunnelKit, CartFlows does not include email and SMS marketing features out of the box. You can only create email and SMS campaigns in CartFlows if you connect them with third-party email marketing tools.
That said, it offers seamless integration with popular email marketing tools such as Mailchimp and Sendinblue without manual data transfer.
Bottomline: In this department, FunnelKit is the clear winner as it has in-house email and SMS marketing features. Additionally, it offers top-notch features such as rich contact profiles, smart delay actions, merge tags, email campaign analytics, etc. On the contrary, you’ll have to rely on third-party email marketing tools to design email campaigns in CartFlows.
CRM
CRM integration is one of the most significant differences between these WordPress funnel builders.
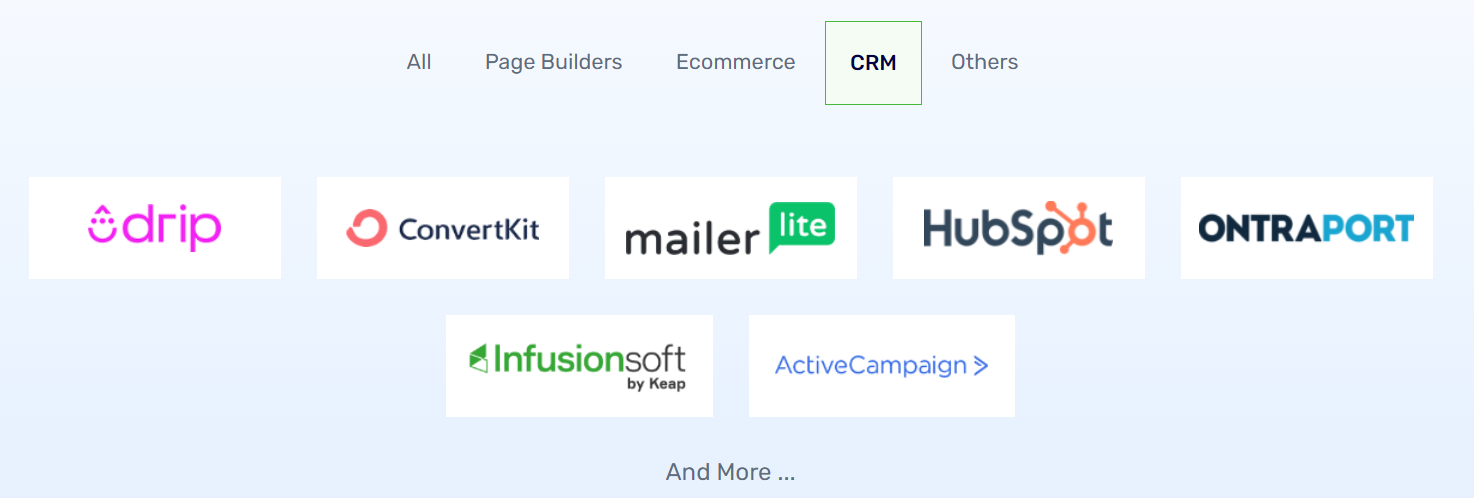
FunnelKit has built-in integration with several powerful CRM applications, including ActiveCampaign, ConvertKit, Hubspot, Drip, GetResponse, MailerLite, Mailchimp, Ontraport, etc.
With this, you can easily store critical data of your customers based on their actions in your sales funnel. You can even add functional labels or tags on your contacts based on previous interactions, demographics, past purchases, average order value, etc.
You can use this crucial information to map out each customer’s end-to-end journey and set up personalized automated campaigns to maintain a healthy relationship with your customers.
On the other hand, CartFlows does not include native features to support any CRM platforms. While it is designed to help you create a sales funnel, it barely does anything else beyond that.
If you want to integrate CRM platforms with CartFlows, you’ll have to rely on third-party plugins such as WP Fusion, which is a bit disappointing considering its potential.
Bottomline: Out of the box, FunnelKit is integrated with several CRM applications like ActiveCampaign, ConvertKit, Hubspot, Drip, GetResponse, etc., to let you store critical data of your customers and set up personalized campaigns. CartFlows falls short in this department as it is not integrated with any CRM applications.
Integrations
Both FunnelKit and CartFlows offer seamless integration with several third-party applications to add more features to the plugin. However, FunnelKit provides a lot more in this department compared to CartFlows.

FunnelKit connects with several popular page builders, CRM tools, eCommerce plugins, and LMS platforms.

Moreover, FunnelKit has multiple built-in integrations called the Connectors. It allows you to connect FunnelKit Automations with 17 tools to help you carry out several tasks effortlessly.
Since both of these WordPress funnel builders are specifically designed for WooCommerce, they seamlessly integrate with all the WooCommerce plugins.
As mentioned, CartFlows offers limited integrations with third-party plugins.

It integrates with several popular page builders, including Elementor, Beaver Builder, Divi, and Thrive Architect. However, as of now, it only supports one LMS platform — LearnDash, and one dropshipping application — AliDropship.
Bottomline: FunnelKit outweighs CartFlows when it comes to third-party integrations. FunnelKit Automation Connectors provides built-in integrations with multiple page builders, eCommerce plugins, CRM applications, and LMS platforms. Comparatively, CartFlows supports limited page builders, LMS platforms, and dropshipping applications.
Pricing
FunnelKit has four different plans. The Basic plan is designed for single-site usage and costs $129 annually.
If you prefer more features and flexibility on the plugin, go for either Plus or Professional plans. While both plans support two websites, the Professional plan offers advanced features, including automation, contact profile, analytics, etc. The price of the Plus plan is $299 per year, and the Professional plan is $399 per year.

However, if you run an agency that requires more site usage, go with their Elite plan. This top-tier plan supports up to 30 websites and adds support for the marketing automation feature and CRM. This plan costs $399.5 per year.
Although FunnelKit previously used to offer a lifetime deal, it has recently updated its pricing plans. Now, the plugin only provides yearly plans, and the FunnelKit lifetime deal is no longer available.
With CartFlows, you get three pricing plans — Starter, Plus, and Pro.
The Starter plan pricing starts at $129 per year. It supports only one website and has basic features to enhance the checkout page.
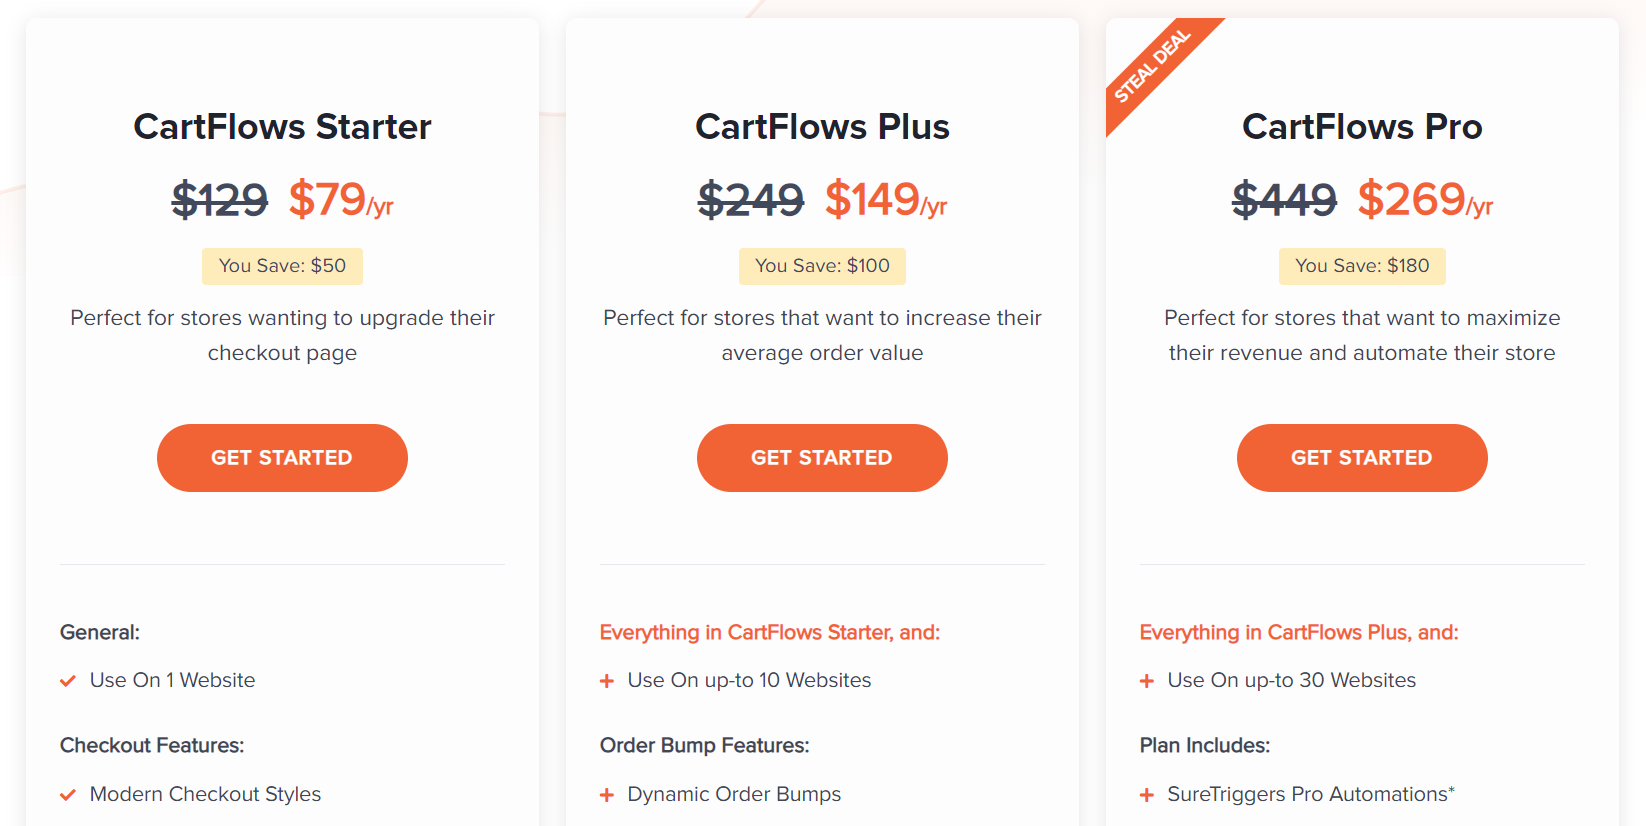
If you want to use the plugin for a small store or agency, go with the Plus plan. It supports ten sites and adds more features, costing only $249 annually.
CartFlows’ Pro plan costs $449 per year. With this plan, you can use the plugin on 30 websites and get access to their most advanced features.
If you want to try a hands-on WordPress funnel builder plugin, both FunnelKit and CartFlows offer free versions at WordPress.org. However, the free versions only offer basic features that barely come into use for creating sales funnels.
Bottomline: In terms of pricing, CartFlows is relatively less expensive than FunnelKit. The downside, however, is the lack of features such as CRM support, email marketing, LMS integration, etc. Although FunnelKit costs you a lot more, it is worth the price considering the features.
Conclusion
That’s all for the in-depth review of FunnelKit and CartFlows. Choosing between these WordPress funnel builders depends on your priority and preference.
FunnelKit is the right choice if:
- You want a built-in automation builder, CRM, and email marketing tools.
- You want a feature-rich canvas builder with built-in analytics
- You want to automate your tasks using the robust FunnelKit Automations connectors.
- You want a live cart tracking feature to automate and recover abandoned carts.
CartFlows is the right choice if:
- You’re looking for a relatively inexpensive yet effective funnel builder.
- You want a simple funnel-building plugin for WooCommerce products.
- You want to power up your business using funnels.