On my site, I switched from Thrive Architect to Elementor Pro in November 2018.
Since then?
I’ve built everything with it. Landing pages. Sales funnels. Full websites.
You’re probably wondering if Elementor is worth it.
In this review, I’ll share what I’ve learned after using Elementor for years. The good parts. The frustrating parts.
And whether it makes sense for you right now.
| Type | WordPress page builder |
| Starting price | $60/year for 1 site |
| Features | WYSIWYG editor, popup builder, responsive editor, developer friendly |
| Competitors | Divi Builder, Oxygen builder, Beaver Builder. |
| Addons available | Crocoblock, Ultimate Addons for Elementor, Essential Addons for Elementor |
At the end of this review on Elementor, hopefully, you’ll have the clarity of whether Elementor is right for you at this time or not.
Quick decision
What I like about Elementor 👍
- Wide selection of templates and widgets: You get quick and consistent design across pages with pre-built templates and elements that work together seamlessly.
- Active community and support: You can find help and tutorials easily thanks to millions of users and countless resources available online.
- Design locking: If you’re running an agency, you can maintain design integrity while letting clients edit content without breaking layouts.
- Theme builder flexibility: You can design every part of your site (headers, footers, single posts, archives) visually without PHP knowledge.
- Replaces multiple premium plugins: You get popup builders, form builders, WooCommerce customization, and image optimization in one package instead of juggling separate subscriptions.
- Polished interface: The editor feels more like a modern SaaS product than a clunky WordPress plugin, making the design process enjoyable.
What I don’t like about Elementor 👎
- Performance hit in some cases: If you load up Elementor with multiple add-ons or third-party plugins, your site speed might suffer. The more you add, the heavier things get.
- Code bloat: Elementor loads assets that you might not even use on every page. This extra code can slow down your site if you’re not careful about optimization.
- Developer limitations: If you’re working with advanced WordPress features like taxonomy handling for blog archives, Elementor doesn’t support them well. This can be limiting if you need that level of control.
Upfront bottomline
Elementor Pro is worth it if you want full visual control over your WordPress site without touching code.
At $60/year, it replaces multiple premium plugins (popup builders, forms, WooCommerce customizers), making it cost-effective.
It’s best for agencies, freelancers, and serious site owners who need the theme builder and advanced widgets.
But here’s what you need to know upfront:
You’ll need decent hosting to make it perform well. Cheap shared hosting will make Elementor feel sluggish. And you’ll occasionally deal with cache conflicts or plugin incompatibilities that require technical troubleshooting.
If you’re on budget hosting or only building simple blogs? Stick with the free version or consider lighter alternatives.
For everything else (landing pages, client sites, online stores), Elementor Pro delivers exceptional value and flexibility that’s hard to match in the WordPress world.
Build Your Site with Elementor Pro!
Get complete design control with 90+ widgets and theme builder for just $60/year.
Verified
Overview
Elementor started as a page builder plugin for WordPress back in 2016.
Today?
It’s grown into a complete website creation platform used by millions of people worldwide.
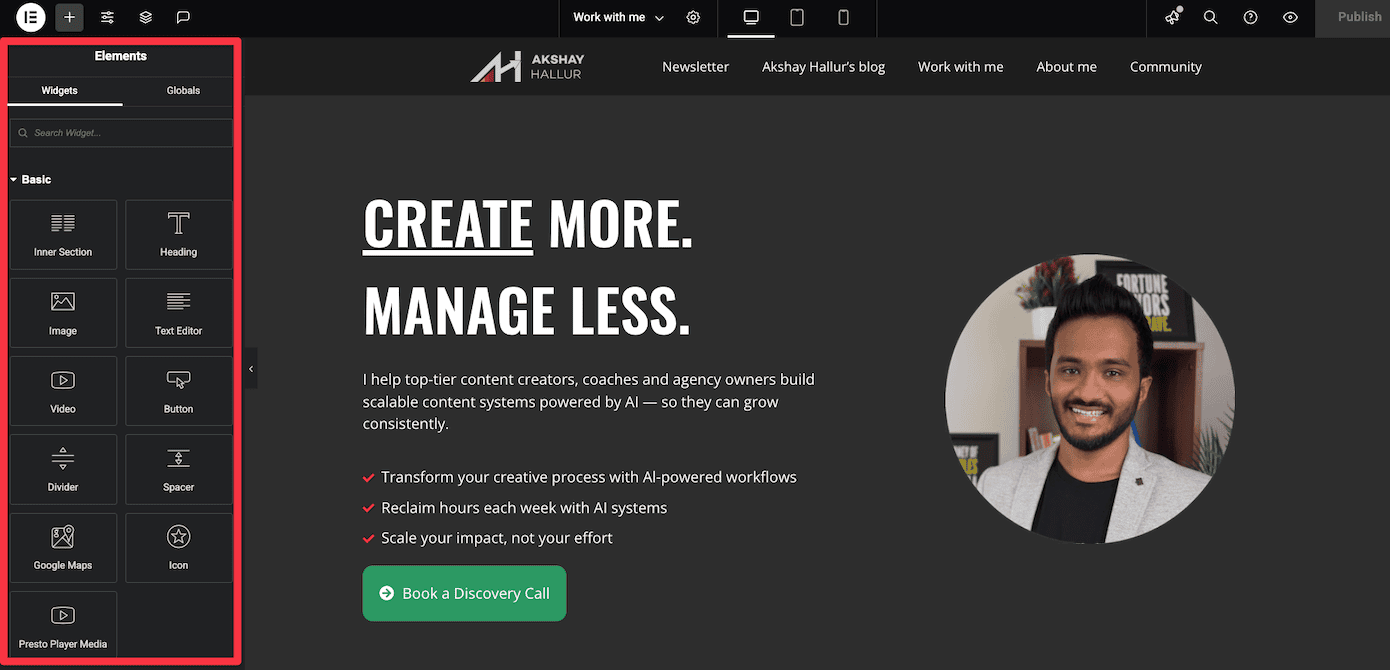
At its core, Elementor gives you a visual drag-and-drop editor that lets you design WordPress websites without touching code.
But it’s evolved way beyond just building pages.
The company now offers an entire ecosystem of products that work together to help you create, host, and grow websites.
Here’s what Elementor offers:
- Elementor (Free): The basic page builder with 40+ widgets and visual editing. You can build decent websites without paying anything.
- Elementor Pro: The premium version unlocks 90+ widgets, theme builder, popup builder, WooCommerce builder, form builder, and advanced styling options. This is where most people end up because the free version is pretty limited.
- Elementor Hosting: WordPress hosting optimized specifically for Elementor. It includes automatic updates, built-in CDN, and support from people who actually understand Elementor inside-out.
- Elementor AI: AI-powered writing and design assistant built directly into the editor. You can generate text, create images, and get layout suggestions without leaving Elementor.
The entire Elementor ecosystem is built around one goal: making website creation accessible to everyone, regardless of technical skill.
You don’t need to be a developer to build professional websites anymore.
And that’s exactly why it’s become so popular in the WordPress world.
Truly all-in-one
Here’s the thing about Elementor: it’s not just a page builder.
It’s an entire ecosystem that replaces a bunch of premium plugins you’d otherwise need to buy separately.
And that’s what makes it stand out.
Hello theme is your foundation
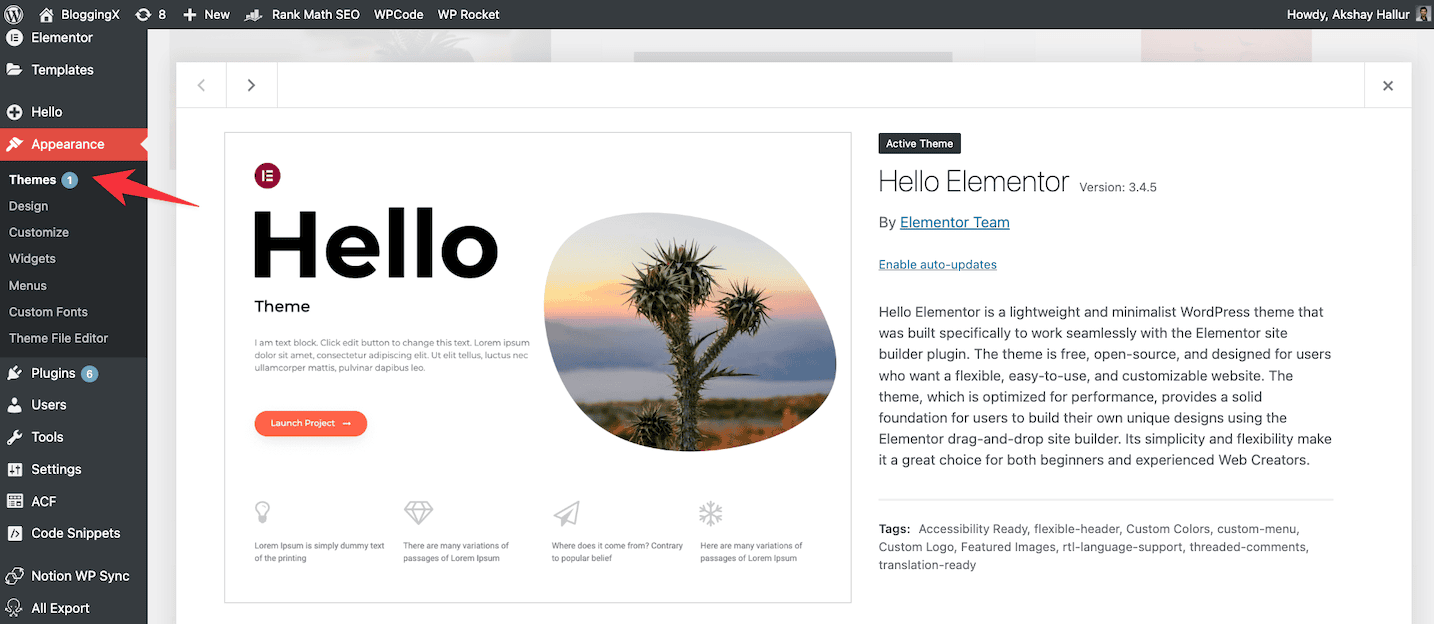
Elementor ships with Hello theme, which is intentionally lightweight (under 10KB).
It’s basically a blank canvas with zero bloat.
No unnecessary styling, no conflicting CSS, no theme-specific limitations holding you back.
This makes Hello theme the perfect foundation for Elementor’s theme builder to sit on top of.
💡 Quick note: You can use Elementor with any theme, but Hello gives you the cleanest starting point without any baggage.
Theme builder changes everything
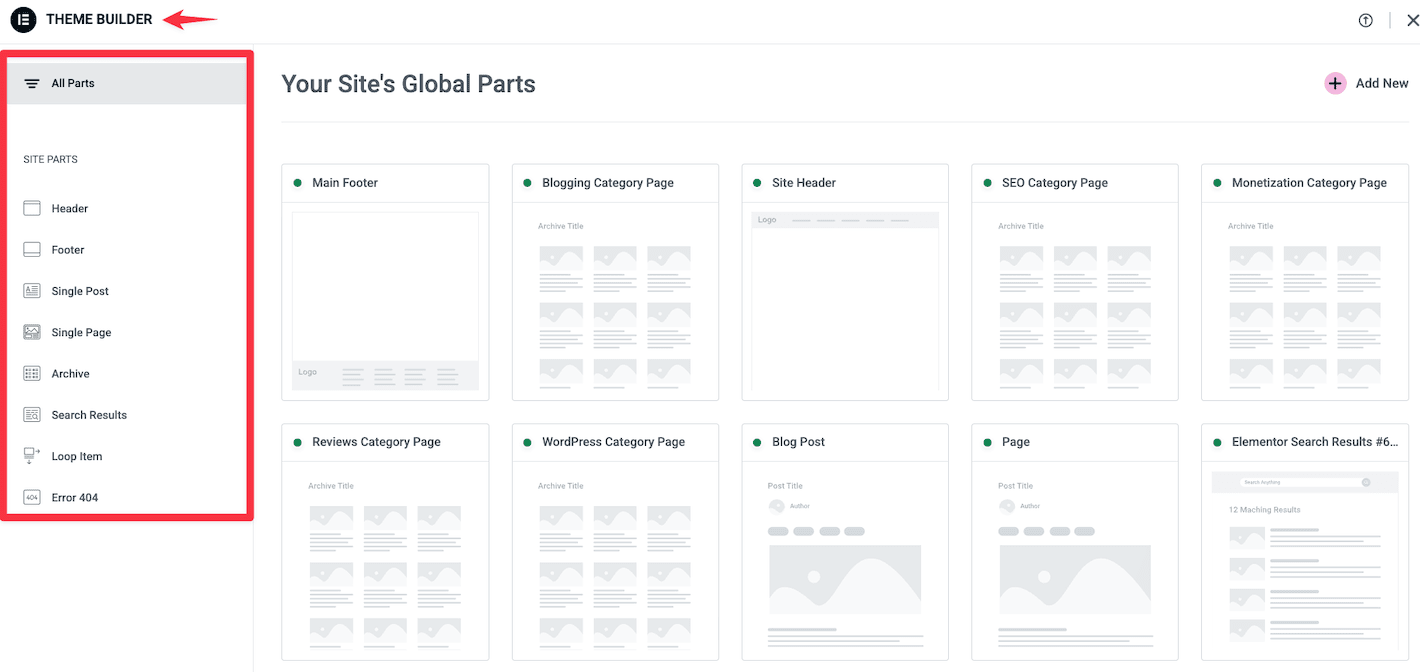
With Elementor’s theme builder, you can design every part of your site visually.
Headers, footers, single posts, archive pages, 404 pages, search results – you name it.
No PHP coding required. No hiring a developer. Just drag, drop, and design.
You get complete control over your site’s structure without touching a single line of code.
Want different headers for different pages? Done.
Need a custom layout for your blog posts? Easy.
This level of flexibility used to require expensive custom development.
🎯 Real benefit: You can A/B test different header designs or create seasonal variations without touching your theme files.
ACF integration makes dynamic sites possible
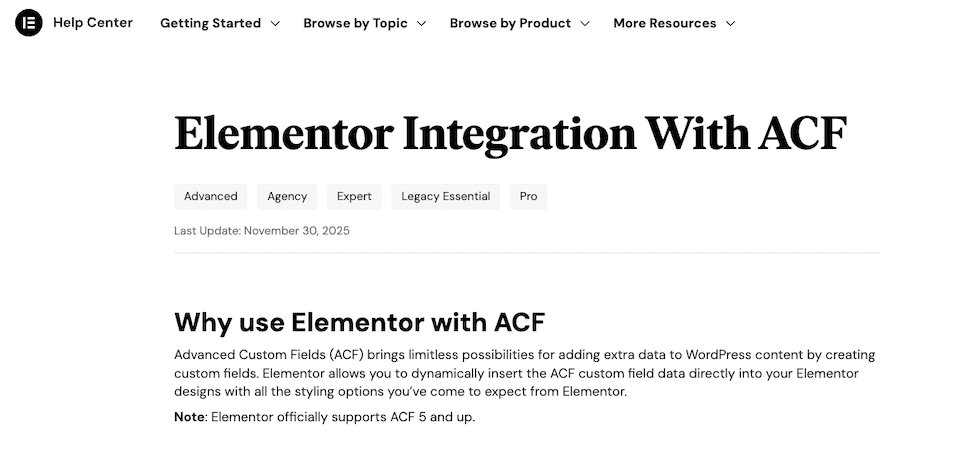
If you’re building anything beyond a simple blog, you’ll love how Elementor integrates with Advanced Custom Fields (ACF).
You can pull custom field data directly into your designs.
Build dynamic templates that populate with different content based on custom fields.
Create real estate listings, product catalogs, team directories – all with custom fields that update automatically.
This opens up possibilities that go way beyond standard WordPress pages.
Replaces a bunch of premium plugins
Here’s where the all-in-one aspect really shines.
Elementor Pro includes features that replace several premium plugins:
- Popup builder: Create exit-intent popups, slide-ins, and promotional overlays without needing OptinMonster or similar plugins.
- Image optimizer: Built-in lazy loading and WebP conversion means you don’t need ShortPixel or Smush Pro for basic optimization.
- Forms: Build contact forms, subscription forms, and lead generation forms without Gravity Forms or WPForms.
- WooCommerce builder: Customize your entire shop layout without paying for premium WooCommerce themes.
- Global widgets: Create reusable elements (like CTAs or author bios) that update everywhere when you edit them once.
💰 Cost perspective: ShortPixel (image optimizer) costs $10/month, OptinMonster (popup builder) starts at $7/month, WPForms is $50/year. Elementor Pro at $60/year suddenly looks like a bargain.
You’re essentially getting 5-6 premium plugins rolled into one package.
That’s the beauty of Elementor’s all-in-one approach.
But that’s not all.
Elementor also gives you access to a massive widget library that effectively replaces several other premium plugins:
- Form builder: Replaces WPForms or Gravity Forms for contact and lead forms
- Popup builder: No need for OptinMonster or Popup Maker
- Slider widgets: Eliminates the need for Slider Revolution
- Pricing tables: Build comparison tables without separate plugins
- Animated headlines: Eye-catching text effects built right in
- Progress bars and counters: Display stats and milestones visually
- Social media feeds: Embed Instagram, Facebook, and Twitter directly
- Video widgets: Enhanced YouTube and Vimeo embeds with custom overlays
Each of these would typically cost $30-80 as separate plugins. With Elementor Pro, you get them all in one package.
Instead of juggling multiple subscriptions and dealing with plugin conflicts, you get everything under one roof.
And it all works together seamlessly because it’s built by the same team.
Doesn’t feel like WordPress
Most WordPress plugins feel like WordPress plugins.
Elementor doesn’t feel like that at all.
It feels like a proper SaaS product. Polished.
If you’re on a decent host with good PHP workers and proper server resources, Elementor absolutely flies.
It feels more like working in Webflow or Framer than traditional WordPress.
⚡ Performance tip: Elementor works best on hosts with PHP 8.0+ and adequate PHP workers. Cheap shared hosting will make any page builder feel sluggish.
Take the Command + E shortcut, for example.
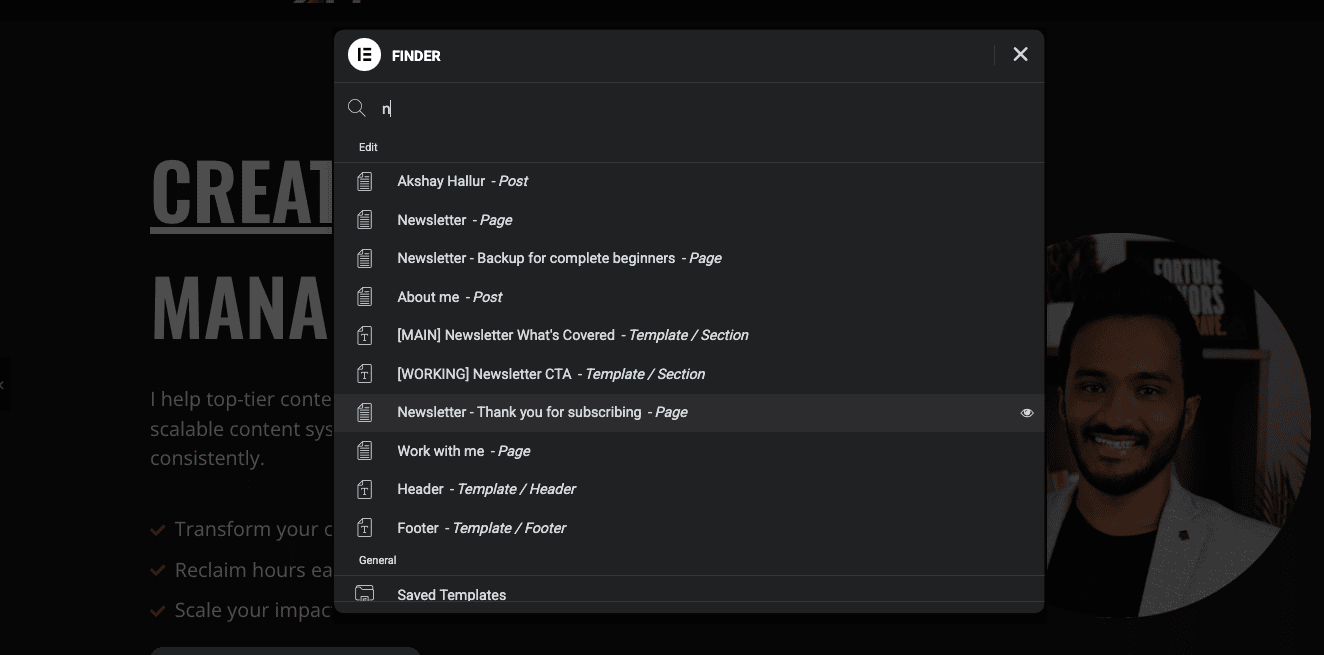
You can press it anywhere in Elementor and instantly search your entire site.
Pages, templates, widgets, settings. Everything.
This is the kind of feature you’d expect in Notion or Linear, not a WordPress plugin.
Or consider the Navigator panel.
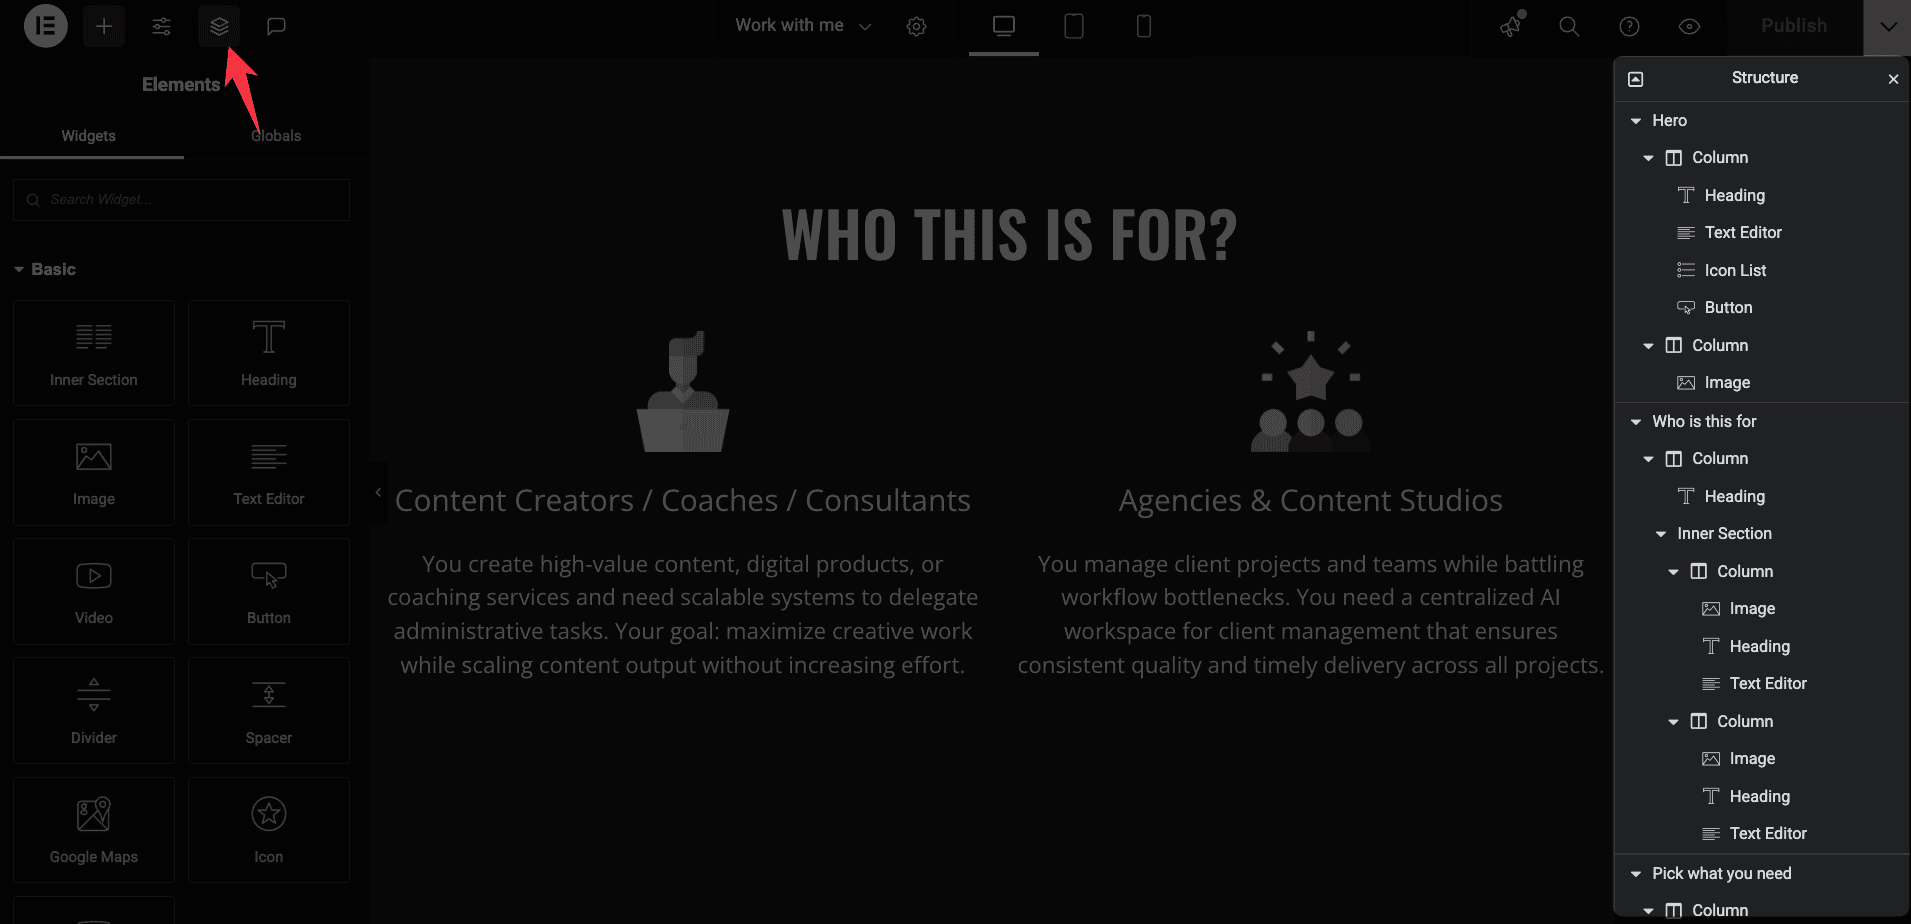
It gives you a clean tree view of your entire page structure, making it easy to select nested elements without hunting through layers.
Again, this feels like a feature from a modern design tool, not WordPress.
The right-click context menus are another example.

Right-click any element and you get instant access to duplicate, copy style, save as template, or navigate to parent.
These small touches add up to an experience that feels thoughtfully designed.
💡 Why this matters: When your tools feel good to use, you’re more productive. Elementor’s interface doesn’t slow you down with unnecessary friction.
Even the way Elementor handles revisions and autosave feels more advanced than WordPress.
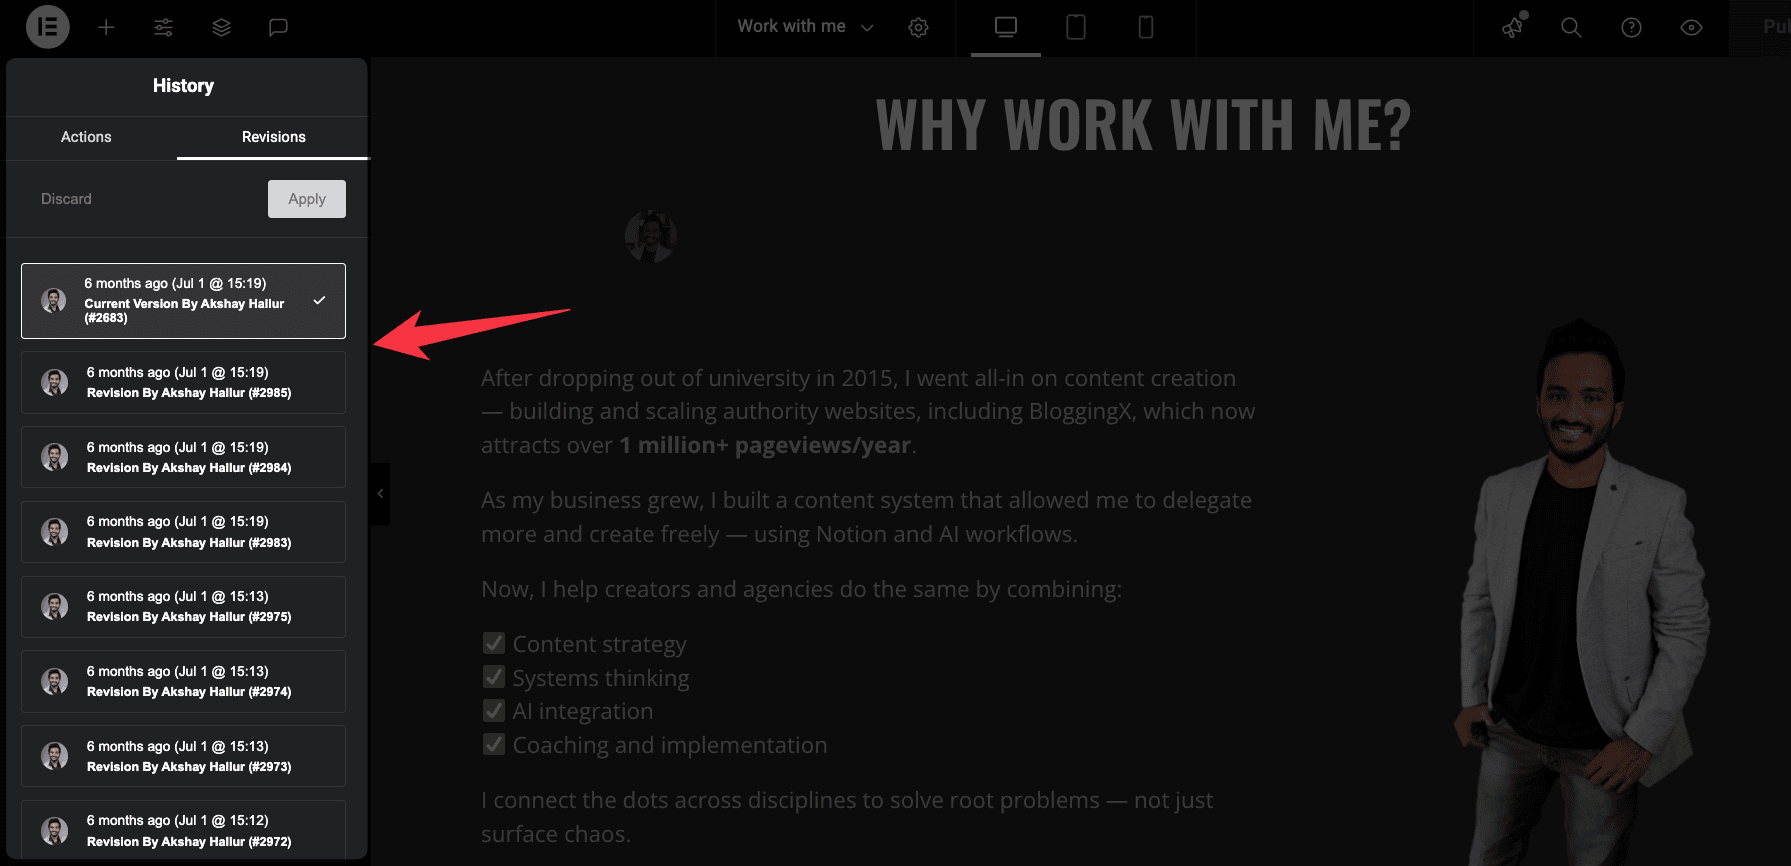
You get visual previews of each revision, making it easy to roll back to a specific design without guessing.
Elementor hosting gets you rid of tech hassle
And if you’re using Elementor Hosting, the experience gets even better.
They’ve optimized their infrastructure specifically for Elementor, so everything runs faster and smoother.
It’s like they’ve created the perfect environment for their own product to shine.
I often wonder why Elementor hasn’t launched their own WordPress-like CMS.
They’ve already built the page builder, the theme system, the hosting infrastructure, and the entire ecosystem.
They’re basically running a parallel platform on top of WordPress at this point.
Maybe they will someday. Or maybe they’re perfectly happy being the best experience you can get within WordPress.
Either way, using Elementor feels less like using WordPress and more like using a premium web design platform that happens to run on WordPress.
Excellent 3rd party integrations
Elementor already gives you a ton of building blocks and elements out of the box.
But the real power comes from how well it plays with third-party tools.
Whether you need extra widgets or want to connect with other plugins you’re already using, Elementor’s ecosystem has you covered.
Add-ons that extend Elementor
A few premium add-ons can push Elementor even further.
These aren’t random plugins you find lying around. They’re built specifically to work inside Elementor’s editor.
- Essential Addons for Elementor: The most popular one out there. Gives you 90+ widgets like advanced data tables, filterable galleries, and interactive promo boxes. Starts at $39/year.
- Crocoblock: The heavy hitter for advanced users. It’s actually a suite of plugins (JetEngine, JetSmartFilters, JetFormBuilder, and more) that turn Elementor into a full application builder. You can create custom post types, dynamic listings, complex filtering systems, and membership sites. Perfect for anything beyond basic websites.
- Ultimate Addons for Elementor: Focuses on conversion widgets like before-after sliders, Google reviews displays, and marketing elements. Great for lead generation and sales pages.
The best part about these add-ons is how they integrate directly into Elementor’s editor.
You don’t need to learn a new interface or mess with separate settings panels.
Everything shows up right in your widget panel like Elementor built it themselves.
Integrations with other plugins
Elementor works well with the plugins you’re probably already using.
- WooCommerce integration: Customize every part of your store without code. Product pages, shop archives, cart pages, checkout flows – all editable in Elementor’s visual editor. This replaces expensive WooCommerce themes that charge $200+ for similar functionality.
- ACF Pro (Advanced Custom Fields): Connects seamlessly for dynamic content. Pull in custom field data, create conditional displays, and build templates that populate automatically. Perfect for membership sites, directories, or any site with structured data.
- LearnDash integration: Design custom course layouts, lesson templates, and student dashboards that match your brand. No more being stuck with LearnDash’s default styling.
Other notable integrations include Mailchimp, HubSpot, Zapier, and pretty much every major marketing tool.
Elementor’s form builder connects to 20+ email marketing services out of the box.
The plugin ecosystem around Elementor is mature and stable.
These tools have been around for years, they’re actively maintained, and they work together without constant conflicts.
That’s the advantage of Elementor’s popularity. Developers build for it because they know millions of people are using it.
Cache and occasional plugin conflicts
Here’s the reality: Elementor’s all-in-one approach is mostly a strength.
But it can occasionally become a weakness if you’re mixing it with less common WordPress plugins.
The problem isn’t usually Elementor itself.
It’s that other third-party plugins don’t always play nicely with Elementor’s extensive functionality.
I’ve found that 9 times out of 10, when something breaks, the fault lies with the other plugin.
Maybe it’s a niche form plugin that hasn’t been updated in a year. Or some obscure analytics tool that interferes with Elementor’s scripts.
Most of the time, the Elementor builder just keeps loading and never actually loads.

When this happens, you’ll need to deactivate all your plugins and turn them back on one by one to find the problem plugin. You can also enable safe mode to help troubleshoot.
💡 Plugin compatibility tip: Before installing any new plugin alongside Elementor, check its reviews and support forum for compatibility issues. A quick search can save you hours of troubleshooting.
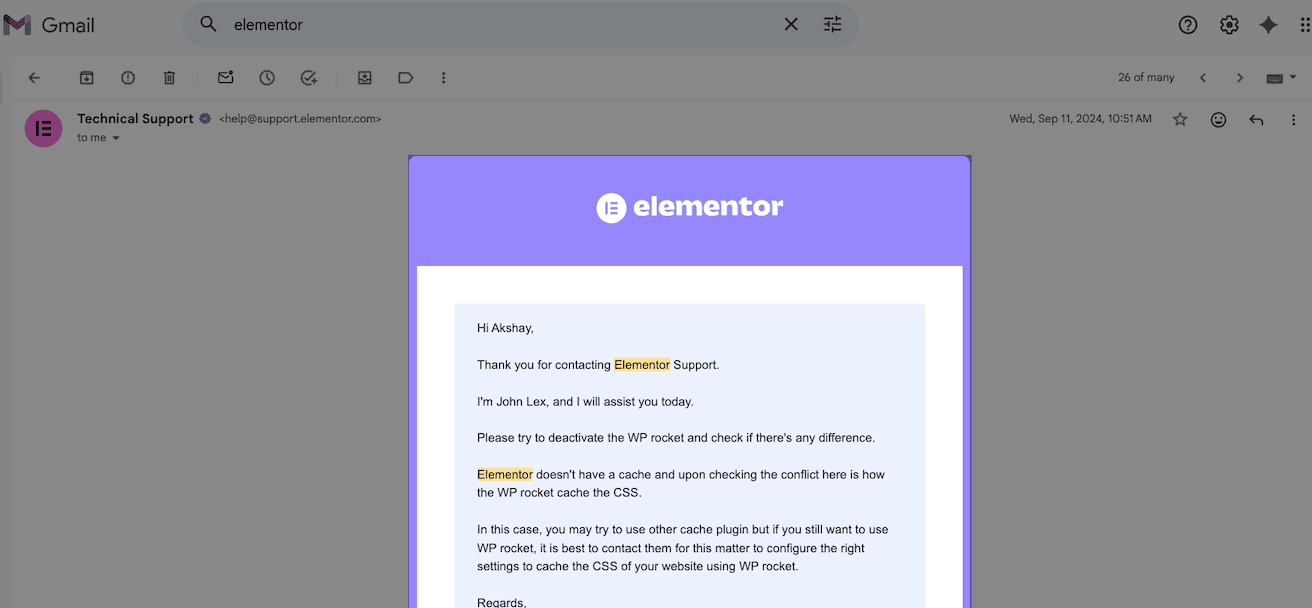
The bigger issue is cache problems (In my case, most often with WP Rocket).
Cache plugins are essential for speed, but they can cause headaches with Elementor.
Changes you make in the editor might not show up on the front end because of aggressive caching.
Or worse, you might end up with a broken landing page while you’re on vacation.
I’ve been there.
You’re away from your desk, trying to troubleshoot a broken page on your phone, and you can’t figure out if it’s a cache issue, a plugin conflict, or something else entirely.
It’s frustrating and stressful.
🚨 Real scenario: Your carefully designed landing page breaks right before a big campaign launch. You’re traveling and can’t dive deep into technical fixes. Good hosting support becomes your lifeline.
This is where having WordPress hosting with excellent support becomes crucial.
Services like Rocket.net, WPX Hosting, or even Elementor’s own hosting come with support teams that actually understand WordPress deeply.
They can quickly identify whether it’s a cache issue, a plugin conflict, or a server configuration problem.
And they can often fix it for you without you needing to be a WordPress expert.
They handle cache clearing, help troubleshoot plugin conflicts, and can even assist with fixing broken pages.
Elementor Hosting is optimized specifically for Elementor, so compatibility issues are rare.
The peace of mind is worth it.
Exceptional support
I’ve seen Elementor’s support team in action, and they’re genuinely impressive.
When you hit a broken layout or plugin conflict, you can raise a ticket and they’ll typically fix it within 24 to 48 hours.
They don’t offer live chat support. It’s all email based.
But here’s the thing: their responses are thorough and actually solve problems instead of just sending generic troubleshooting steps.
I’ve personally experienced their tech support fixing issues while I was away from my desk, and it’s saved me!
Now, if you need immediate responses, Elementor Hosting becomes really worth it.
The support team there is faster and more hands-on because they control the entire stack.
When you’re running a business on WordPress, having support that actually understands Elementor inside-out isn’t just nice to have.
It’s essential.
Pricing
Elementor is a freemium plugin.
That means you can use the core features completely free, but the real power unlocks when you upgrade to the paid version.
Let me break down what you get with each.
| Feature | Free Version | Pro Version |
| Widgets | ✅ (40+) | ✅ (90+) |
| Visual drag-and-drop editor | ✅ | ✅ |
| Responsive design controls | ✅ | ✅ |
| Theme builder (headers/footers) | ❌ | ✅ |
| Popup builder | ❌ | ✅ |
| Advanced styling options | ❌ | ✅ |
| WooCommerce builder | ❌ | ✅ |
| Custom CSS controls | ❌ | ✅ |
| Pre-designed templates | Limited | 300+ |
| Form builder with marketing integrations | ❌ | ✅ |
| Conditional logic & multi-step forms | ❌ | ✅ |
Elementor Pro pricing
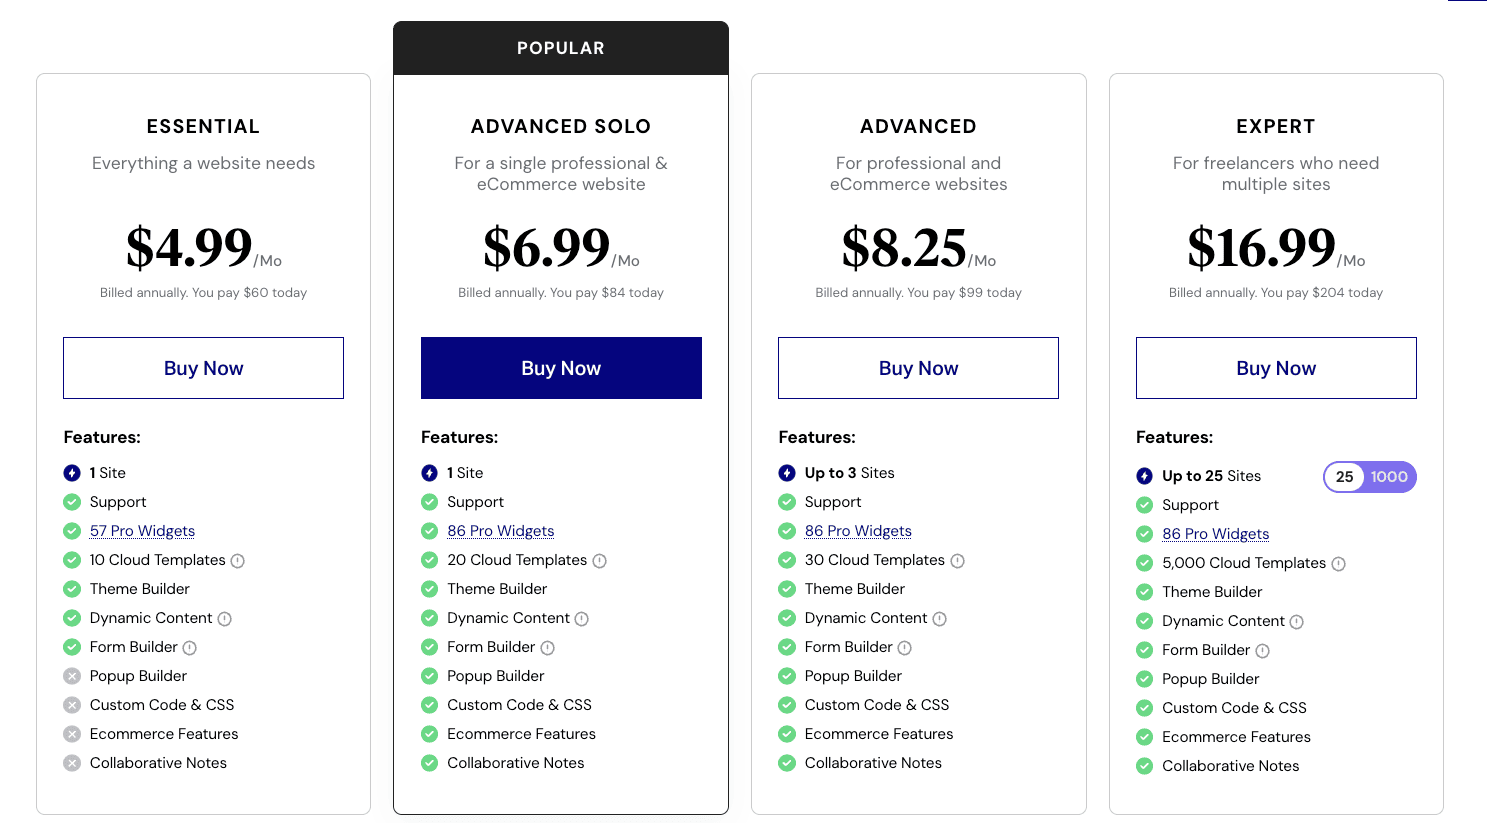
Elementor Pro starts at $60/year for 1 site.
If you’re managing multiple client sites or running an agency, the Expert plan at $204/year covers 25 sites.
There’s also an Agency plan at $399/year for 1000 sites, which makes sense if you’re building at scale.
All plans include 1 year of support and updates.
After that, you can renew to keep getting updates, or keep using the version you have without renewal (though that’s not recommended for security reasons).
The pricing is straightforward. No hidden fees or surprise charges.
And compared to premium WordPress themes that charge $200+ for similar functionality, Elementor Pro is actually a bargain.
Other Elementor products
Beyond the core plugin, Elementor offers several add-on products that extend functionality even further.
- Elementor AI (starts at $48/yr): Built-in AI assistant that helps you write content, generate code, and create images directly in the editor. Saves time on copywriting and speeds up design workflow.
- Elementor Hosting (starts at $180/yr): Managed WordPress hosting optimized specifically for Elementor. Includes automatic performance optimization, enhanced security, and faster support response times.
- Elementor Image Optimizer (free trial for up to 200 image credits): Automatically compresses and optimizes images to improve page load speed without sacrificing quality. Works in the background so you don’t have to think about it.
- Elementor Cloud Website (starts at $180/yr): Lets you build and host a complete website entirely in the cloud without needing separate hosting. Good for quick projects or landing pages.
- Angie: AI agent for WordPress that automates site management, content, and design through natural language commands. Performs complex multi-step tasks across your entire site without coding (I haven’t tried it yet!).
These aren’t required to use Elementor, but they’re worth considering if you want a more integrated experience.
Elementor AI is particularly useful if you’re creating a lot of content.
And Elementor Hosting eliminates most technical headaches since everything’s optimized to work together.
Compared to competitors
Elementor vs Divi

Both builders are packed with features, but Elementor pulls ahead in flexibility and ease of use.
You get advanced features like popups and responsive controls that just work better. And if you’re new to page builders, Elementor’s interface makes way more sense from day one.
Divi has its advantages though.
For agencies managing tons of sites, Divi’s unlimited site licenses and lifetime pricing options offer better value. Plus, you get built-in A/B testing and conditional logic without needing extra plugins.
But here’s why most people still choose Elementor: the widget library is massive, the community is active and helpful, and you’ll find more tutorials and add-ons than you know what to do with.
🏆 Winner: Divi wins on pricing for agencies. Elementor wins on features, flexibility, and beginner-friendliness.
Elementor vs Beaver Builder
Beaver Builder built its reputation on stability and simplicity.
It’s rock-solid and rarely breaks. If you want something that just works without drama, Beaver Builder delivers.
But Elementor gives you way more to work with.
More widgets, more design options, more templates. And it’s genuinely easier for first-time users to pick up and start building.
Beaver Builder feels limited once you want to do anything beyond basic layouts. You can’t expand it as easily, and the design options feel restrictive compared to Elementor.
🏆 Winner: Beaver Builder is stable but basic. Elementor gives you more power without sacrificing usability.
Elementor vs Bricks

Bricks is the performance beast.
If speed is your top priority and you’re comfortable with code, Bricks will give you faster page loads and cleaner output.
It’s built for developers who want maximum control over every detail.
But Elementor is way more beginner-friendly.
You get a huge template library, drag-and-drop simplicity, and a massive community. You don’t need to understand CSS or HTML to build professional sites.
Bricks requires more technical knowledge. You’ll spend more time in settings and less time designing.
🏆 Winner: Bricks is faster and more technical. Elementor is easier and more visual.
Elementor vs Oxygen
Oxygen gives you complete control over your HTML and code output.
Developers love it because you can fine-tune everything. No bloat, no unnecessary divs, just clean code exactly how you want it.
But it comes with a steep learning curve.
If you’re handing sites over to clients or working with non-technical team members, Oxygen becomes a problem. They won’t know how to use it.
Elementor is built for everyone.
Clients can make simple updates without breaking things. Non-developers can build pages without feeling lost. And you still get enough control for professional work.
🏆 Winner: Oxygen is for developers who want code control. Elementor is for everyone who wants visual design freedom.
Bottom line
Elementor isn’t perfect, but it’s the best page builder for most WordPress users.
You get powerful design tools without needing to code. The interface makes sense from day one. And you can build professional sites that actually look good.
Yes, it can slow down your site if you go overboard. And the free version has real limitations (refer above).
But if you want control over your website’s design without hiring a developer, Elementor Pro is worth every penny.
It’s transformed how I build WordPress sites. And after a year of daily use, I’m still finding new ways to use it.