Are you still an outdated blogger who doesn’t create outline for blog posts?
Even worse.
Do you have a list of half-cooked blog posts, that you initially began with great zeal but abandoned them running dry of ideas?
Are you suffering from writer’s block?
Or do you end up jumping around the tabs like a drunk monkey while writing?
Does this sound familiar?
I’ve been there!
Couple of years ago, I used to write blog posts without any outline.
I just used to pen down sporadic thoughts that appear in my mind.
Guess what?
The posts turned out to be disoriented, unorganized, messy, higgledy-piggledy, and whatnot?
Later I realized that researching, outlining and writing are three separate cognitive processes. They require different parts of the human brain. If you mix them, it’ll not be possible for you to attain the divine psychological state – “flow”, while writing.
Think about it!
The more quickly you realize the importance of blog outlines, the better it is for your content marketing efforts.
Ever since I started the habit of blog post outlining, I’ve experimented the process with different apps, frameworks, and hierarchies.
I also examined the difference in quality of work delivered by my content writers on providing this framework.
I came up with a bullet-proof methodology for outlining, which I documented in my business SOPs. I’m gonna present the exact system I follow for outlining content for all my websites.
In essence, the overall blog post outlining process includes two steps:
- Research
- Creation
Buckle up tight as in the following sections, I’m gonna explain these steps in detail.
SECTION 1
Research
Listen.
You’ll not be using any outlining tools in this step, as this step is only meant for research and analyzing the data.
In this step, you just need to collect the essential data for outline creation not worrying about grouping them or subheadings.
Let’s get started.

Define your goal

Every piece of content you write should have a specific goal. Are you trying to get more people to the top of your funnel? Are you nurturing the people in your funnel? Are you making people buy your products?
You need to first define what you want to achieve with the particular blog post you’re gonna create.
If you already have your funnel mapped out, it’ll be easy for you to figure out the goals that your new content will have to satisfy.
A goal statement would be something like,
Our content helps <target audience> to <accomplish> by <doing something>
If you are writing a post on Paleo diet for weight loss, it would be:
Our content helps overweight people to lose at least 20lbs of their weight by Paleo Diet
While crafting the goal, you need to keep the final call to action in mind.
Topical research

In this step you need to research what is the main keyword and also the LSI keywords that you need to target in your blog post.
In this step, you need to enter your main idea in Google and check what topics and subtopics you can rank for.
You can also consider doing competitor analysis wherein you plug your competitor’s URL in tools like SEMrush’s Keyword Magic Tool.

It’ll return you all the keywords you can target in your blog post.
You need to go with a keyword that has low competition, aligns with your goals, and has plenty of related keywords to target.
By the end of this post, you need to have your target keyword and a list of related keywords you need to include in the heading of your blog post.
Make a list of questions to answer

In this step, you need to make a huge list of questions you need to answer in your blog post.

If you’re writing a blog post on “Paleo diet for weight loss”, just enter it in SEMrush and apply the filter to display only questions.
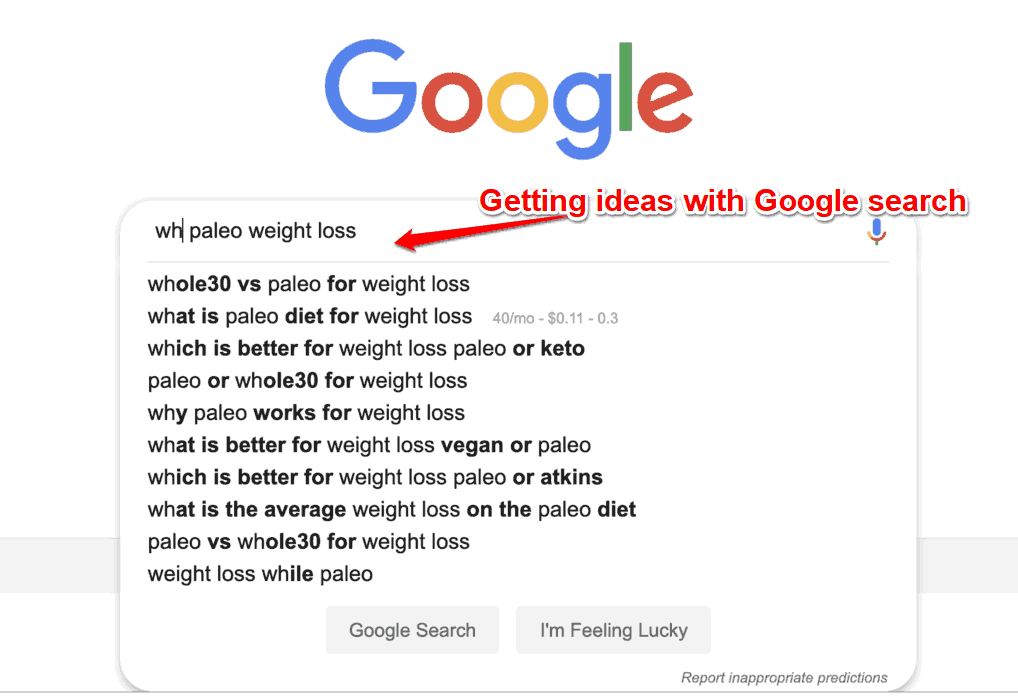
You can also make use of Google search and prefix your seed keyword with words like “why”, “what”, to get some great ideas.

You can also browse the relevant forums related to the topic and come with the most common questions that people have. You can browse niche relevant forums or Quora.
Don’t worry if the search volume for these questions is zero, because the combined search volume will be more and moreover it is for outline creation.
For a blog post of 1000 words, I would come up with at least 10 questions. But remember, it’s just a list – we’ve not categorized them yet.
Research user avatar and intents
Now you’ll have a fair idea about the kind of audience you will be targeting in the blog post. If you’re not yet clear with this, you can consider using Google Trends, Facebook Audience Insights tool, surveys, etc.
- Who will be reading this article?
- What are the underlying reasons why they are reading this article?
- What can you include in your article to address their needs effectively?
If you’ve done the keyword and audience research properly, you can state at least five intentions for people reading your blog post.
You need to make a list of at least 5 search intents for every 1000 words you write in your article. These user intents can also be called problem statements of the searchers, for which you need to give solutions.
To sum it up, you need to have a list of at least five main problems your readers will be facing before reading your article.
This step ensures that you write a good article that accomplishes the tasks that searchers’ may have in mind.
Analysis of top 7 pages
Now you need to analyze the content of top 7 ranking similar content on the web.
Just search for your seed keyword in Google, analyze the top ranking pages and try to come up with:
- An ideal word count for your article – Use word counter extension
- List of headlines that would work great. Do they have compelling headlines? What’s unique about the headlines? How well are their headlines contributing to rank their articles on top?
- Do their contents offer great real-life examples, case studies, statistics, etc?
- Content that very few of your competing pages have covered (content gap analysis)
- Note down at least 5 things that your competing pages are lacking in so that you can improvise upon them in your upcoming blog post
After you note all these things, you need to skim through their content.
Inorder to make things easier, you can make use of the tools like HeadingsMap and SmartTOC to quickly make out the structure of your competitor’s article.
At this step, you need to make use of Evernote Web Clipper or any other tool to do the research.
Analyzing the content structure of the top 7 pages, come up with a rough structure of what you need to include in the blog post. At the end of this step, you need to have all the above researched data dumped down in a text document in your editor (you can use Notion, Evernote, Wordpad).
You need to have a huge list of ideas, that you need to add them to the groups a.k.a headings and subheadings in the next step.
Creating the outline
Once you have a completely filled research document in your hands, you need to start crafting your blog post outline that’ll be easy to digest, work upon, and gives you a macro-level view.
It’s time to organize the idea mess you created in the previous step.

Once you have a completely filled research document in your hands, you need to start crafting your blog post outline that’ll be easy to digest, work upon, and gives you a macro-level view.
It’s time to organize the idea mess you created in the previous step.
I highly recommend you to use any outlining tools like Dynalist or Workflowy.
These apps force you to create the outline based on the bullet points rather than huge paragraphs that defeats the purpose.
I use Dynalist due to the sheer amount of features it offers like collaboration, folders, themes, etc even in their free version.
Paste the essentials
Create a new Dynalist document. Here you can create lists and create sub lists inside lists by clicking the “Tab” key on your keyboard

Consider pasting the following that you have researched, at the top of your outline document:
- Goal of the article
- Word count
- Main keyword and LSI keywords
- Target audience and their intents
- List of pain problems you’re solving
I recommend you to paste these at the top as you need to be mindfully aware of these things throughout the creation process.
Outline the introduction
As a first step, you need to examine the problems that people are facing, their concerns, intents, and come out with points you need to include in your introduction.

Good introductions are conversational. It should have questions, spark curiosity, and encourage people to read more.
Wanna get some inspiration?
Check out the intro of this very blog post by scrolling back!
It reaffirms the problems that people are facing, describes about the causes of the problem (one to two steps deep), and promises to give them a solution.
It should grab the attention of the users, and hold it by developing interest as part of the AIDA rule.
Prepare great subheadings (h2, h3, h4)
In this step, you need to prepare the top level hierarchy for your content.
You’ll be only including the headings and subheadings of your blog post by analyzing the research file you created in the previous step.
I would suggest you first write the top level subheadings first, then the remaining ones inside them.

While writing headings, make sure that they hook the people in to keep on reading. Also, make sure you include LSI keywords in the subheadings as they carry more weight when it comes to SEO.
You need to consider rephrasing some of the subheadings you write for them to properly fit the context of the article.
At the end of this step, you need to have a skeletal structure of your outline with headings and the subheadings.
Expand
Outline the points for each subheadings
Once you have your subheadings hierarchy done, you need to add in the content you need to include in each of these sections.
Now it is the time for you to refer back to the questions, intents, competitor analysis you included in the research document and add them to the right buckets inside Dynalist.

You need to include what topics or arguments writer needs to include in the content to resolve the audience’s biggest problems or questions.
You may need to re-research these individual sections (as if they are separate blog posts), to supplement the initial research you did.
Try to include the section details in the form of questions. Because, there’s a saying “Right questions lead to right answers”.
Also based on my research, when you are outsourcing blog writing, quality questions in the outline often cause the writer to write more clearly by sparking his/her creativity.
You need to also refer to the content gap analysis report, you did in the first section of this article. The goal here is to prepare an outline that is clearly better than your competitors – and also to create an entry-barrier to new competitors.
While filling in the details, you need to also try to:
- Include quality questions that help the writer know what to include
- Add any statistics, research papers, quotes, facts, you need to include in the sections along with the source links
- Include some contexts in which you can add internal links to your old posts
- Mark the places where you need to add screenshots or images
At the end of this step, you’ll have a completely filled outline. You would have created at least an outline of 500 words for 2000 word article.
Outline conclusion
You need to consider adding some points regarding what the writer needs to include in the conclusion of the article.
Most of the times, it’ll be the summary or wrap up of the blog post. Or in case of affiliate reviews, it’ll be restating the product names and their unique features.
It should also include call to action like asking people to buy, asking people to share the blog post, or leave a comment.
Word count for each section
If you want your article to be consistent and right emphasis is given to each of the sections, you need to consider assigning each section a word count.
In dynalist, you can can right click on the points, and “add note” to insert notes like say word count.

This is very crucial in case you are working on an in-depth blog post with a content writer. Or else, they are likely to add some unnecessary fluff to the intro or some random sections of the blog post to ease their workflow.
If the keyword associated with a particular section of your blog post is more valuable to you, you can assign higher word count to it for more emphasis. It increases the chances of you ranking for that keyword.
Optimize
Reorder the structure
Now, once the complete outline is prepared, you need to consider reordering the structure of the article to ensure that there’s a smooth flow for the readers.

Every section of your blog post should logically and smoothly lean the readers to the subsequent sections.
If there’s a disconnection between any two sections, you need to consider swapping in another section or create a new bridging section to fill the gap.
Check topical alignment
Now, you need to go through the entire outline, and check whether there is any content that does not align or irrelevant to the main theme topic.
Along with this, on a much micro-scale, you need to check if the content inside the heading groups are indeed relevant in its scope.
Because, once you start creating the outline it’s easy to get fully absorbed in the process and lose the track.
If there is any irrelevant content, consider moving it to a different group or completely removing it.
Start writing

Now once your blog outline is ready, you need to head over to the content editor of your choice and start filling in the outline.
You need to have your content editor and outline document side-by-side. I would have the content editor at the left ¾ of the screen, and right ¼ the content outline (with distraction dimmers like Hazeover on).
In case you feel distracted when you have outline open while writing, you may need to consider using (CMD+Tab) to cycle between the editor and the outline.
And also, in your outline app, click on the bullet list or zoom in the section you’re working on – to avoid getting overwhelmed by the size of the outline.
With the detailed outline in place, you’ll truly be astonished by seeing the speed at which you will be able to write the blog post.
In case you are outsourcing your content to writers, they’ll be able to deliver more quality work at a much cheaper price as half of the research is already done for them.
Wrap up
Blog outlining is a very crucial process you need to adopt to ensure the quality of content.
Initially, blog post outlining may seem like a time-sucker on surface. Creating a detailed outline may seem like some extra work to your little fingers.
But trust me, it saves you a lot of time and cognitive effort while writing the actual blog post. It ensures that your blog post is of highest quality.
Especially, if you are outsourcing your blog writing, it’s critical to provide them the outline.
Hope you found this blog post helpful, if you have any doubts feel free to add them in comments.