
Love the Gantt Chart from other project management apps?
Or, maybe you want to use the new timeline view with your current Notion workflow?
Perhaps you may be wondering if the timeline view is the right feature for you.
Whatever your query is, if it’s something related to the Notion timeline feature, you shouldn’t miss this article.
Here, I will show you several ways you can use the new timeline view and improve your productivity.
So, without further ado, let’s look at how the Notion timeline feature can help you in different scenarios:
- Planning and scheduling projects
- Managing personal tasks
- Time-blocking
- Yearly or monthly Goal setting
- Planning your travel
- Event management
- Product development
- Managing marketing campaigns
Now, most people use the timeline view to manage tasks, projects, and goals!
Let’s drill in deep into each of these.
Manage Tasks with Notion Timeline and Sleep Peacefully at Night

Daily Time Blocking:
What if I tell you, your productivity will dramatically improve from the very next day?
How?
Use the Notion timeline view for blocking your time.
You might be wondering how it’s going to improve your productivity.
Let me explain.
You have a lot of tasks to do, right? And, you know what tasks you’re going to do the next day.
But have you planned when you’re going to do those tasks? Or, what time of the day?
You probably don’t.
But, if you use the time blocking method, you will know exactly when you’re going to do the tasks. This will remove the guesswork and help you focus only on one task.
So, how are you going to do that in Notion?
Use the timeline view.
Go to your main tasks database and add a timeline view.

Now, to the left of <Today>, you will see the option to change the timeline view: hours, day, week, bi-week, month, and so on.

Then either select the Hours (15 minutes interval) or select Day (Hourly increment) depending on how you want to see the timeline.
Now all you have to do is hover your cursor over the timeline and add a new task. Then grab either side of the task and adjust the time.

This way, you can add all the new tasks or modify the current tasks.
So, from now on, you are going to plan your day a lot better. Because you’ll know beforehand which task you’re going to perform at which time of the day.
Protip: Instead of using the same date property for both start and end dates, use separate date properties for them. So, when you filter tasks by the due date, Notion will show tasks based on the end date, not the start date.
Weekly/Monthly Planning:

Like you’ve planned your days, you can also plan your weeks or even months.
Just change the timeline view from Day/Hours to Week/Bi-Week/Month. And, plan your tasks accordingly.
So, before the start of each week or month, add the tasks you want to perform.
It’s a great way to have a weekly or monthly overview of all your upcoming tasks.
You can also create several timeline views of the same database to view the daily/weekly/monthly tasks separately.
So, from now on you’re going to be more productive with the help of this Notion timeline feature.
Manage All Your Projects with Notion Timeline

Want to better manage your projects? Need to complete them even before the deadline?
Yes! You can do that with the help of the Notion timeline feature.
You can use the Notion timeline feature for project management too.
With this, you will have a visual overview of when the project starts and when it ends. You can then plan your tasks accordingly.
Let me show you how you can leverage the Notion Timeline feature to do that:
Create a Gantt Chart
You can easily customize your timeline to look and work like Gantt Chart.
Add a timeline view as I’ve already shown. Then instead of hours or day views, use the Month view for the timeline.
Now add a new task and click open to maximize it. Add any property you want (Date, Checkbox, Status, or anything).
Additionally, add a new Text Property and name that “Gantt Emoji”. It will be used for the Gantt Bars.
Now, go to the properties of the timeline and enable or disable any property you want.
But do make sure that under ‘Show in Table’, you must enable the Name property and disable the Gantt Emoji (text field). Similarly, under ‘Show in Timeline’, you must disable the Name Property and enable the Gantt Emoji.
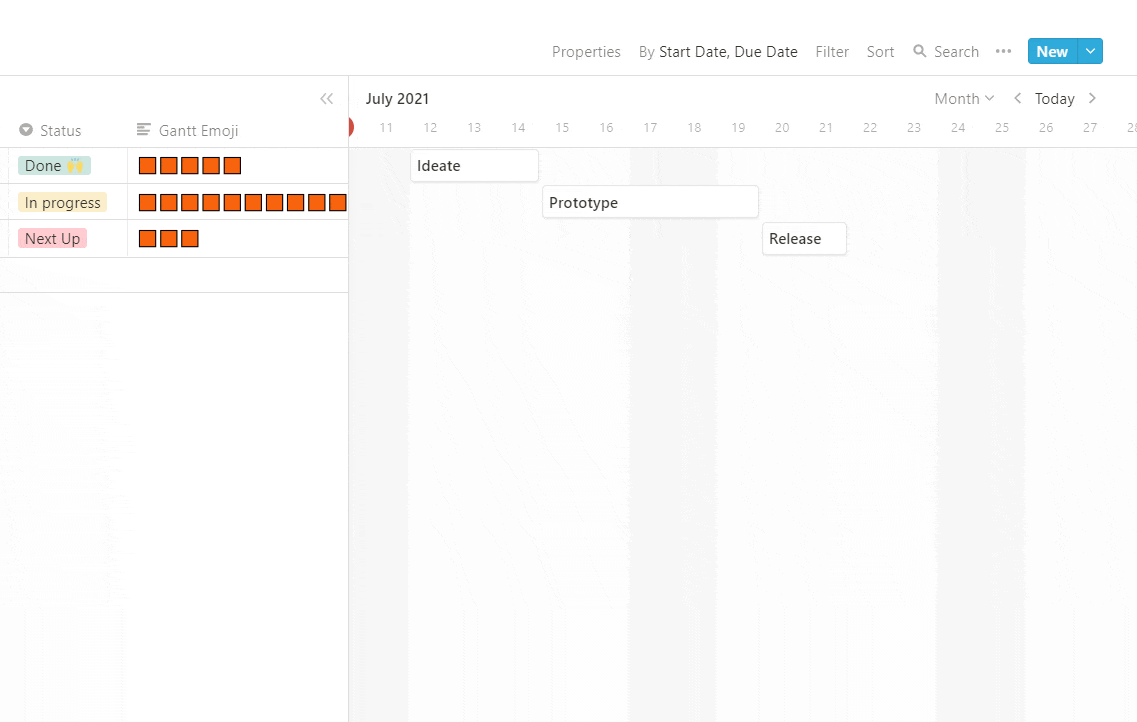
Now, add a new project. Set the start and end date. After that, depending on the length of the projects, copy any emoji and paste it in the Gantt Emoji field multiple times until it fully covers the project bar.
For emoji, you can use any of these:
🟧🟦🟥⬛️⬜️🟠🔵🔴⚫️⚪️🔶🔷♦️◆◇
If you need the template, Click here and duplicate it to use in your workspace.
You can also change the workspace a little bit.
Instead of adding only the projects, you can add multiple stages or tasks that need to be done to complete those projects.
You can add icons to each stage/task if you want. Now you’ll have a timeline of multiple stages totally planned out.
It can be used for freelance projects, product design/development, or any other projects with a deadline.
Now, you have a Notion Timeline that looks just like a Gantt Chart.
Pro Tip: On a page, you can create two instances of the same database: one for the table and the other for the timeline. You can then brain dump all your tasks in the table view, add the dates, and your timeline view will be automatically populated.
Set Goals and Achieve more with Notion Timeline

Yes! You can set your goals too using the Notion Timeline.
The goals can be yearly, quarterly, or even monthly.
Setting goals this way will help you better prioritize your goals and achieve the right ones at the right time.
Now, let’s look at how you can better set and manage your goals with the Notion Timeline feature:
Yearly/Quarterly Goal Setting
Like always, create a new timeline block, or if you have a database already, add a new timeline view.
Set the view to Year. Or, you can go for Quarter if you want to set quarterly goals only.
Now add all the goals you want to achieve and set the start and end dates. You can also drag either side of the goals to set the duration.
After you’ve added all the goals, reorder them based on your priority or the order of starting them.
Or, if you’re like me, you can add a sort by the Start Date. (Make sure it’s set to ascending)

This way, all your goals will always be sorted by the order you’re going to start them.
Now, you have a bird’ eye view of all the goals you need to achieve in the coming months.
Conclusions:
Notion is coming up with so many helpful features. The timeline view is one of them.
It can revolutionize your workflow if you use it right.
Facing difficulties in managing so many tasks? Use the daily time-blocking method I just showed you.
Have multiple projects to complete? Use the Gantt Chart.
Want to achieve more? Use the timeline for setting goals.
So, let me know how you’re going to use the Notion timeline in your workflow?


