
Welcome to my hands-on NitroPack review where I’ll share everything you need to know.
NitroPack is a powerful all-in-one website optimization tool that consistently impresses users with its effectiveness.
Its cloud-based approach simplifies speed optimization.
No more juggling multiple tools like W3 Total, WP Rocket, Auto Optimize, or WP Super Cache.
The cloud-based system makes it platform-independent.
Use it on any CMS or website you own.
This optimization approach stands apart from traditional methods.
With Google’s increasing emphasis on site speed, optimization isn’t optional anymore, but it’s absolutely essential.
But is NitroPack right for you?
Does it actually optimize your site properly, or just trick Google PageSpeed into showing better numbers?
I’ll answer all these questions and more in this detailed NitroPack review.
Let’s dive in.
| Features | NitroPack |
| Type | Cloud-based website speed optimization service |
| Starting price | $8 per month |
| Best for | One-click speed optimization for your website |
| Mobile app 📱 available? | No |
| Competitors | Cloudflare, WP Rocket, Speed Kit, Pegasaas, Edgemesh |
Quick decision
👍 What do I like about NitroPack?
- Swiss-army knife: NitroPack puts all optimization tools in one place. You get caching, image optimization, CSS/HTML/JS minification, compression, built-in Cloudflare CDN, font subsetting, and more!
- In-built Content Delivery Network (CDN): No need for a separate CDN – NitroPack comes with its own built-in solution.
- Significant improvement in site speed: Tests show NitroPack can boost your average site speed by 57%. NitroPack optimizes mobile and desktop pages differently, giving the best results for each.
- Customizable optimization modes: NitroPack gives you full control over how scripts load on your site. You can either defer most scripts by default and exclude the important ones, or start with nothing deferred and pick what to delay. This lets you fine-tune your JavaScript execution for the perfect balance between speed and functionality.
- Excellent support for eCommerce: NitroPack includes eCommerce-specific settings that help cut bounce rates and increase sales.
- In-built image optimization: NitroPack handles image optimization too, making your visuals load quickly and efficiently.
- Ad optimization: You can optimize your ads with NitroPack so they don’t block your site’s initial render.
👎 What I don’t like about NitroPack?
- Initial learning curve: The setup requires some effort. If you’re not tech-savvy, NitroPack’s knowledge base and support team are there to help you.
- Cloud-only limitation: Since NitroPack is cloud-based, you can’t deploy it locally.
- Premium pricing: NitroPack’s price tag can be too high for many businesses. Some users have experienced unexpected spikes in usage and costs, with NitroPack’s analytics differing from Google Analytics, leading to disputes over billing.
- JavaScript compatibility issues: Users report problems with sites that rely heavily on JavaScript, especially when using aggressive optimization settings.
- User experience concerns (important): For example, some scripts are only loaded after user interaction, which may boosts scores, but at the cost of degraded user experience. However, depending upon the site (say dynamic sites), you may need to dial down on some settings which may defeat the purpose partially.
Upfront bottom line
NitroPack is a powerful optimization solution that delivers impressive speed improvements with minimal effort. If you’re looking for an all-in-one tool that handles caching, CDN, image optimization, and code minification without technical headaches, NitroPack is worth every penny.
However, it’s not perfect.
The pricing can be steep for small sites, and some users report compatibility issues with JavaScript-heavy websites.
Here’s the bottom line: NitroPack works exceptionally well for most websites, delivering real performance improvements that boost user experience and SEO. Just be prepared for a bit of a learning curve and some potential script compatibility issues.
But remember this – NitroPack is not a substitute for proper hosting.
While it can dramatically improve your site’s performance, investing in quality hosting will often yield better long-term results without the potential downsides I’ve mentioned.
Good hosting provides a solid foundation that no optimization tool can fully compensate for.
Get Nitropack (Activate 10% reader discount)
Overview
Founded in 2018, NitroPack is a leading all-in-one SaaS website performance optimization solution.
It’s known for powerful automation that boosts site speed and Core Web Vitals with minimal technical effort.
In July 2024, NitroPack was acquired by WP Engine, a popular name in managed WordPress hosting.
Here’s the fact:
With a decade in business, NitroPack has seen mixed reactions.
Initially praised for innovation, some users later worried it might be manipulating Google PageSpeed results. This led to black hat SEO accusations from the Google SEO community.
In response, NitroPack addressed these concerns by refuting 20 false claims.
To strengthen their position, Google and NitroPack held a webinar together, showing Google views NitroPack as legitimate!
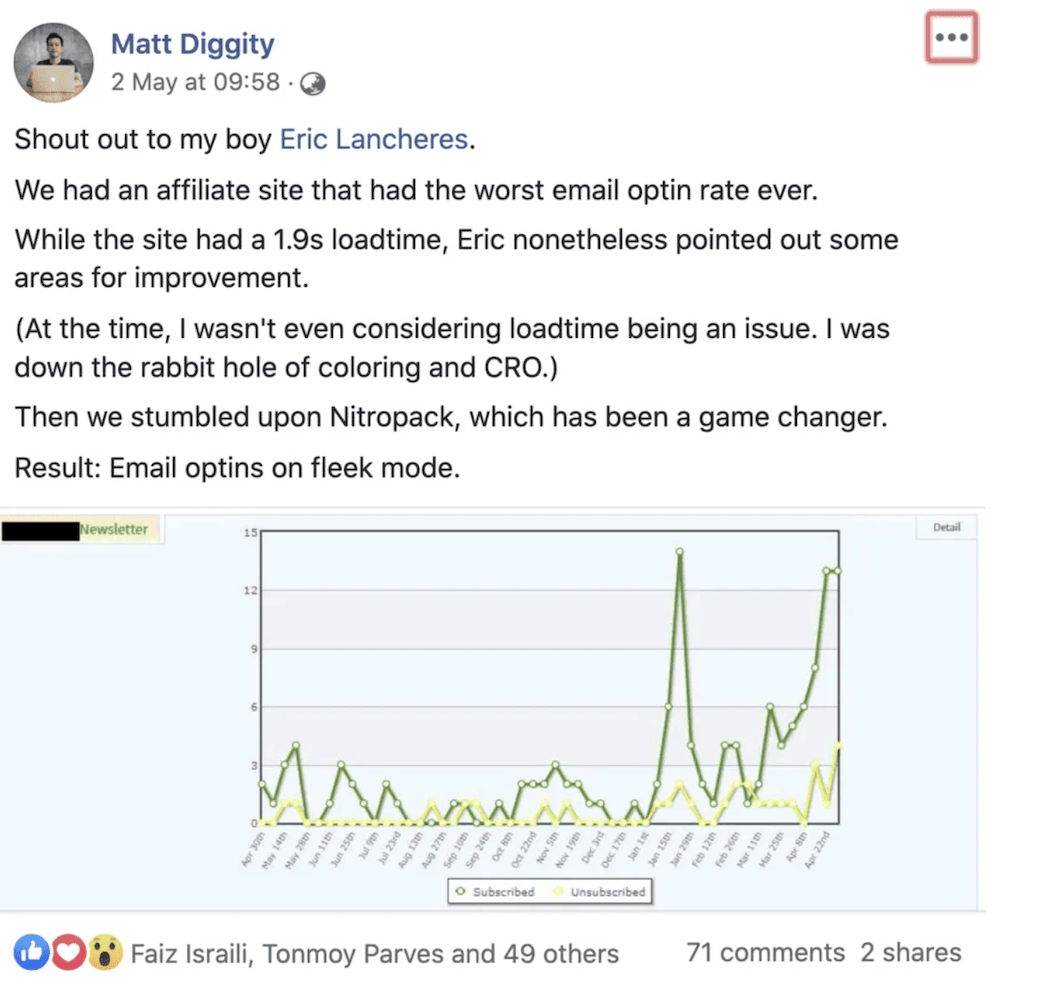
I fully understood this tool’s importance when I found this post by Matt describing NitroPack’s impact on his business.

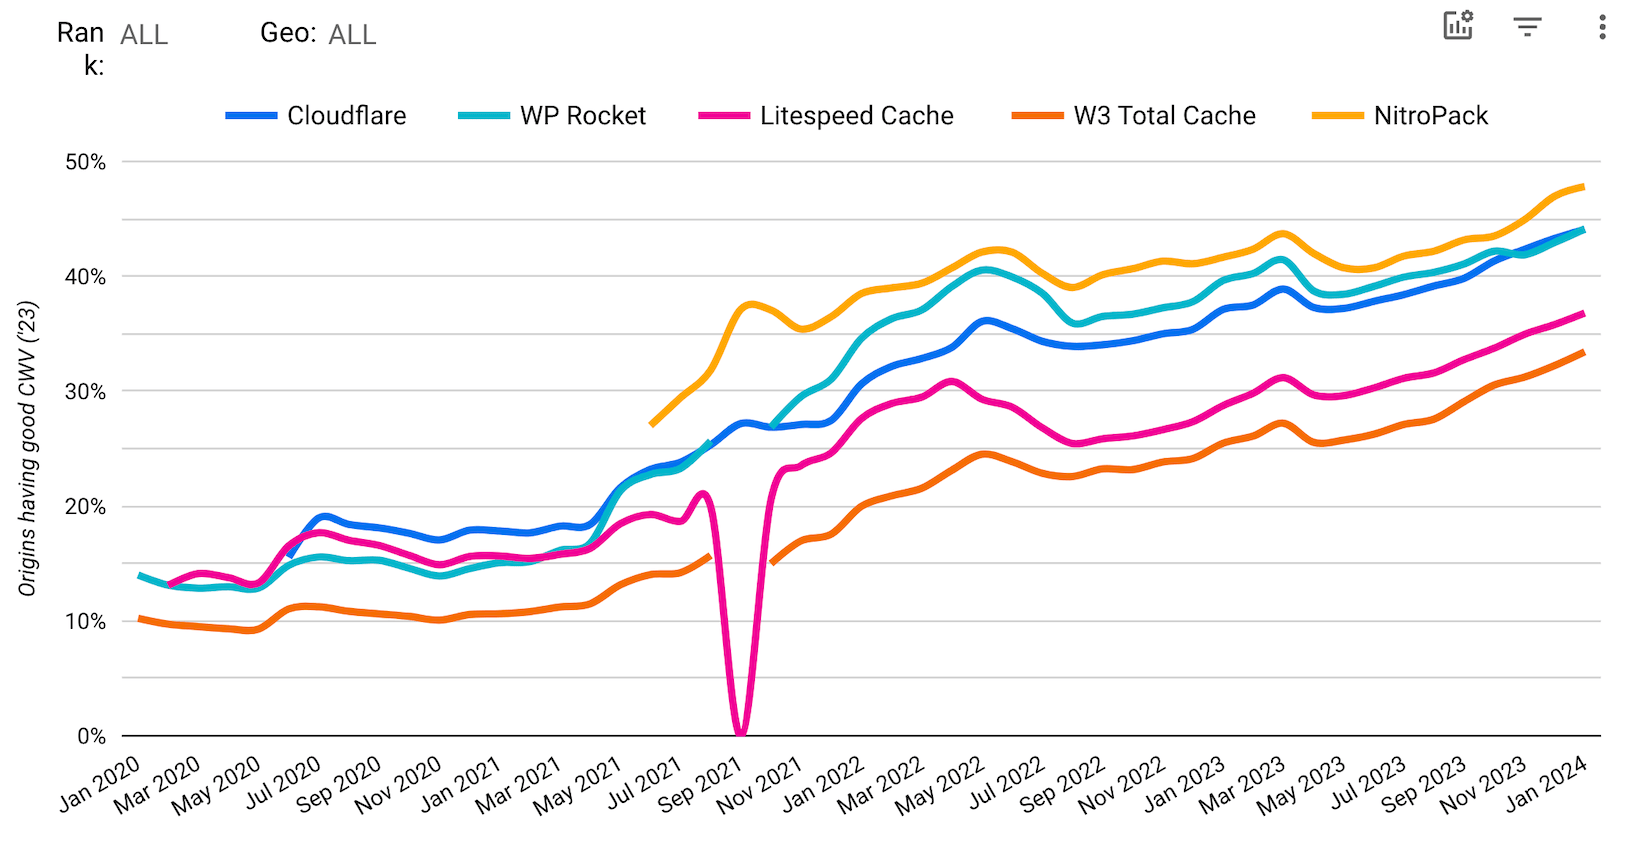
According to the Core Web Vitals Technology Report, NitroPack stands out as the top optimization plugin with the highest success rate for passing Core Web Vitals.
Get NitroPack with 10% Discount!
Speed up your site with cloud-based optimization. All features included.
Verified
Installation
They offer specialized plugins and tools for various platforms:
- NitroPack for WordPress
- NitroPack for OpenCart
- NitroPack for WooCommerce
- NitroPack for Magento
- NitroPack PHP SDK
- API integration
Let’s see how to install NitroPack on WordPress.
First, install their WordPress plugin by going to “Add New Plugin”.
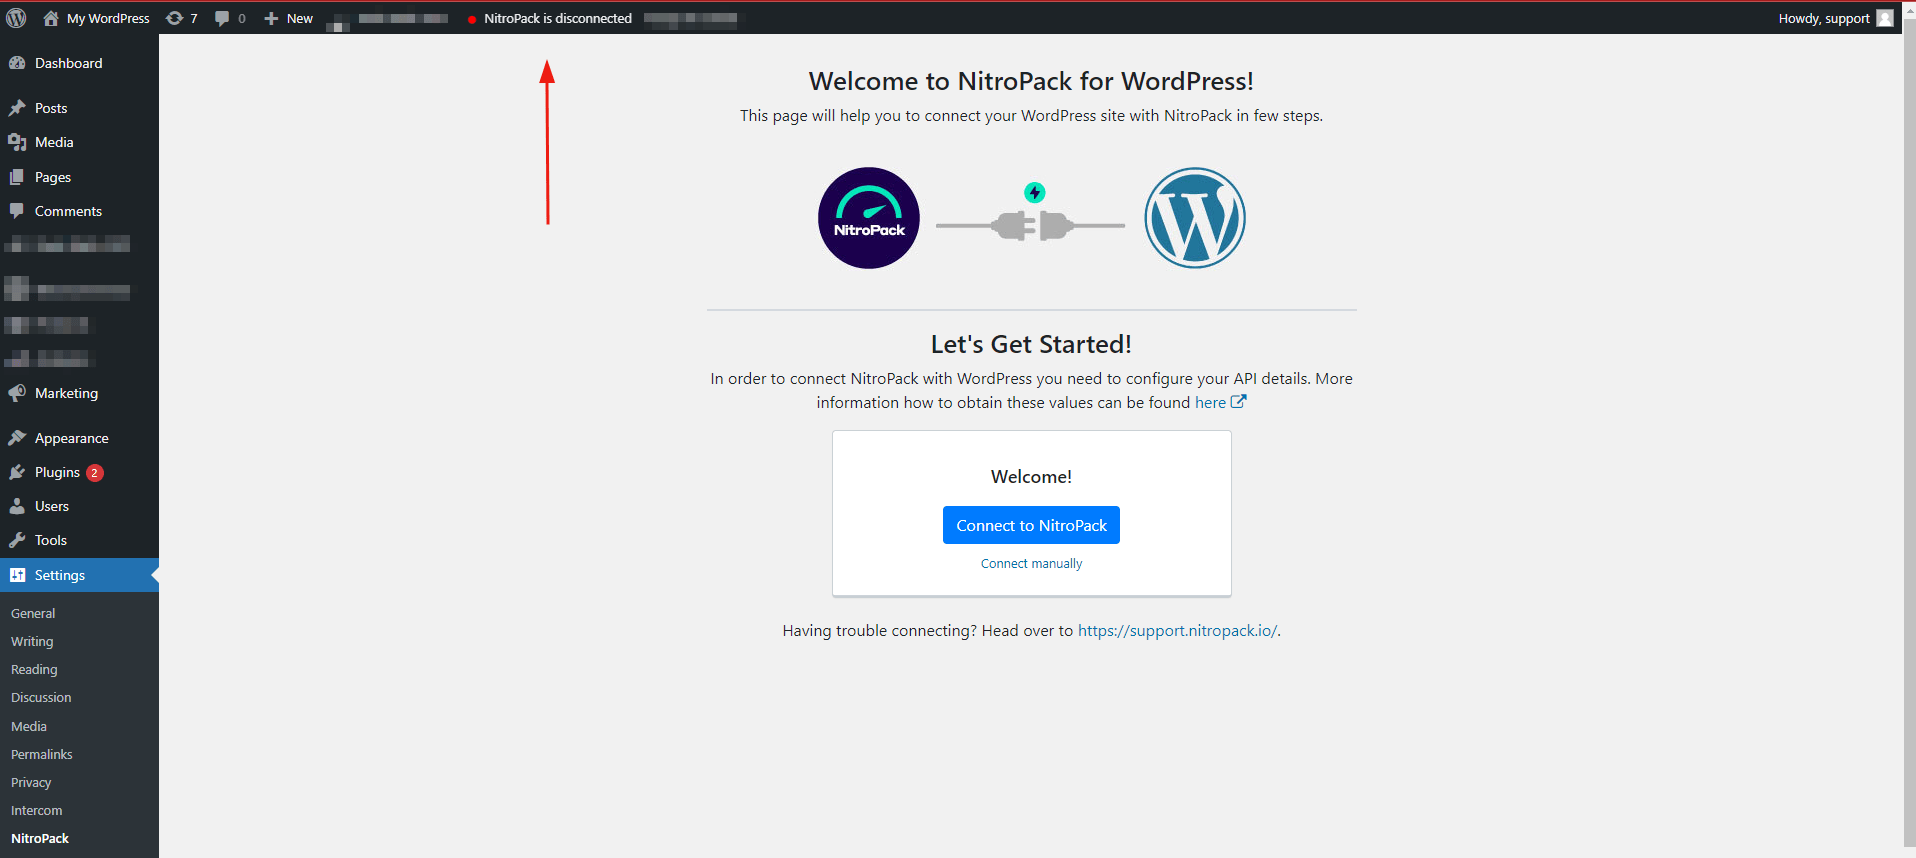
After activating the plugin, paste your NitroPack API key in the plugin settings and click Connect.
You can find these credentials in your NitroPack account.
User interface and user experience
NitroPack gives you a web app to manage and set up your site.
If you use WordPress, you can install their WordPress plugin.
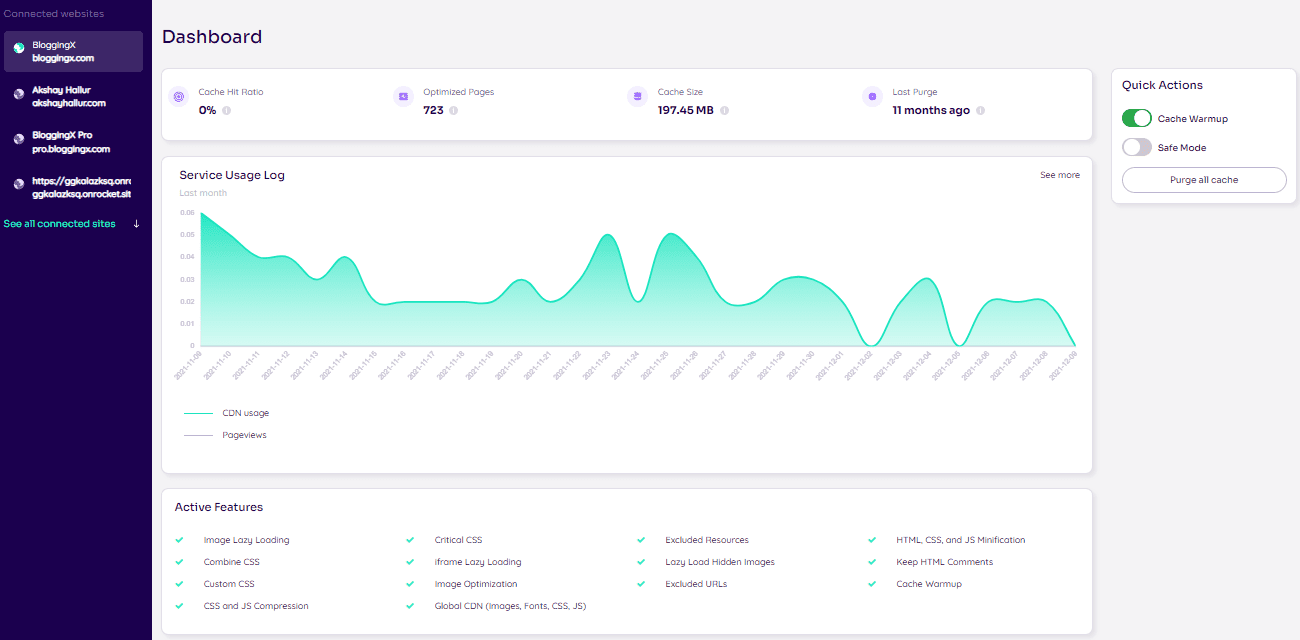
When you log in to NitroPack, you’ll see a clean, simple dashboard.
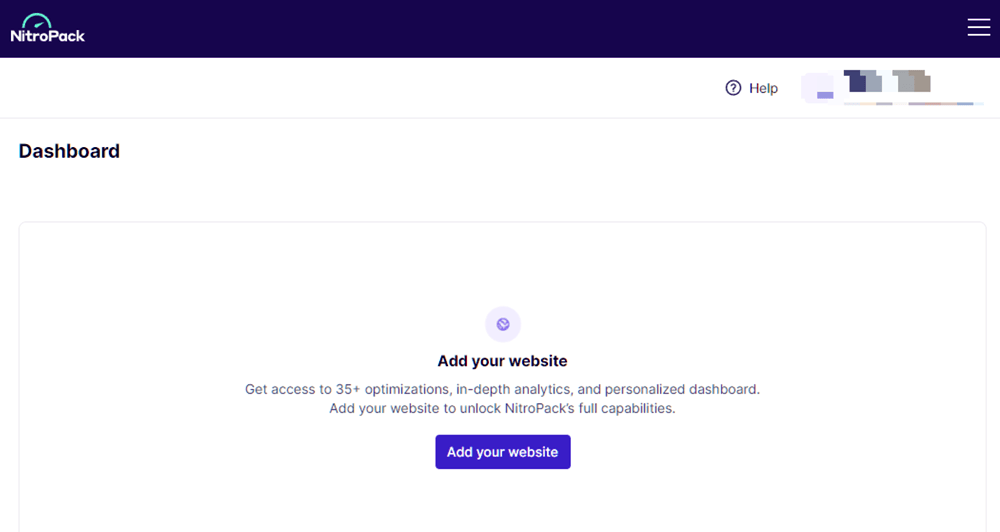
The clean dashboard makes it super easy to add your website in just a few clicks.

After adding your site, NitroPack guides you through the setup process with clear steps.
Since I use WordPress, it prompted me to install their WordPress plugin to get started.
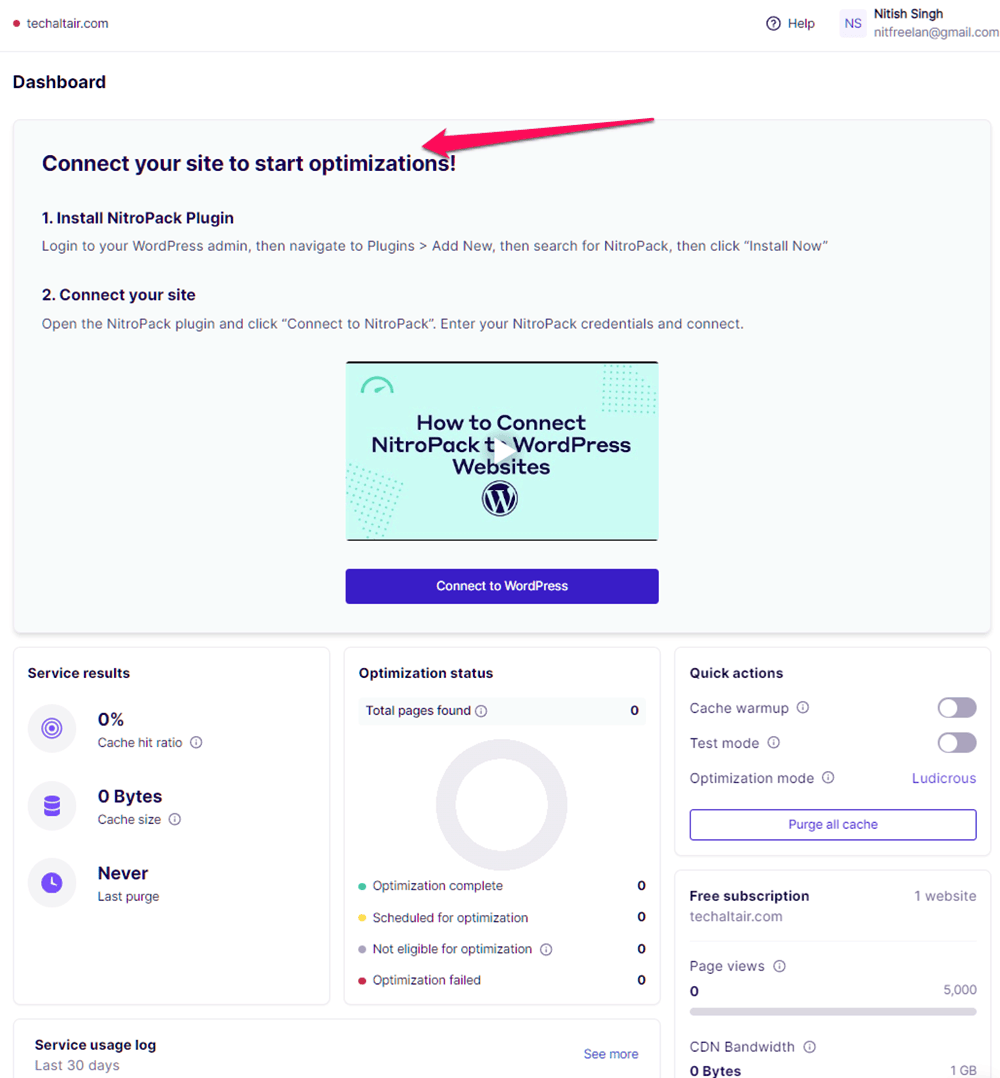
After connecting, the NitroPack WordPress plugin makes it easy to change settings, see updates as they happen, and run checks on your site.
I really like how easy NitroPack’s interface is to use.
You can turn features on and off with just one click.
It’s also great for new users since it guides you through each step, making it simple to set up on your site.
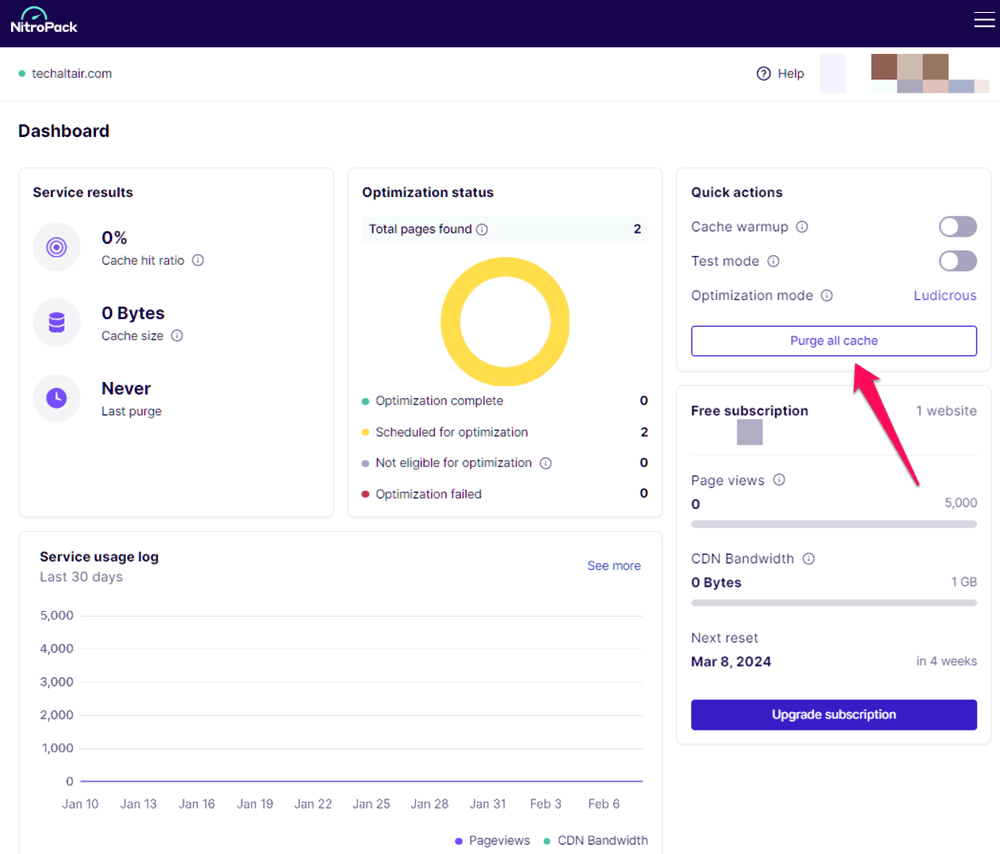
The Purge all cache option is another feature I found useful.
If something breaks on your site, this option can quickly fix things and get your site back to normal.
NitroPack review: Features and explanation
NitroPack boosts your site speed with tons of features.
Let’s break them down.
I’ll compare these features with other optimization plugins like WP Rocket or ShortPixel so you know exactly what you’re getting.
Performance modes
In plugin configuration these are the important options you need to pay attention to.
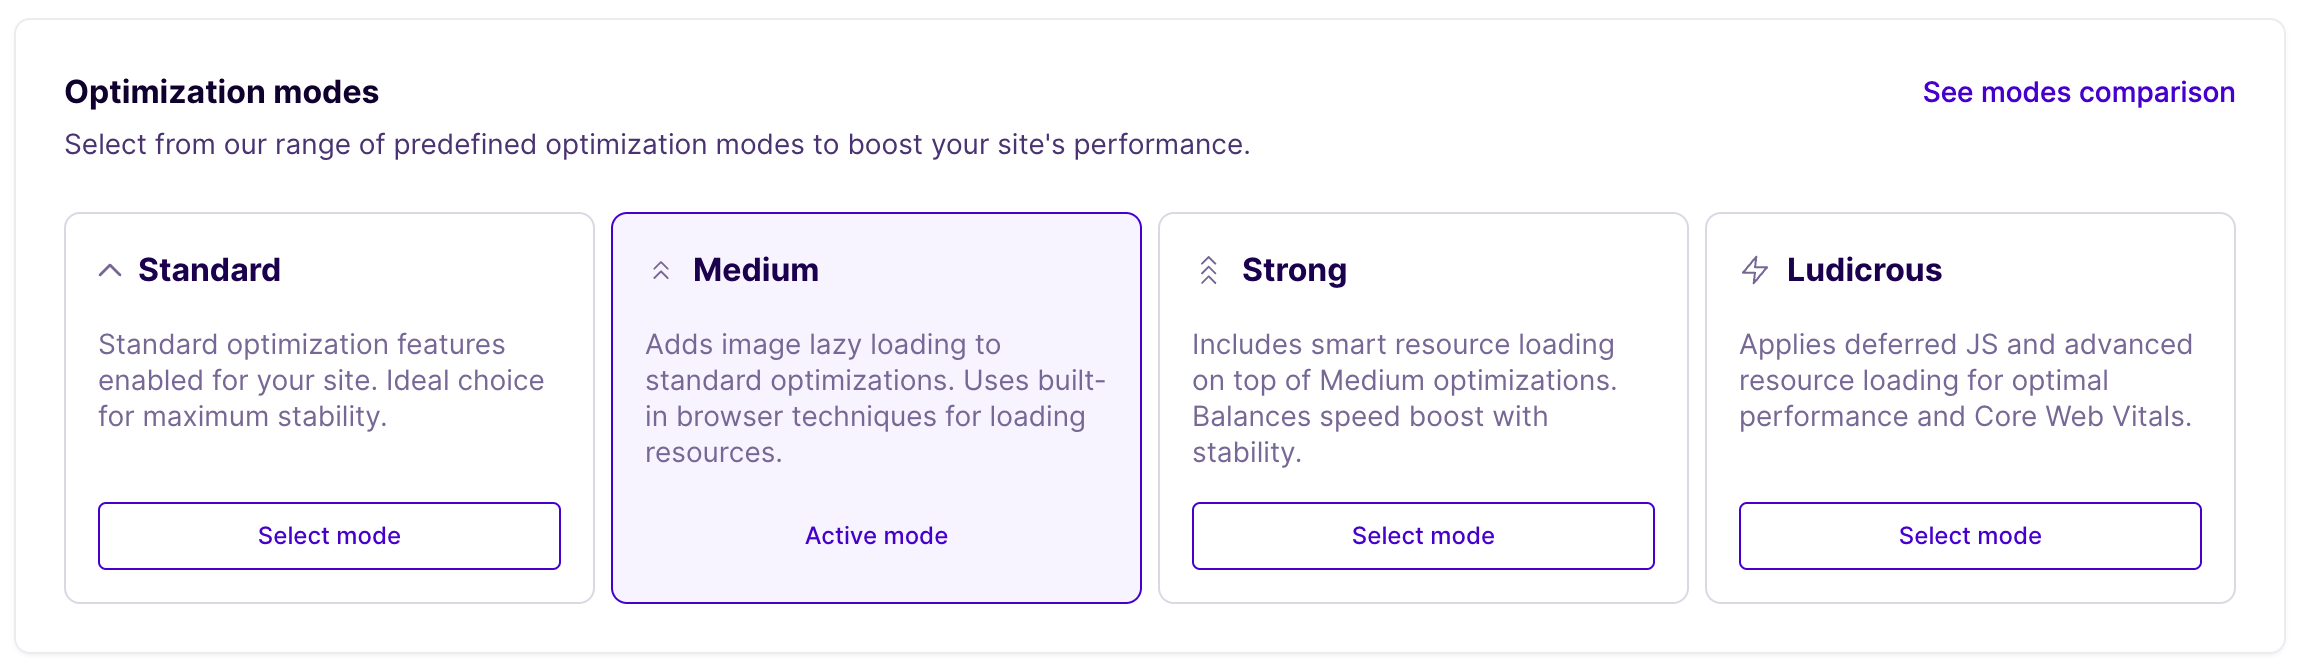
When it comes to optimization modes, you have Standard, Medium, Strong, Ludicrous, and Manual mode.
- Standard mode: If you’re looking for stability and speed, the Standard mode is for you.
- Medium mode: A more aggressive mode than Standard that adds image lazy loading and built-in browser techniques.
- Strong mode: Want faster load times? Strong mode builds on Medium by adding smart resources loading while maintaining stability.
- Ludicrous mode: The ultimate mode that applies all speed optimization techniques to improve site speed, including deferred JS and advanced resource loading. It also improves Core Web Vitals.
The Strong mode is the default mode.
I recommend sticking to Strong or Medium mode.
Why?
Because Ludicrous mode is too aggressive and might cause issues with your other plugins.
In NitroPack, I appreciate the control it provides over script deferral.
This feature helps you optimize individual scripts rather than just setting the mode to Ludicrous, which might interfere with your essential scripts.
You can also start with nothing deferred and then choose what to defer.
This flexibility gives you better control over your website’s performance.
Don’t forget to enable cache purging when content is updated and published.
You can also configure the plugin on your cloud dashboard.
Remember that global configurations will be overridden by plugin-specific configuration.
NitroPack has recently added several new widgets to give users more information in the dashboard. You can expect more features to come soon.
👉 Note: NitroPack has improved support for cache proxies, making WordPress super compatible with top hosting services like Kinsta, SiteGround, WP Engine, Flywheel, and many more.
Code optimization
NitroPack offers powerful code optimization and minification.
So what it does?
It minimizes HTML, CSS, and JS file sizes for quicker browser loading.
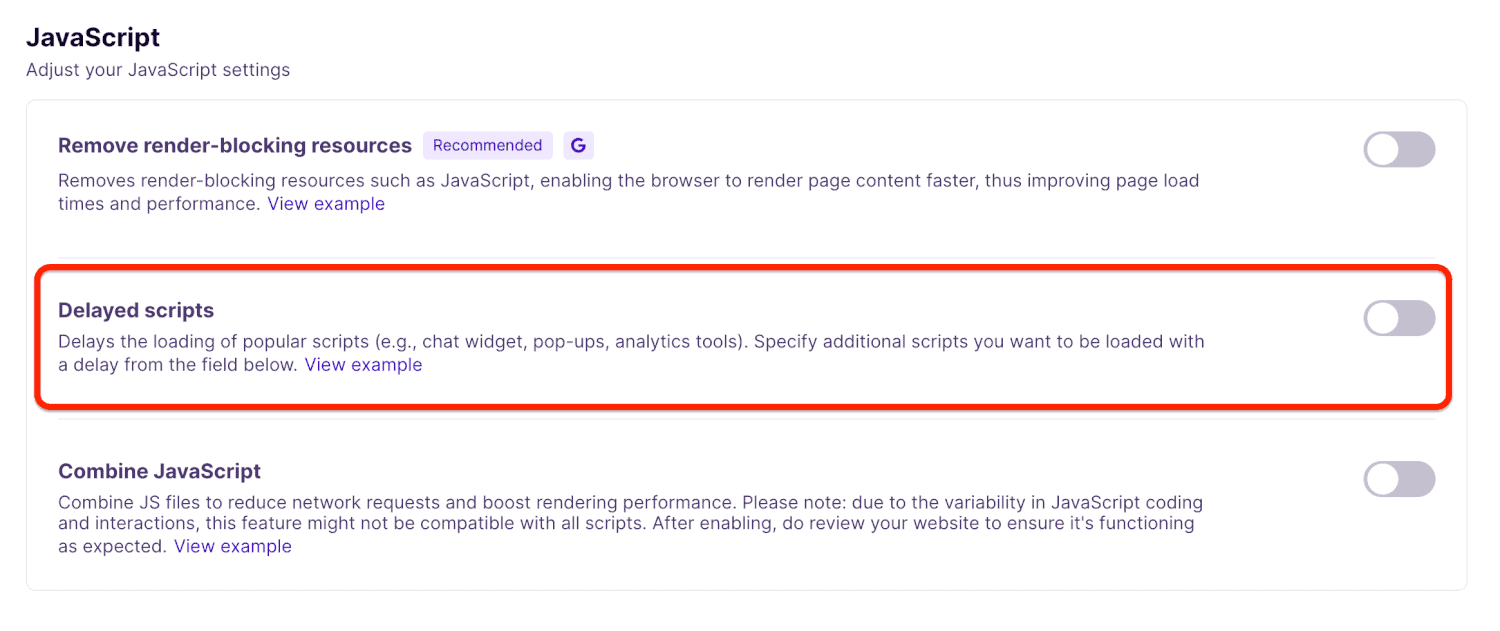
Along with this, it also defers render-blocking JavaScript, loading only essential code in the header.
With this, the browser shows content faster without waiting for all files to load.
You can delay scripts (needed for various site features) for even better speed.
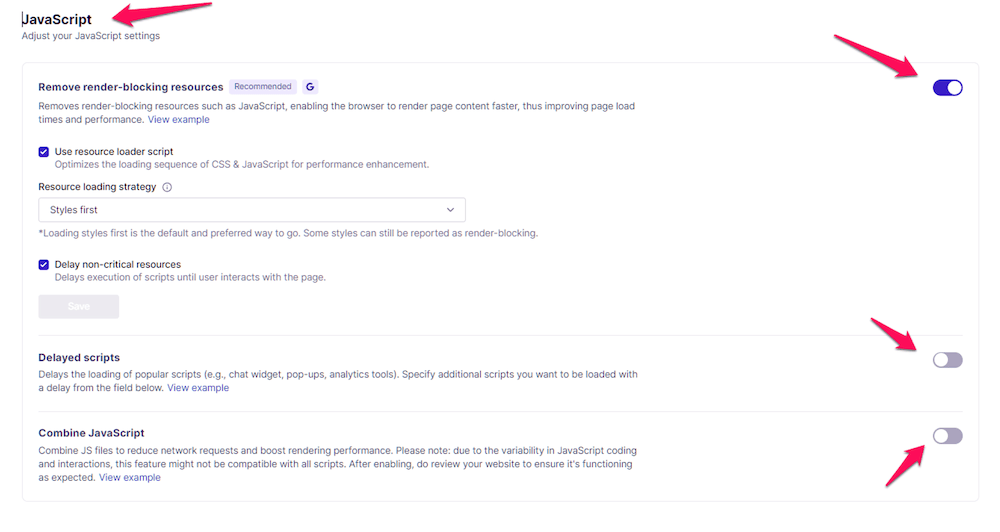
Similarly, it also defers render-blocking CSS.
Once I enabled these features, I saw the site’s overall size decrease which directly improved my Google PageSpeed and Core Web Vitals score.
For comparison, WordPress plugins such as WP Rocket also offer similar services where they minimize and defer site files (JS and CSS) to improve site speed.
Critical CSS Generation
Apart from handling render-blocking CSS and JS, NitroPack also optimizes site code by generating critical CSS for each unique layout.
But what is Critical CSS?

It’s the important CSS needed to load the above-the-fold content (the part of the site that loads first on your screen).
Load times improve significantly when Critical CSS is generated and included in the first package received from the server.
If you look for similar standalone services, they charge around $10 per month (CriticalCSS.com).
So, NitroPack’s all-in-one approach saves you money.
Doing all of these boosts PageSpeed and GTMetrix scores.
👉 To compare, WP Rocket falls short. It doesn’t have CSS deferring or the ability to generate CSS for each unique layout. And let’s not forget how it might clash with other WordPress plugins on your site.
Font optimization
NitroPack makes websites load faster by making sure your browser doesn’t wait for fonts to load.
It does this in two simple ways:
- Font Preloading
- Font Subsetting
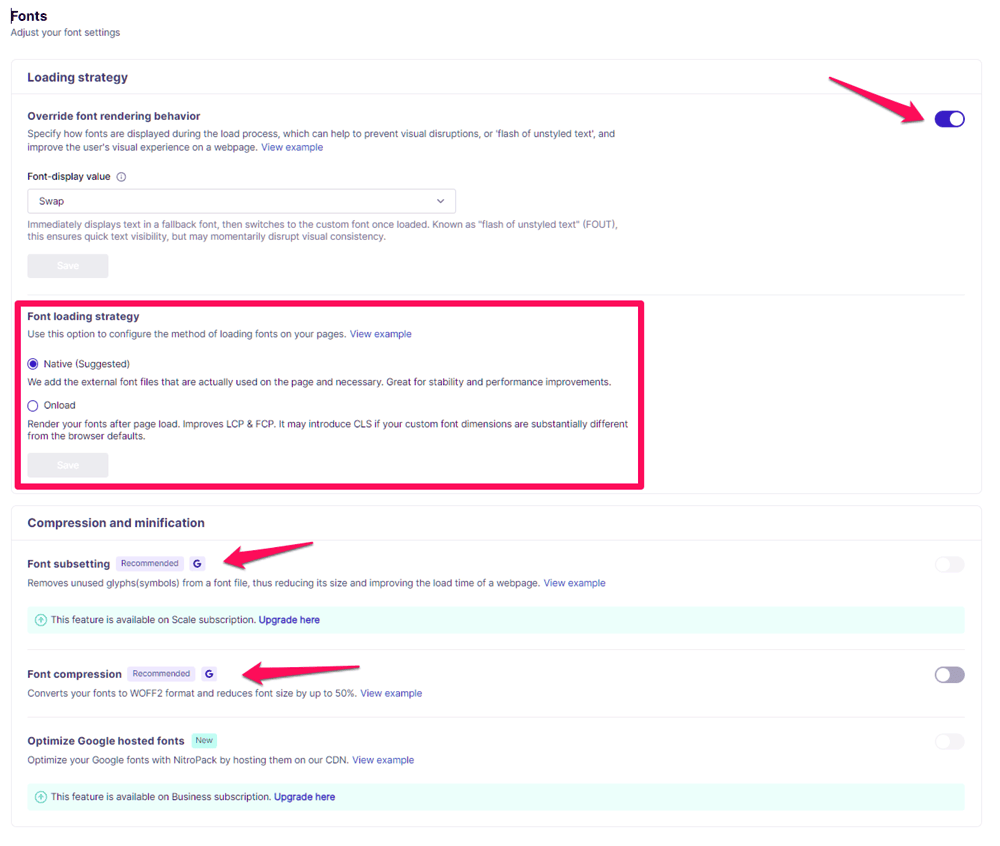
With Font Preloading, NitroPack smartly spots important fonts and loads them first.
Font Subsetting cuts down font file sizes.
But here’s the thing – Font Subsetting only comes with their Pro plan starting at $99.99/mo.
Image optimization
NitroPack offers a full image optimization package.
It delivers images smoothly by shrinking file sizes through lossy and lossless compression.
For example, when someone opens your site on mobile, it adjusts image size on the fly to fit their screen.
This means your 1000×1000 image might be resized to just 250×250, saving tons of space.
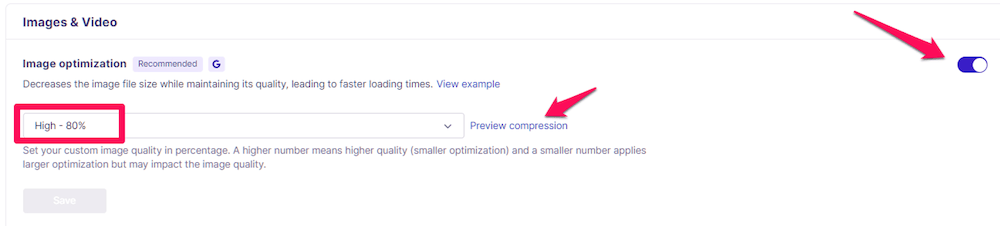
You can customize image quality and preview compression to match your exact needs.
Images outside the viewport?
They’re smartly deferred with advanced lazy loading that even handles CSS backgrounds.
Plus, higher plans include Adaptive image sizing that automatically creates device-specific versions for lightning-fast loading on any screen.

When I tested this on my tablet and mobile, adaptive image sizing boosted speeds by 20-25%.
With NitroPack, your images can be converted to WebP format, saving you more space.
These files are 25-35% smaller than JPEGs.
You can also check out my comprehensive guide on image optimization to delve deeper into the nuances of image optimization and explore additional strategies to enhance your website’s performance.
Smart caching
NitroPack comes with advanced caching features to make web pages load faster.
What’s caching?
It’s when a site pre-loads before someone actually requests it.
Almost every speed optimization tool uses caching to serve visitors.
This makes your site load quicker and reduces the load on your server, especially during high traffic periods.
It uses four different caching methods:
- Browser caching
- Cookie caching
- Device caching
- Session caching
To get you the best results, NitroPack smartly chooses the right caching method for each visitor.
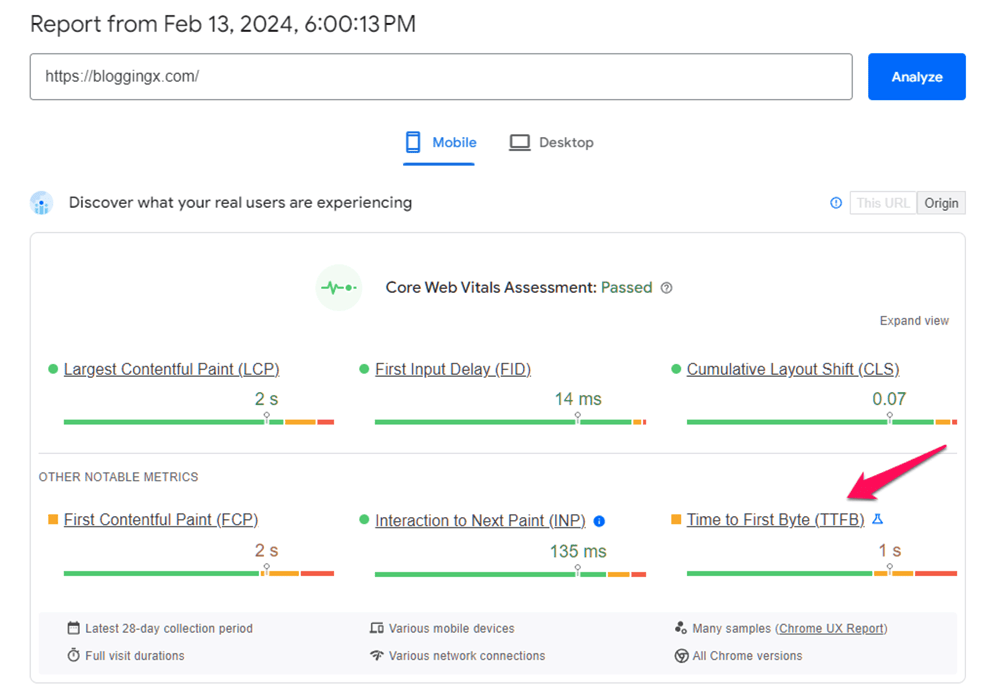
This has a direct impact on your Google PageSpeed’s TTFB (Time to First Byte).
The value drops significantly, which means your site responds much faster.
Now.
Here’s the best part.
NitroPack uses a cache warmup feature to deliver your webpage without delays to first-time visitors.
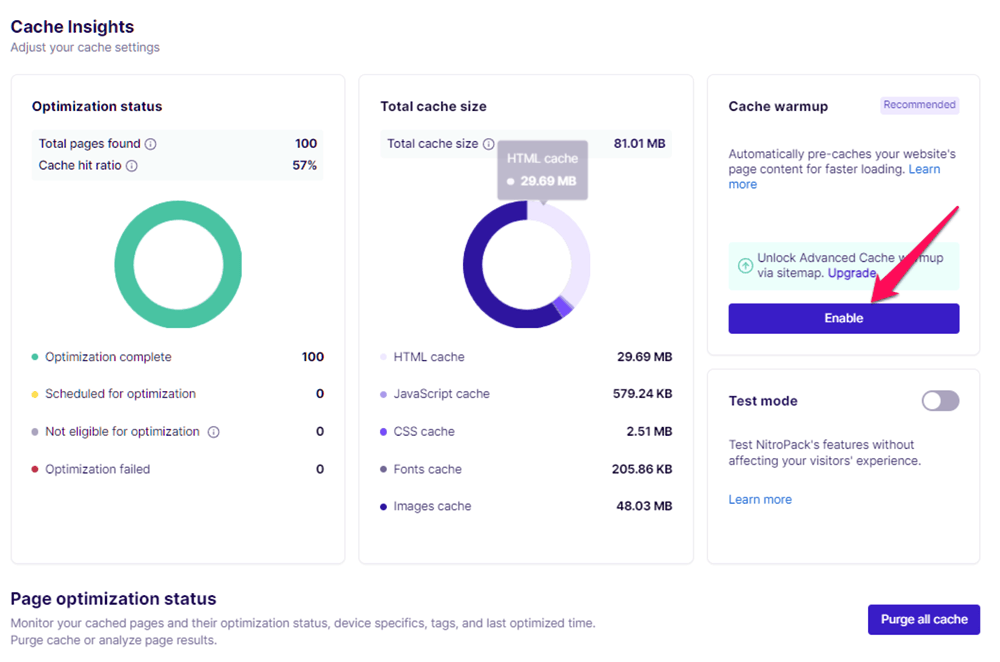
Without this feature, first-time visitors would see slower loading times.
After you enable the cache warmup feature in NitroPack, it will ask you to choose between two types:
- Standard: A basic cache warmup option
- Sitemap: Uses your website’s sitemap to warm up the cache
Between these two options, Sitemap is generally the better choice because it’s more comprehensive and all you need to do is wait for the process to complete.
CDN for faster page speeds
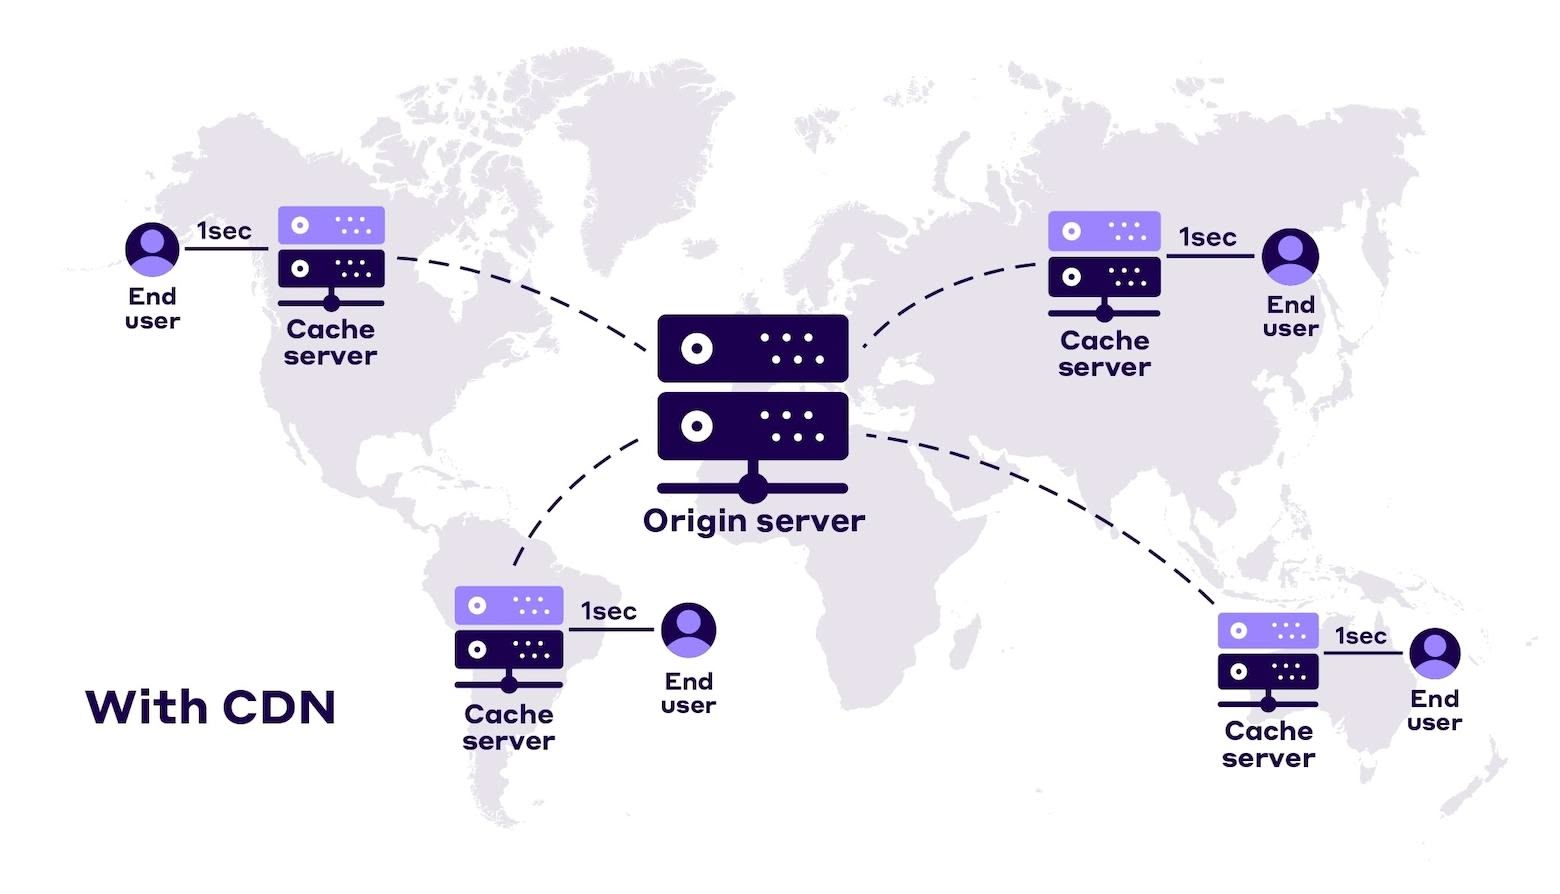
NitroPack is an all-in-one solution with a built-in global CDN powered by Cloudflare.
No extra setup needed – it’s automatically enabled when you install NitroPack.
When visitors from far locations access your site, they don’t connect to your main server.
Instead, they access a CDN server that’s physically closer to them.
Think of it as serving your cached site from the nearest possible location.
These strategically placed edge servers ensure fast loading times for all visitors, regardless of location.
I really appreciate this built-in CDN feature.
Unlike WP Rocket, which forces you to pay for separate CDN services, NitroPack includes everything in one package.
With other solutions, you’d need to spend extra for CDN services to boost your site speed.
But NitroPack gives you this essential feature at no additional cost.
Core Web Vitals (CWV) optimizations
NitroPack excels at optimizing Core Web Vitals.
Core Web Vitals are Google’s key metrics for measuring user experience on websites. They focus on three critical aspects:
- Largest Contentful Paint (LCP): Measures loading performance – how quickly the main content appears on screen. Good sites load in under 2.5 seconds.
- First Input Delay (FID): Measures interactivity – how quickly your site responds to user interactions. Good sites respond in under 100 milliseconds.
- Cumulative Layout Shift (CLS): Measures visual stability – how much elements unexpectedly move during page load. Good sites maintain a CLS score under 0.1.
These metrics directly impact your SEO rankings since Google uses them to evaluate page experience signals.
But why should you care?
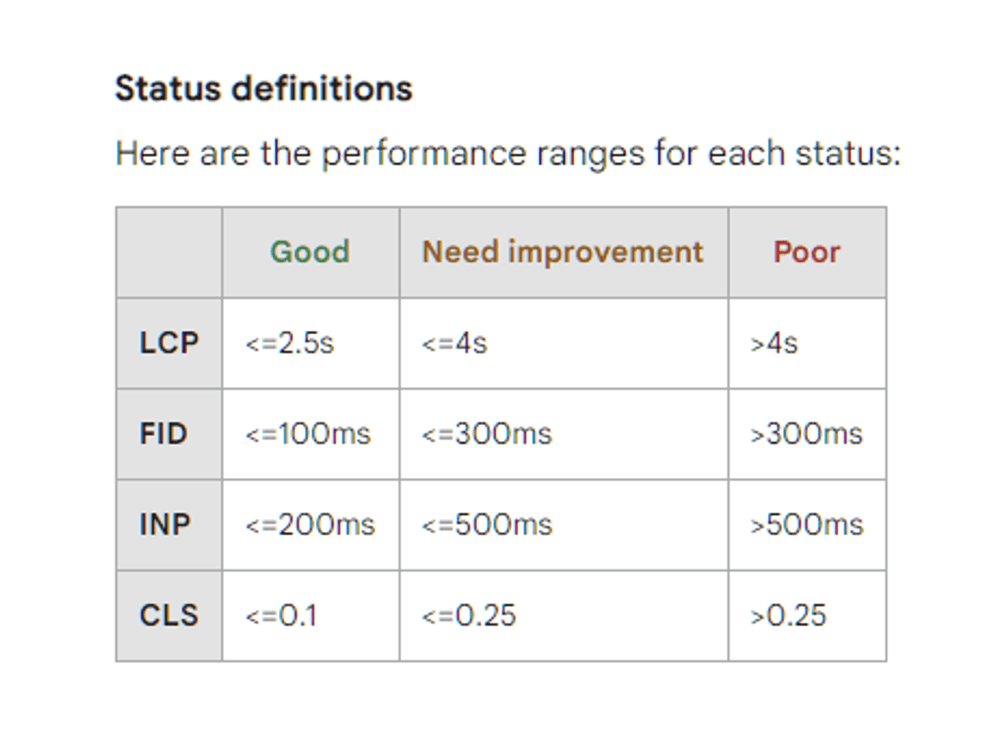
If you don’t optimize Core Web Vitals, Google might lower your site’s ranking due to poor user experience.
NitroPack significantly improves Core Web Vitals by aligning your site code with Google’s requirements.
The improvements are so dramatic that many were skeptical about NitroPack’s methods.
However, NitroPack has thoroughly explained their techniques for boosting PageSpeed Insights scores.
eCommerce Cart optimization
NitroPack supercharges your eCommerce store with lightning-fast cart experiences.
It uses an eCommerce Cart cache that stores cart items locally, eliminating server response wait times when loading cart pages.
Why does this matter for your online store?
Because faster carts mean more sales. Period.
But that’s not all NitroPack offers for eCommerce sites:
- WooCommerce Integration: NitroPack offers a dedicated plugin and extension for WooCommerce, ensuring compatibility with online stores and optimizing all relevant pages (product, cart, checkout, etc.).
- Automatic Image Optimization: Compresses and serves images in modern formats (like WebP), which is crucial for stores with many product images.
- Advanced Caching: Smart invalidation and automatic cache warmup help keep dynamic e-commerce content fresh while maintaining speed.
Compatibility and integrations
NitroPack works well with many different platforms.
You can use it with WordPress (4.7 or above), WooCommerce, OpenCart, and Magento.
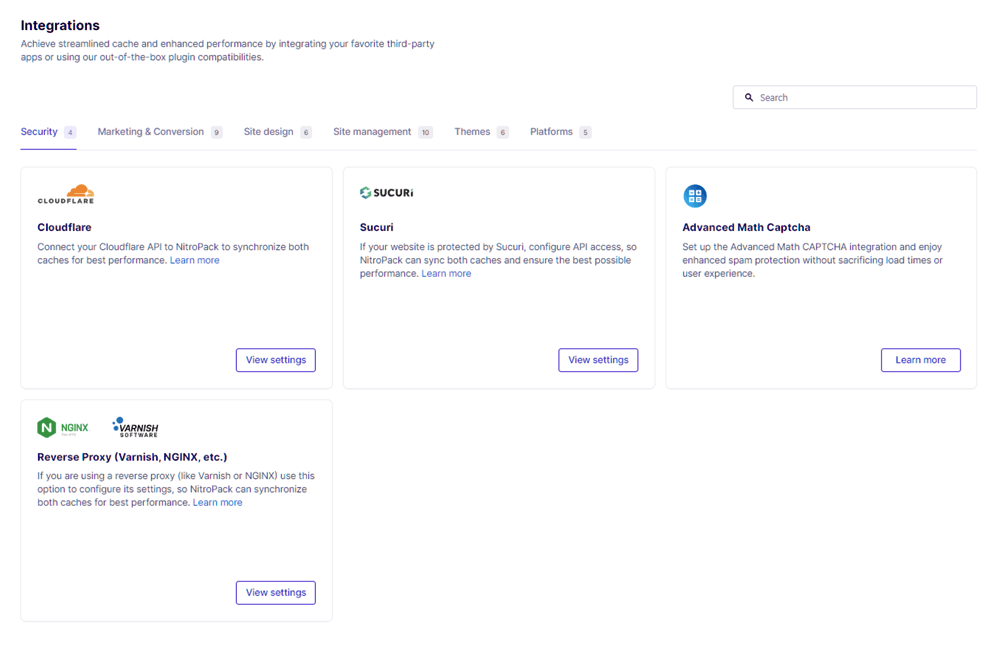
NitroPack works with other site optimization plugins like Cloudflare, Sucuri, and Reverse Proxy Solutions like NGINX.
But you’ll need to tweak some settings to make them work together smoothly.
It also plays nice with various hosting platforms, including Kinsta, Cloudways, Siteground, and Pagely.
Want to use NitroPack on a custom website? You can do that with API integration.
Having trouble with compatibility? Check out the Compatibilities page for quick fixes.
My results with NitroPack
I recently installed NitroPack on my website.
Lucky for you, I documented everything while testing for this review.
I checked my website’s PageSpeed before and after installing NitroPack.
Here’s what I did to make sure the test was fair:
- Tested PageSpeed in Google Chrome’s “Guest” mode with no active extensions
- Cleared the cache of the page being tested (just to be safe)
- Only had CDN and caching mechanisms active at one time
- Made no other changes to the website during testing – only disabled the CDN and caching plugins when needed
WPX hosting default CDN vs NitroPack
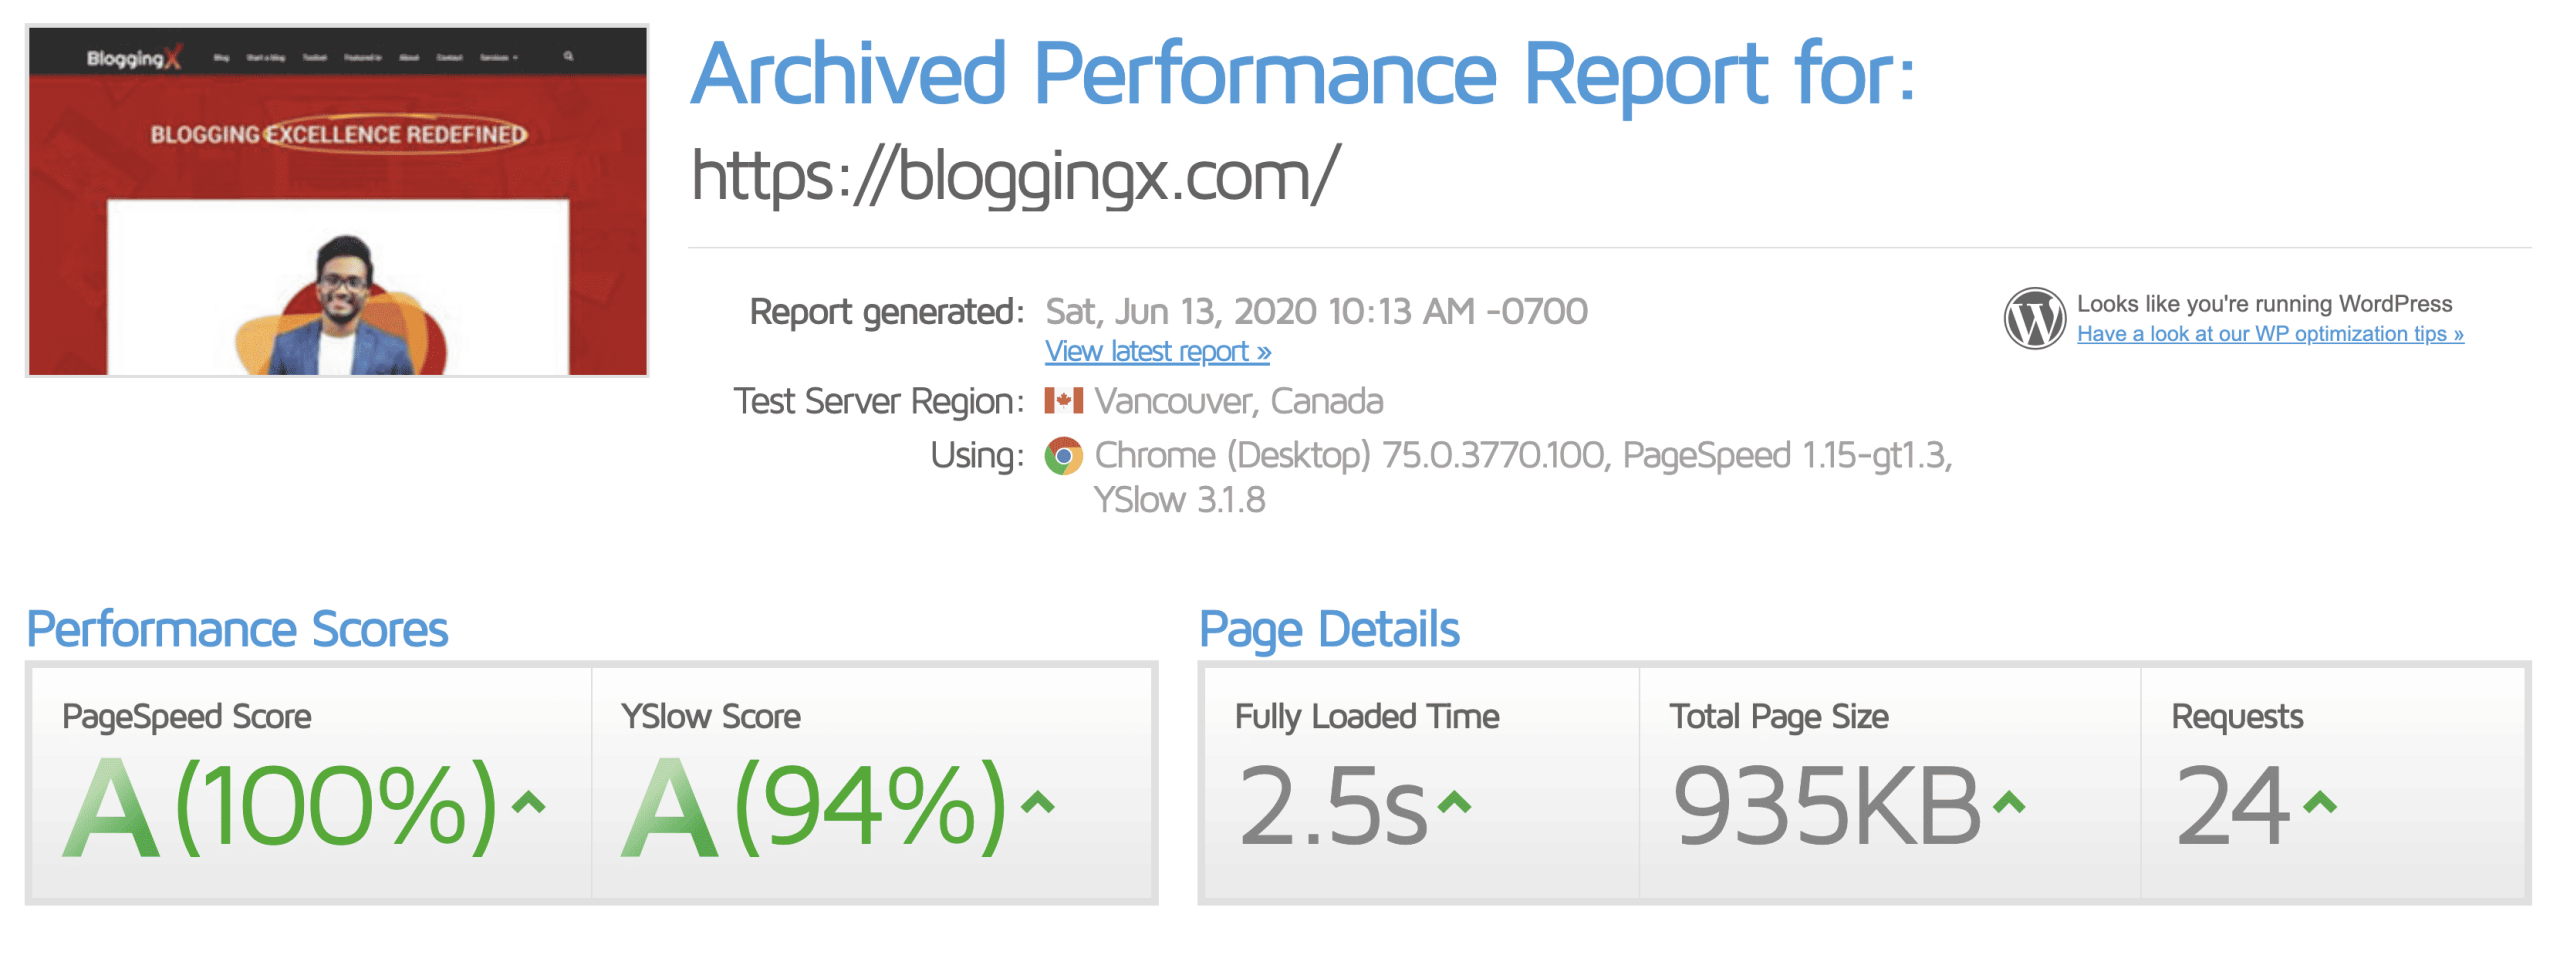
Let me give you some background.
I host my websites on WPX hosting.
It comes with WPX Cloud CDN.
I was also using WP Fastest Cache (which worked better than W3 Total Cache for me).
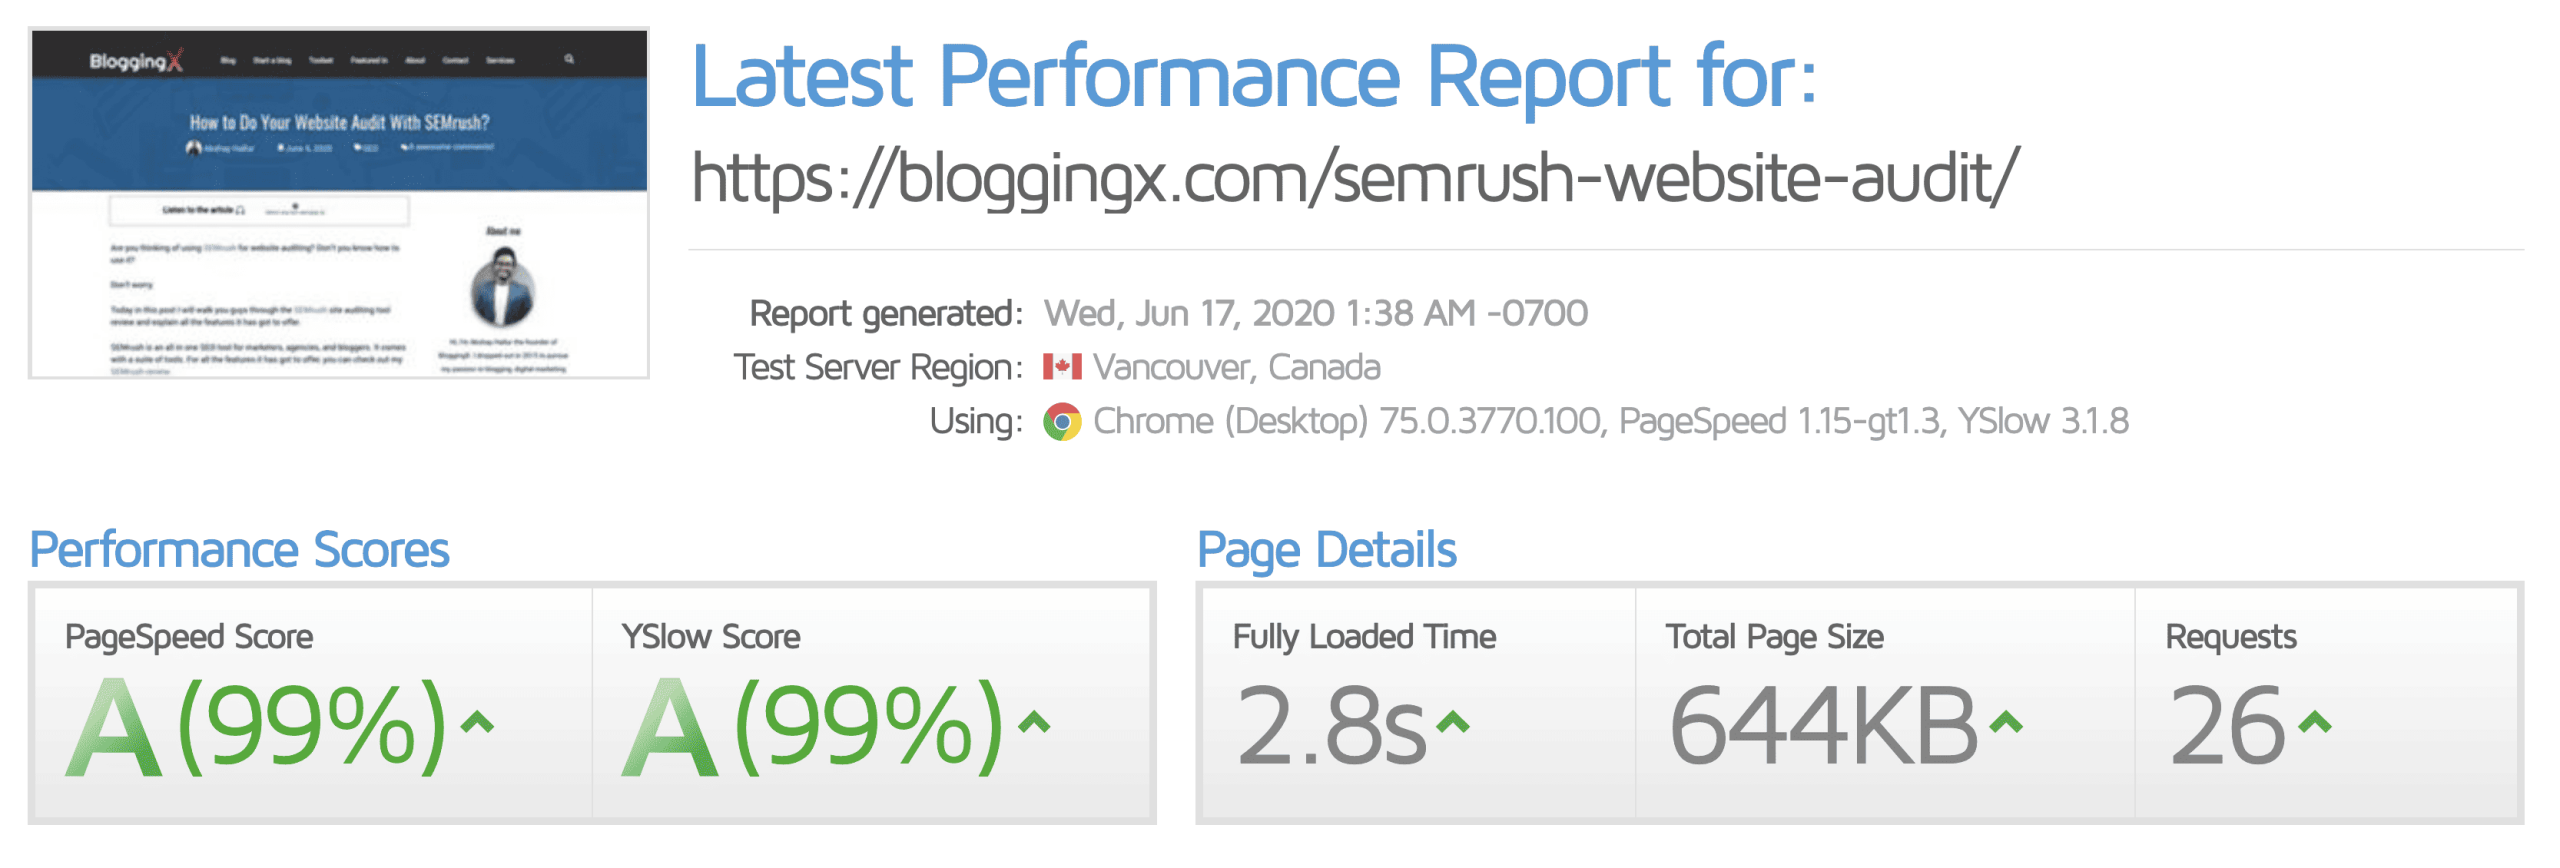
I checked the PageSpeed of my website homepage before installing NitroPack with the above setup, and here’s what I found:
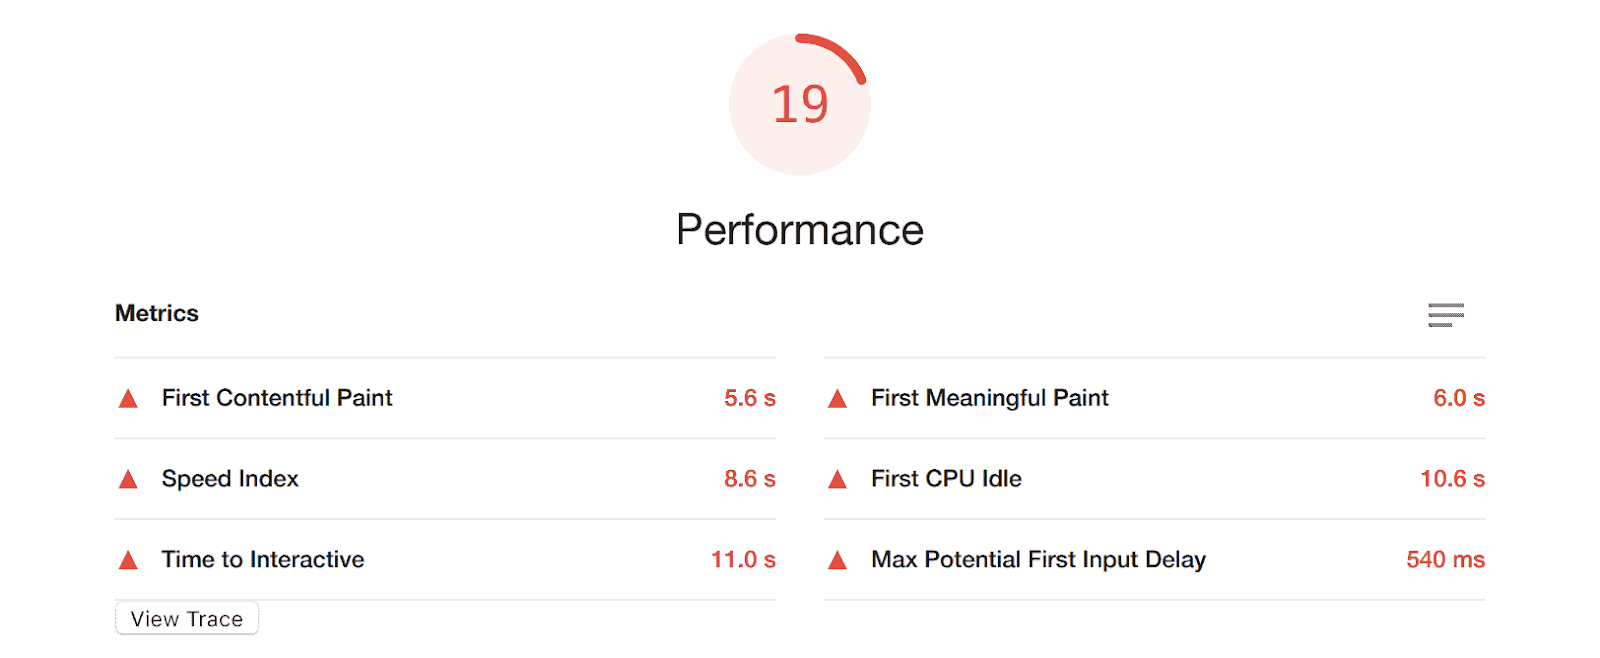
Now let’s look at mobile.
Then I disabled WPX Cloud and turned off “WP fastest cache”.
Why?
Because NitroPack would replace all their functions.
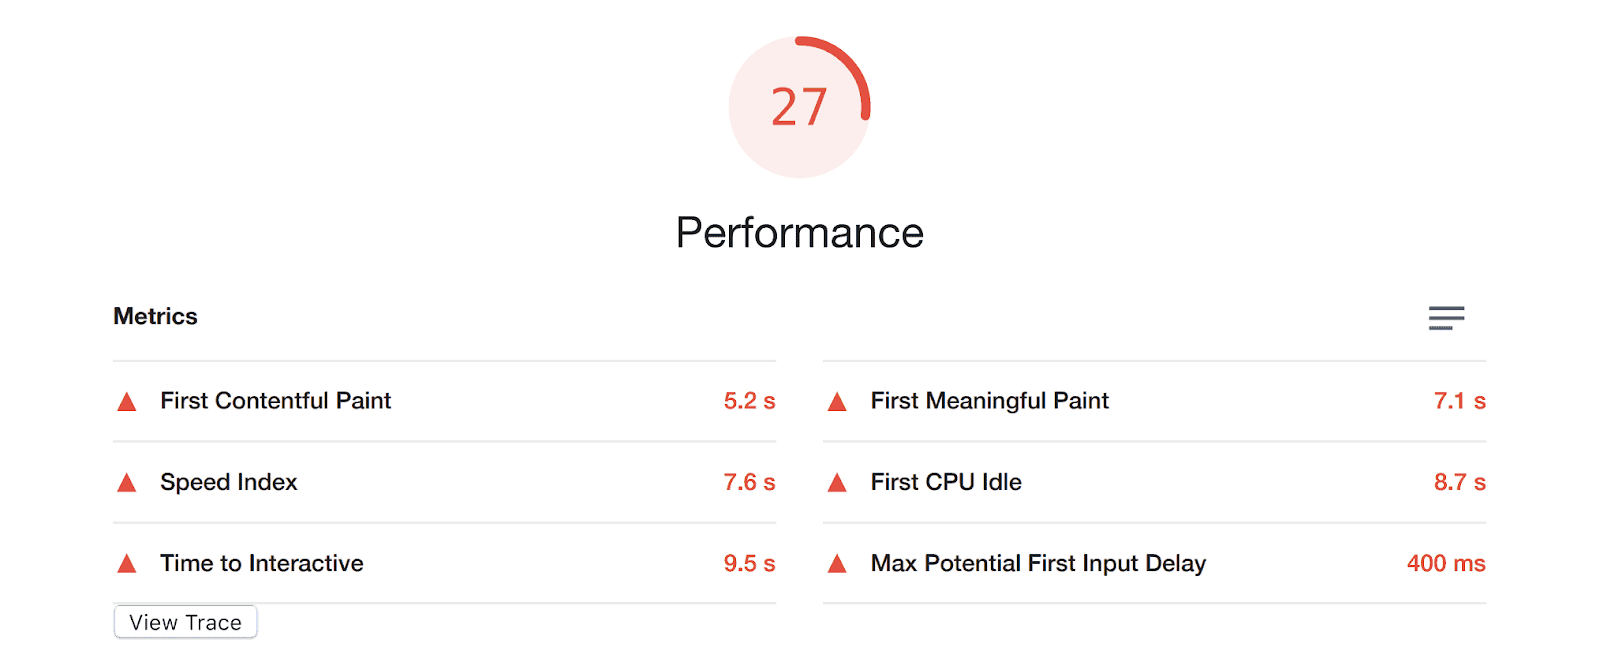
I ran the same tests on my homepage again, this time with NitroPack active.

Let’s look at mobile results now.

As you can see, my Google Pagespeed score jumped up nicely.
I’m confident I can push these scores even higher with some tweaks to my site, plugins, and by playing around with different NitroPack modes.
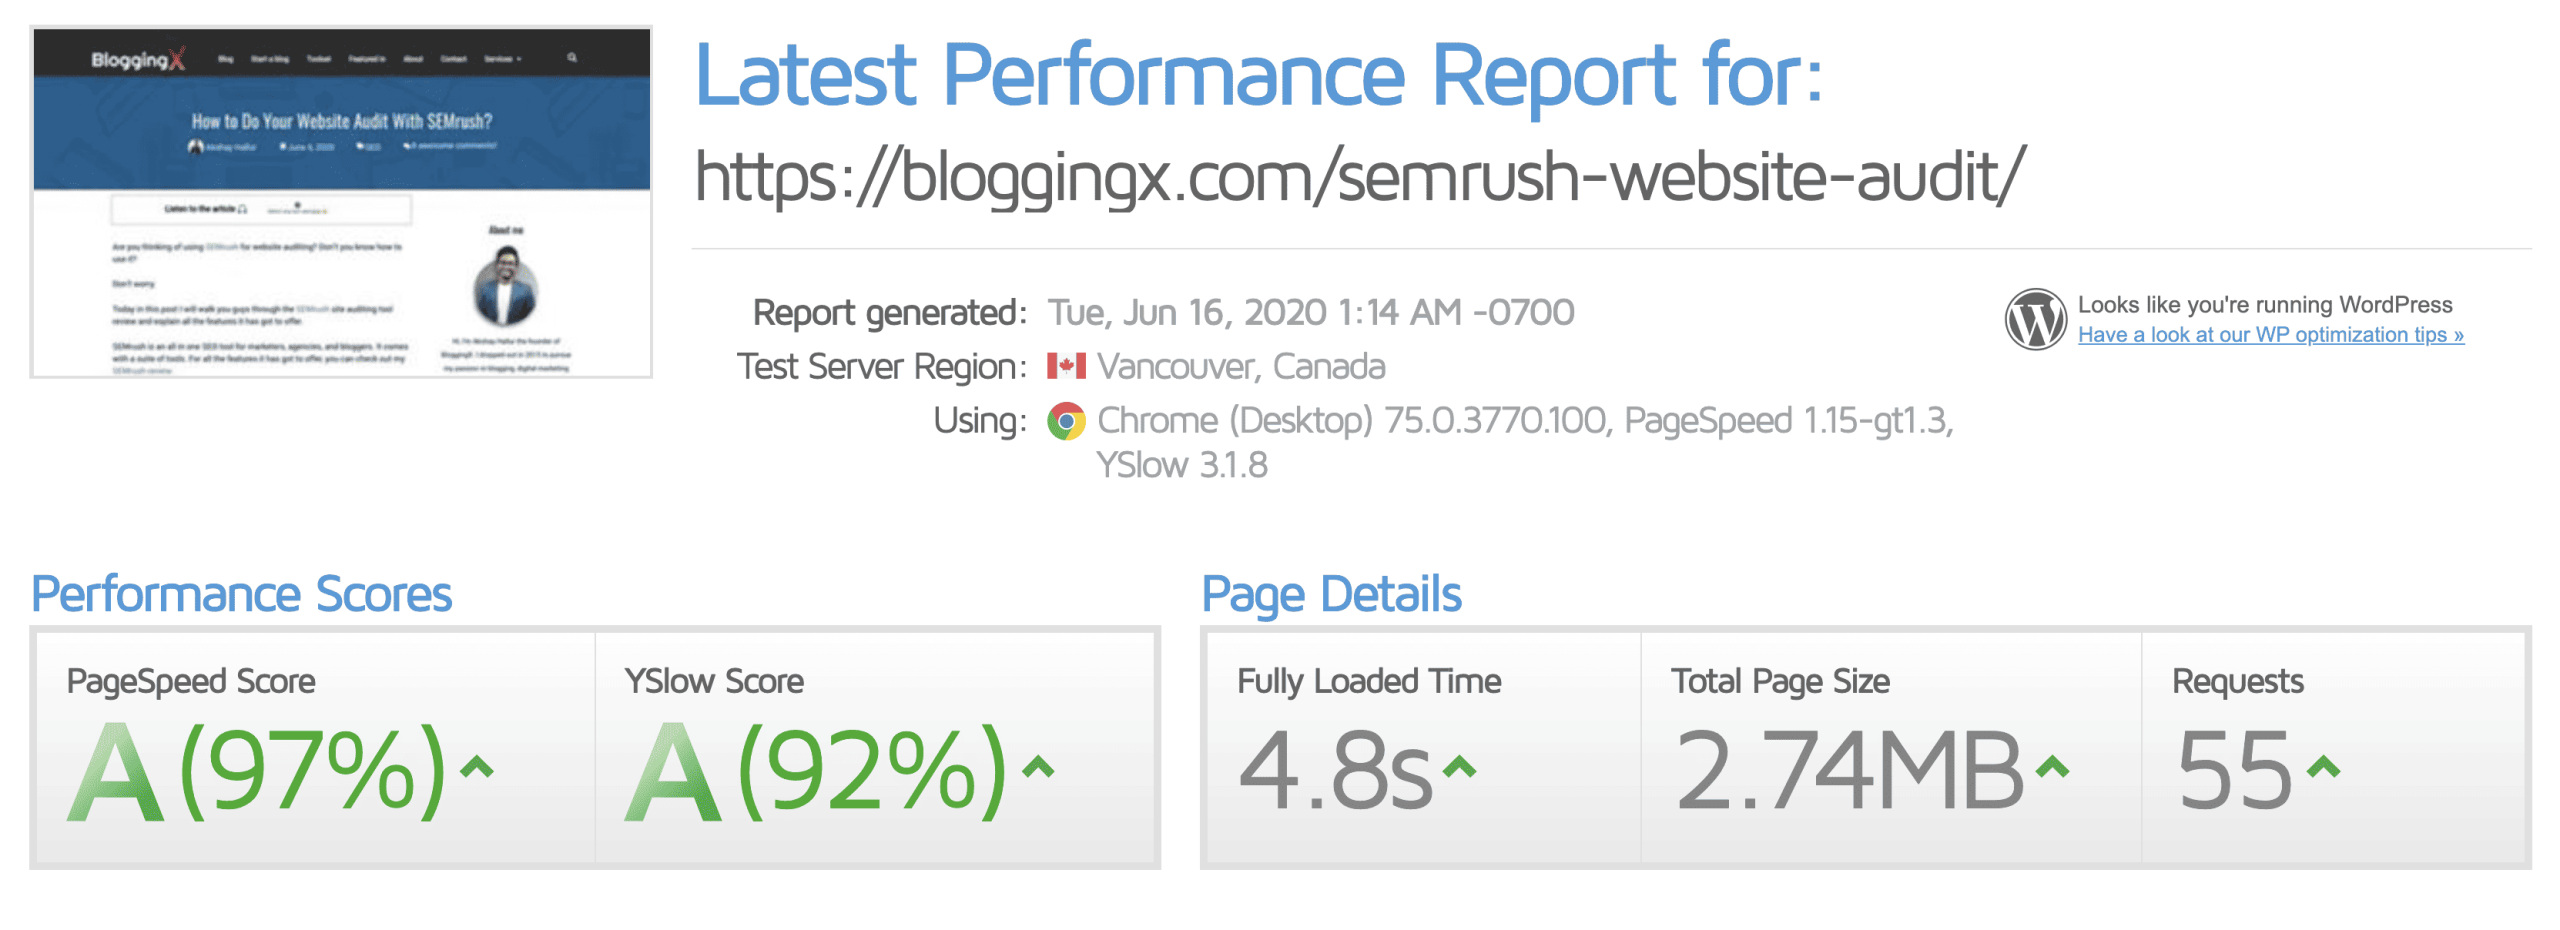
Next, I tested one of my longer blog posts – about 5,000 words.
For this test, I switched to GTMetrix.
I followed the same testing process as before.
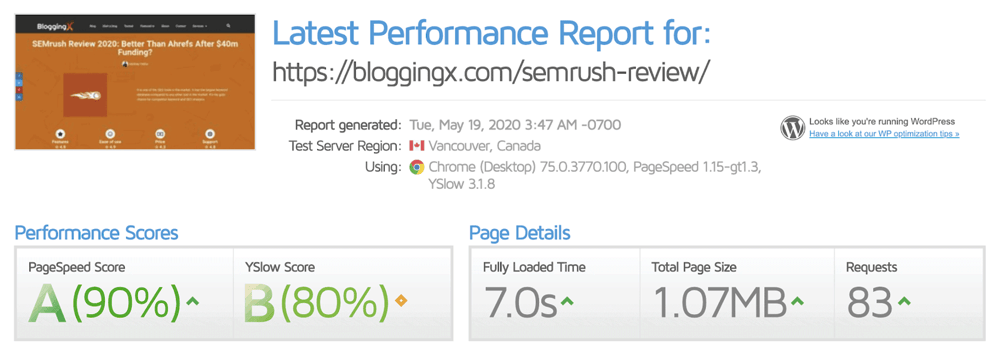
Now let me analyze the same post that I checked before installing NitroPack.
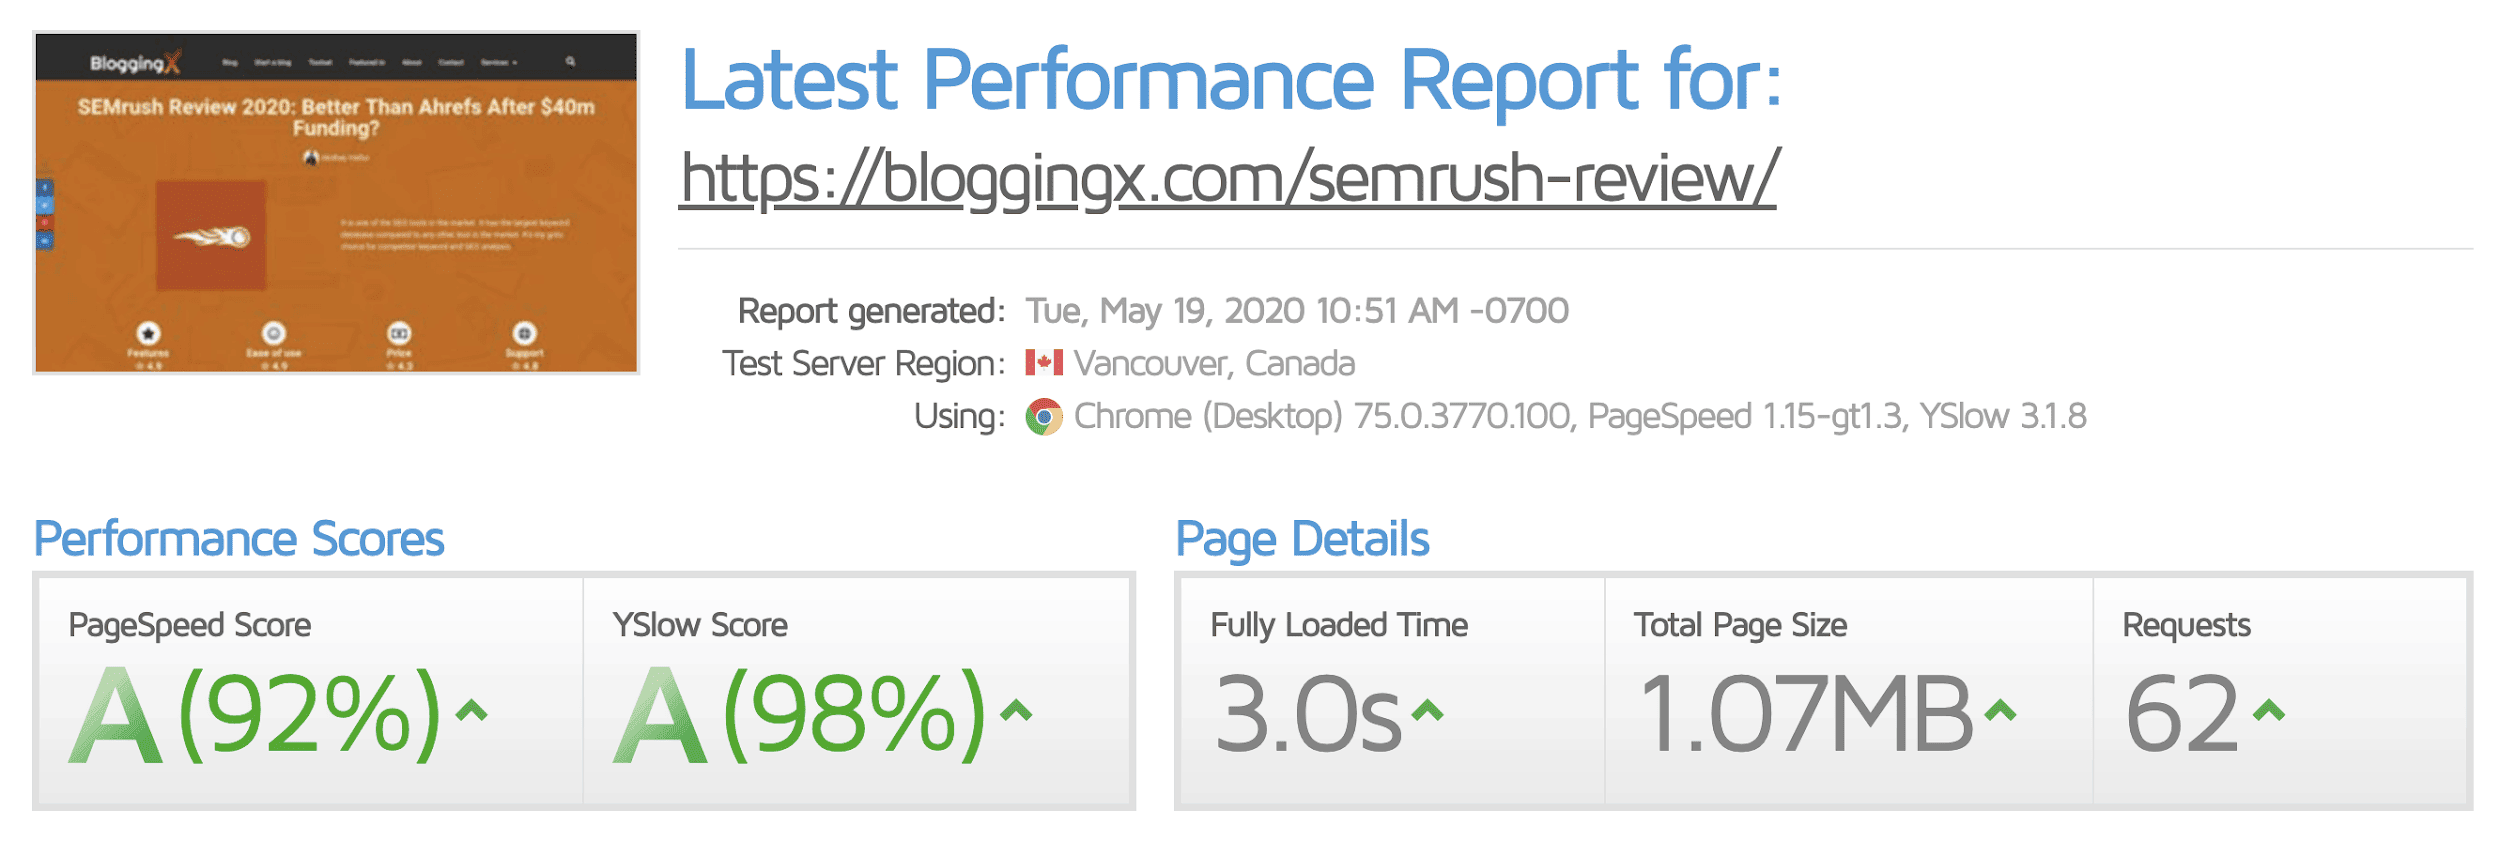
Like I mentioned earlier, this post has around 5,000 words with lots of images and GIFs.
This post used to take a whopping 7 secs to load, but now loads in just 3.0 secs.
That’s a 57% improvement in speed.
As you can see, both my homepage and blog post load times dropped significantly.
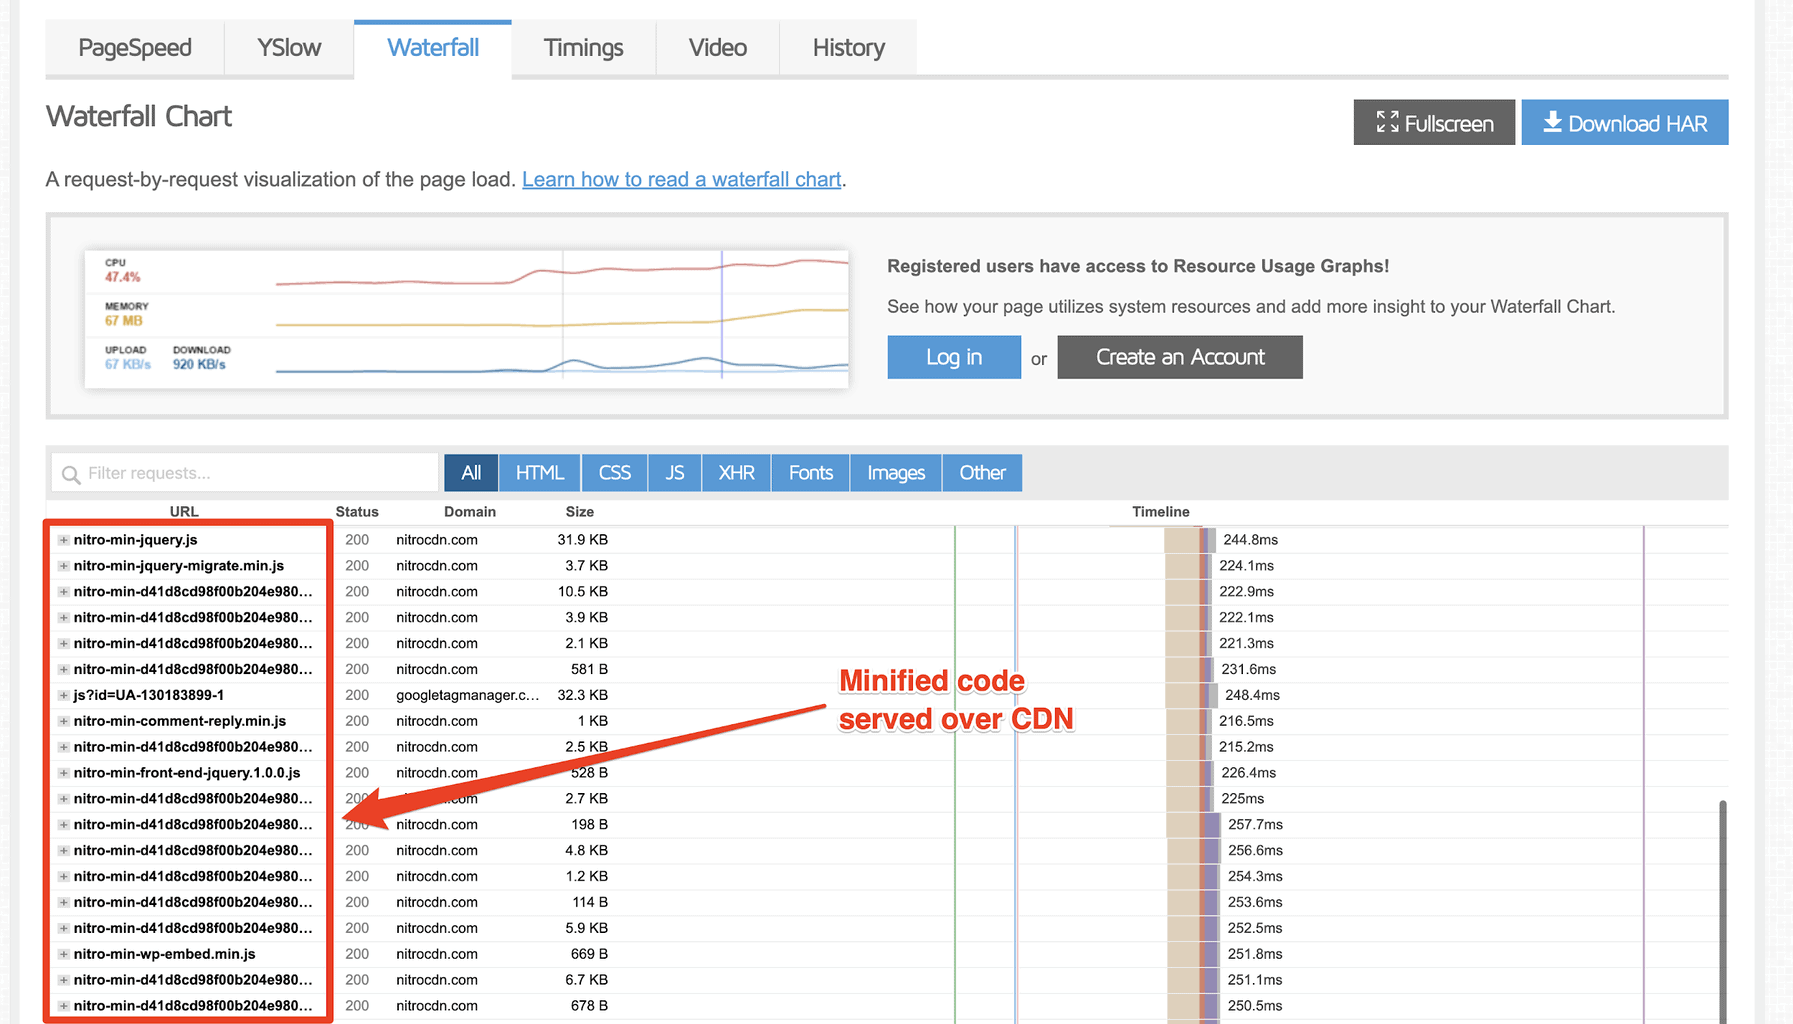
Looking at the GTMetrix waterfall report, I found that code minification and optimization were the main reasons for the faster page speed.
JS and CSS files loaded much faster, especially those from the plugins I use.
Sign up for NitroPack free plan and test it yourself
Experimenting with NitroPack vs. WP Rocket
While testing NitroPack on my site, a friend suggested trying to get similar results using WP Rocket with my WPX Cloud CDN.
I thought, why not give it a try?
If it worked, I could save on a monthly subscription fee, right?
So I decided to test it out.
We made several optimizations to our website.
Here’s what we did:
- Deactivating many plugins (replacing them with code)
- We moved our custom CSS to the child theme
- We resized some important images
- Many other optimizations
Now we want to test WP Rocket + WPX Cloud CDN and NitroPack alone (as it comes with CDN)
We installed WP Rocket with almost all performance settings turned on, except CSS minification as we’re using HTTP-2 (enabling that option broke our site).
We carefully documented all test results.
Then we deleted WP Rocket, disabled WPX Cloud, and activated NitroPack on our site.
Here are the test results for the homepage optimized with WP Rocket
Next, we disabled WP Rocket and optimized the homepage with NitroPack.
As you can see, the NitroPack homepage loads 1 second faster than WP Rocket, taking only 1.4 seconds.
Its total page size is also much smaller than WP Rocket’s.
Now we tested how NitroPack performs against WP Rocket with a blog post.
You can see NitroPack made a big difference in speed and page size.
It almost doubled our speed in some cases.
WP Rocket costs $299/year while NitroPack is $830/year.
NitroPack also includes a CDN, which is an extra cost with WP Rocket which sells it separately as RocketCDN costing $7.99/month.
NitroPack is more of an all-in-one solution.
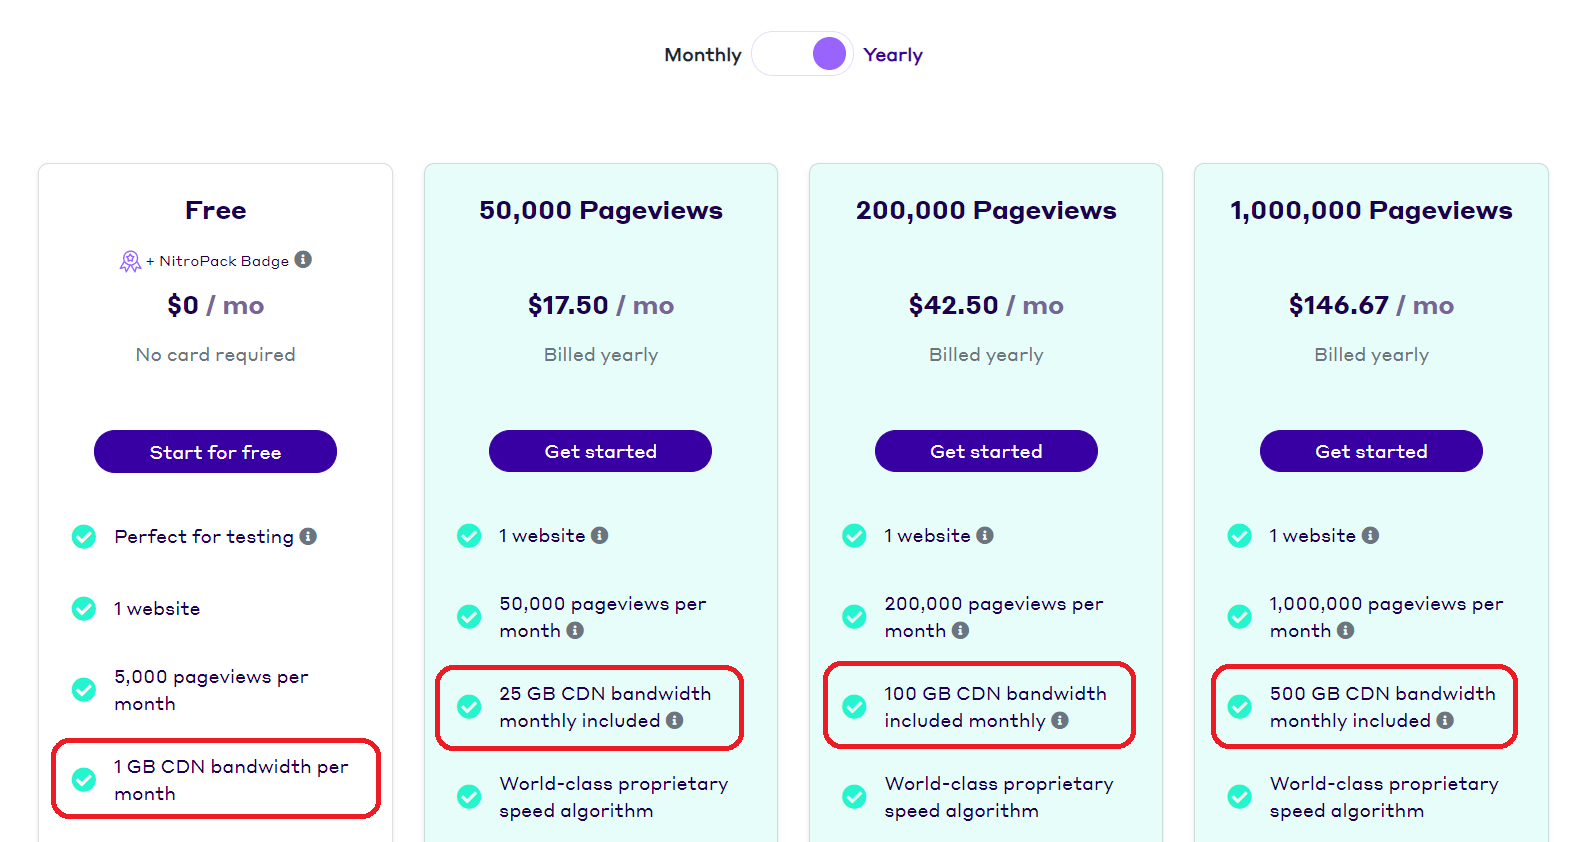
Pricing and support
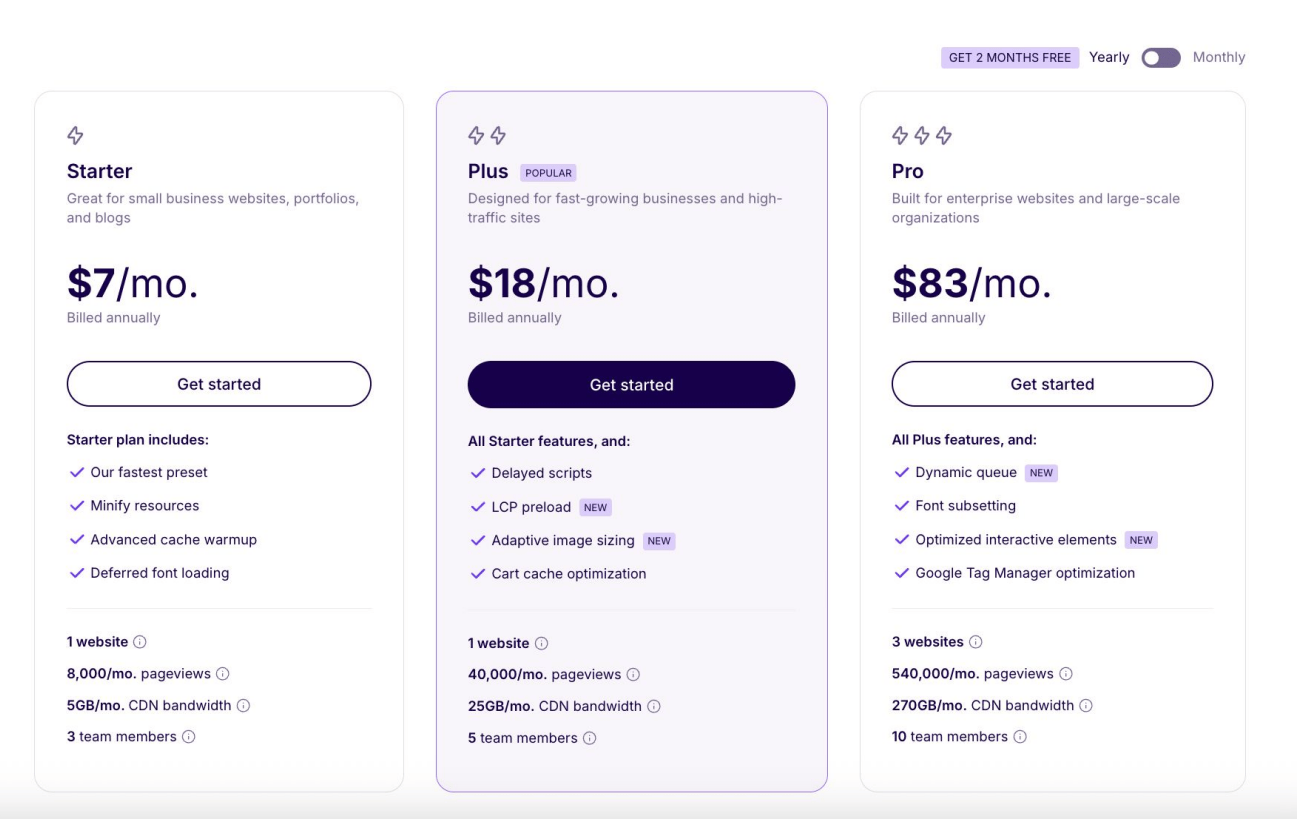
NitroPack comes with three different plans:
- If you are just starting out and have a low-traffic website, the Starter plan would be ideal.
- If you are looking to host only one website and it has more than 1,000 views per day, then the Plus plan would be ideal.
- If you have 2-3 websites, even if they have low traffic, you may need to upgrade to the Pro plan, which is a huge jump from the Plus plan.
Now here’s the interesting part.
NitroPack has rolled out a lot of features like Dynamic Queue, caching to ensure faster load times for actively visited pages, instant cache re-optimizing, Google Tag Manager, and many more.
All of these new features are only available in the Pro plan (at $83/month). That means new features may not be actively added to the lower plans.
This seems to be the direction they are heading, especially as WP Engine recently acquired NitroPack.
For high-traffic websites, the pricing of the Pro plan may not justify the cost. You would be better off going with the good hosting providers.
If you are WordPress-based, I do recommend Rocket.net (see my full review) or WPX (check out my detailed experience). Both offer excellent performance without the hefty price tag of NitroPack’s Pro plan.
👍 Now, if you want to get your hands on NitroPack, I can offer you 10% extra discount on the pricing. Please go through the below link to activate the discount.
Security
NitroPack keeps your site secure with its robust infrastructure.
It follows industry-standard security practices for complete peace of mind.
Under the hood, it uses SSL/TLS (HTTPS). It also creates copies of original files for processing.
All data processing happens in encrypted format, so there’s no risk of data leaks.
Your website data is only processed, not analyzed or stored.
Competitors and how NitroPack compared to them
Let’s look at some NitroPack alternatives.
- 10Web Booster: Like NitroPack, 10Web Booster uses AI to optimize Core Web Vitals and PageSpeed scores for WordPress sites, but it also includes built-in security and Cloudflare Enterprise CDN, whereas NitroPack focuses primarily on speed and optimization.
- WP Rocket: Both NitroPack and WP Rocket are popular for WordPress performance, but WP Rocket offers more granular manual controls for caching, minification, and image optimization, while NitroPack automates most optimizations for ease of use.
- Sucuri: Sucuri stands out for its robust security features, including a web application firewall and CDN, making it a better choice if security is your priority. NitroPack, by contrast, is centered on performance rather than security.
- ShortPixel/Imagify: These tools specialize in image optimization, offering high-quality compression at competitive prices. NitroPack includes image optimization as part of its all-in-one performance suite, but ShortPixel and Imagify may offer more advanced options for users focused solely on images.
FAQs on NitroPack
- What is NitroPack? It is a website performance optimization solution that is cloud-based.
- Is NitroPack SEO-friendly? According to my above experiment, NitroPack increased our website speed on average ~57% (refer the above analysis for more exact metrics)
- Is NitroPack compatible with Cloudflare? Yes, NitroPack is compatible with Cloudflare. But you need to disable some of the Cloudflare features like Mirage, Rocket Loader, and some others for a smoother experience.
- Is NitroPack compatible with WordPress? NitroPack is a cross-platform cloud-based tool. It has its own WordPress plugin which I reviewed in one of the above sections.
- What CDN does NitroPack use? NitroPack makes use of Cloudflare for spreading your optimized static assets across various servers for faster page load times.
- What if NitroPack is breaking my site? How to fix it? If NitroPack breaks your site, you can fix it by purging the cache, removing unused CSS features, or using a less aggressive optimization mode. You can also switch to custom mode to set optimization options yourself.
Verdict
NitroPack is an excellent choice for websites looking for an all-in-one optimization solution.
It improves your Core Web Vitals & PageSpeed scores, directly impacting website conversions and SEO.
If you’re a business in lead generation, product-selling, or affiliate field, then NitroPack is an excellent pick.
However, it is not for everyone, as their plans can be costly.
That’s why, I have listed the NitroPack alternatives you can check and decide for yourself.
The best way to know if NitroPack is for you or not is to sign up for their free plan and give it a test ride.


