
Did you know that images can be your secret weapon when it comes to SEO?
You might think that they only enhance your site's look, but they can actually boost your search engine rankings with the right optimization.
In this blog post, I want to share with you the top 10 image optimization hacks that every SEO enthusiast should know.
I'll discuss alt tags, file formats, compression techniques, and more.
I'll show you how you can use them to improve your website's performance, enhance your search engine rankings, and drive more traffic to your site.
⚠️ Important note: Avoid using images found on Google to prevent copyright issues on your website. Instead, opt for free stock photo sites like Pixabay, Unsplash, and Gratisography. You may also hire a graphic designer, purchase stock photos from sites such as DepositPhotos or Shutterstock, or use AI image generation tools like Midjourney or DALL-E by OpenAI.
In this post, I’ll present you with some of powerful tips to optimize your images for SEO.
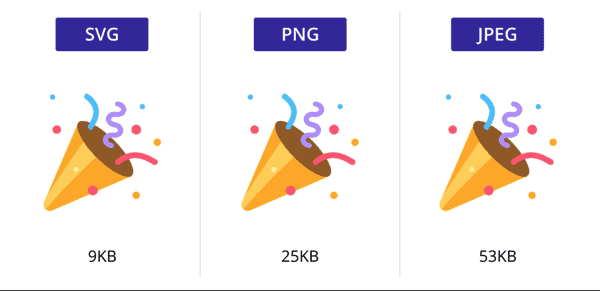
Choosing the right image format
When it comes to image formats, choosing the right one is key. You don't want to waste time resizing and compressing images only to find out they're still too big because you used the wrong format.
There are three main image formats you'll encounter on the web: JPG, PNG, and GIF.
JPEG
JPEG or JPG is an image format that is ideal for portraits, nature photos, or images with diverse colors. The format compresses the image while retaining most of its quality. However, it is not recommended to use JPEG for screenshots or vector images.

Screenshots and vector images have sharp edges and contain a lot of text, which can result in the image appearing pixelated after compression.
In such cases, it is better to use PNG or GIF format, which are lossless image formats and can retain the quality of the image even after compression.
PNG
PNG works well for screenshots and vector images. It's a lossless format that provides high-quality images with a limited color palette.
The format is widely used in the design and web development industry because of its ability to retain image quality while reducing file size.
If an image has less than 256 colors, the recommended format is PNG-8. This format is ideal for images with a limited color palette (like screenshots and say icons) because it provides reduced file size without compromising the quality of the image.
On the other hand, for images with more colors, PNG-24 is an excellent alternative to JPG. However, it has a relatively larger file size.
Nonetheless, it has the advantage of preserving the quality of the image with no loss in detail.
GIF
GIF is the way to go if you need animated images, but be warned: GIFs take up a lot of space because they contain multiple images to create the animation.
When writing a tutorial for a blog post, it can be tempting to include multiple screenshots stacked one after the other.
However, at those times it is more effective to use GIFs
Also instead of using GIFs repeatedly throughout your blog post, consider using PNG screenshots with clear annotations and arrows.
I recommend using GIFs sparingly as they are of huge size. For instance, in a typical blog post ranging from 1500 to 2000 words, I usually include around 2-3 GIFs.
SVGs (can do magic)
SVGs or Scalable Vector Graphics are image files that are made up of lines, shapes, and curves instead of pixels. This means that they can be scaled up or down without losing quality, making them perfect for responsive web design and different screen sizes.
They are more efficient compared to other image formats like JPEG or PNG and can be a great option for simple graphics, icons, and illustrations.
To start using SVGs on your WordPress website, you should ensure that your theme and security settings allow for the uploading and display of SVG files.
While WordPress has security restrictions in place to protect against potential vulnerabilities (like say script injection), you can often enable SVG support by using plugins or adjusting the theme's code.
For example, with Elementor the first time you’re uploading SVG files, it presenting you a warning.

When choosing to use SVGs, it is important to remember that not all images are suitable for this file format.
SVGs are primarily designed for simple graphics, icons, and illustrations.
To optimize your SVGs further, you can utilize various techniques such as reducing unnecessary code, removing hidden elements, or compressing the files using online tools.
Highly detailed or complex images may not translate well into SVG format and could result in larger file sizes or a loss in quality. PNGs and JPEGs are still there for a reason!`
Remember, choosing the right image format is just the first step. There's more to image optimization than that, but it's a good place to start.
Bottomline?
- JPG for color-rich natural photos (like say portraits)
- PNG for screenshots and vector images with preferably less than 256 colors in them
👉 Struggling to choose between PNG and JPEG? Use WebP. This clever little format, created by the folks at Google, gives you the best of both worlds. It keeps your images looking sharp and vibrant, just like a JPEG, while also keeping file sizes small, like a PNG. The result? Your website loads faster!
Reducing the image size
Resize the images properly before uploading
Resizing is one of the important things you should do to reduce the overall size of the image you are uploading.
Most of the screenshots that you take are more than 1000px wide. If you are on a retina display, this will even be more. This unnecessarily increases the size of the image.
Typically on my blog, the largest images I use are 1000 px wide. Before uploading any image to my blog, I resize it to 1000 px wide.

On my Mac, I make use of Preview app’s inbuilt resize tool.

On Windows, I used to use the RIOT (Radical Image Optimization Tool) that handled both resizing and compression.
👉 We currently use ShortPixel to automatically resize and compress images right on WordPress (you know server-side). The plugin also includes Adaptive Images, which serves images in the appropriate size based on the user's device when viewing the website. For more information, please read below.
Compress the images
To reduce page load time, it is important to properly compress images. This involves reducing the number of colors and details that may not be visible to the human eye.
For this, there are several softwares. The best of them are RIOT for Windows and ImageOptim for Mac. If you are searching for the best JPG/JPEG compressor for both of the platform, then give JPEGMini a try.
Instead of all the above fuss, I would recommend you install WordPress plugins like ShortPixel, EWWW image optimizer, and WP Smush It.
These plugins strip off additional information and compress your images losslessly on the WordPress end.
Among these, ShortPixel seems to be having a great free plan and also the best compression when compared to other plugins.
As shown in the screenshot, it also includes the ability to automatically resize any large images as well.
As of now, I’m using it. I have their premium plan. They have their awesome plugin for WordPress that automatically resize and compress the images after uploading.
Optimizing GIF files
If you are reviewing any softwares or you are simply using cute cat GIFs for fun, you may need to be extra cautious about using GIFs on your site.

Those cats can take up a lot of space and slow the page down if you are not extra cautious.
Here are some of the things you can do with GIF files:
- Reduce the frame rate
- Reduce the colors
- Resize the GIF image to as small as possible
- Enable transparency
You can do all of these things in Photoshop.
But there are dedicated apps to do it.


- Gifski – For Mac
- PicsArt Photo Studio – For Windows
- Picture Perfect – For Windows
If you prefer keeping things simple, you can make use of GIF Brewery.
Best practices for SEO
Lazy load images
Lazy load is a method that delays the loading of elements such as images, videos, or other types of multimedia content until the user scrolls down to that part of the page. This way, they don’t bog down the pagespeed of the overall webpage.
In WordPress, lazy load is enabled by default, which means that you don't have to install any additional plugins to take advantage of this technique.
However, if you want to customize how lazy load works or if you're using a theme that doesn't support it, you can use plugins such as Lazy Load by WP Rocket or a3 Lazy Load. These plugins will allow you to fine-tune the settings and improve the loading speed of your website even more.
Use Progressive JPEGs
When it comes to image optimization, using Progressive JPEGs is a smart choice.
Unlike Baseline JPEGs, which load gradually layer by layer, Progressive JPEGs allow users to get a glimpse of the image's content without having to wait for the entire image to load.
As each layer loads, the image quality improves, resulting in a better overall user experience.
For WordPress users, there are several solutions available to implement Progressive JPEGs. WordPress offers plugins such as ShortPixel, Smush and Imagify, which can automatically optimize images and convert them to Progressive JPEGs.
For example, ShortPixel has a feature that automatically creates either progressive (interlaced) or normal images, depending on which option reduces the file size more effectively.
Use CDN
A content delivery network (CDN) plays a vital role in optimizing the images on your website and improving page speed. CDNs, like BunnyCDN, are known for being cost-effective (pay-as you-go) and offer great value for money.
So, what exactly does a CDN do here?

In simple terms, it distributes your website's images across multiple servers around the world. When a user visits your site, the CDN automatically delivers the image from the server closest to them. This reduces load times and ensures a smooth user experience, regardless of their location.
These CDNs work like an express delivery service for your images.
By storing copies of your images in multiple locations, they eliminate the need for users' devices to fetch images from your original server, improving load times significantly. This is especially important for larger or high-quality images that may take longer to load and to make things worse, you’re on a shared hosting server.
Ensure images are mobile-friendly
The size and resolution of the image should be optimized for mobile devices, as larger images can slow down page load times and negatively impact the user experience.
Additionally, it's important to ensure that images are responsive and adjust to different screen sizes and even orientations.
You don’t need to load super high-quality retina-screenshots on 5-inch mobile screens right?
This can be achieved through the use of CSS media queries and flexible layout techniques.

What are they? Queries?
Clueless?
If you're not a coder, there are still ways to optimize your images for SEO. For example, you can use WordPress plugins like ImageSEO to help you with image optimization for mobile.
On the other hand, if you're already using Shortpixel to automatically resize and compress images, you might be interested in their plugin called "Adaptive Images".

This plugin can serve images in the appropriate size based on the user's device when viewing the website.
Use relevant images
Using relevant images is the best image SEO tip anyone can give you right now. I’ll tell you why.
Do you know that when you upload an image of a certain flower, Google can determine what flower it is?
Google has the capability of recognizing the images that it comes across. It is made possible with the help of machine learning and artificial intelligence.
Google can now expect images to be included in your content, so it's important to choose them carefully.
Use meaningful image names
Have you ever noticed that auto-generated image titles are often not very informative?
They usually look something like DSC002, SCR001, or IMG123… 😖
It's always a good idea to rename these images before uploading them to your blog posts. Try to give them more meaningful names with 2-5 words.
For instance, if you want to upload a picture of a lotus flower, consider naming it "lotus-flower.jpg". Doing so can help you generate organic traffic from Google Images.
Use proper ALT tags

If the image is a screenshot, then mention the word ‘Screenshot’ in the ALT text.

For this image, you may use the alt text – “Alaskan trees covered with snow during sunset”.
ALT tags are intended to describe an image in words. They help search engines to identify the image. If the image is not available for some reason, the alternate text is displayed instead.
Tips for ALT tags:
- Keep it concise.
- Keep it self-explanatory.
- Include a keyword in it (once).
One of the first plugins you should install for optimizing images for SEO is the WordPress plugin "Auto Image Attributes." This plugin can automatically add alt text for your images based on their file names, saving you time and effort.
Add captions
If you have captions set to the images, it helps a lot both the users and the search engines to deeply understand what the image is all about.

The readers tend to read the captions, and it, in turn, increases their on-page visit duration.
I tend to avoid including captions for each and every image.
In the captions section, I tend to include the credits to the image owner or a description whenever I feel the visitors will find it useful.
Add open-graph images
If you are making use of any SEO plugins like Yoast SEO, you have a social media option. There you can set a separate image for both Facebook and Twitter.

The images you set here will be displayed as a featured image for your site whenever you share your blog post link on social networks.
The image URL you include here will be added to the Open Graph Markup that controls how your content will be displayed on Facebook.
If you don't have any plugins, you can insert this HTML code anywhere in your content.
<meta property="og:image" content="IMAGE-URL"/>If the image you specified does not immediately appear when you share your blog posts on Facebook, use the Facebook Sharing Debugger Tool with dummy parameters (such as ?i=5) in front of your URL to force Facebook to pull the new information.


